
Left-Hand Side Icons
The icons displayed on the left-hand side, are explained below.
Click on an icon in the graphic above to go to the relevant topic.
Show or Hide the Search Template Selection List Panel
Click this icon to display or hide the list of available search templates.

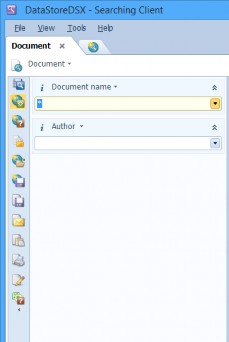
Show or Hide the Searching Panel
Click this icon to display or hide the view of the search fields’ panel.

This option is only available when a search template has been opened.
Show or Hide the Search Output Configuration Panel
Click this icon to display or hide the search output configuration panel.

This option is only available when a search template has been opened.
This panel is used to configure what information is displayed when the search results are displayed.
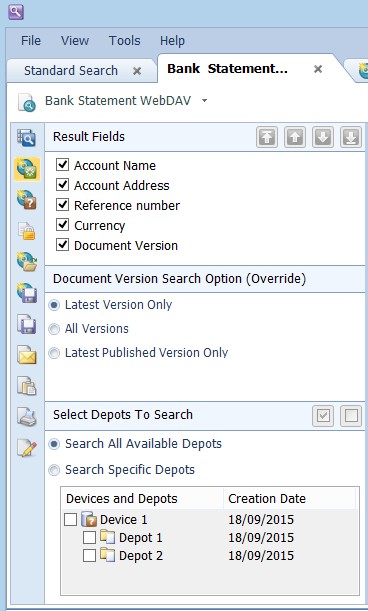
Result Fields
Click this button to display the panel which enables you to change the order of the Result Field headings, override the Document Version search options and select which Depots will be searched.
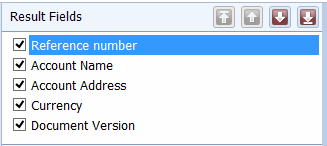
To change the order of the Column Headings displayed in the Results View, select a Result Field in the results field panel and use the up and down arrows on the right-hand side to re-position the Field Headings.
The field displayed at the top of the list will be displayed as the left-hand column and the field displayed at the bottom of the list will be displayed as the right-hand column.
To remove Columns and their Headings from the Results View table, clear the required Result Fields' tick-boxes in the results field panel.
In the following example, the Reference Number result field has been moved to the top of the list.
Click the Show or Hide the Searching Panel icon to return to the Searching Panel display. If required, click Start Search to begin (or repeat) a search with the changed settings.
In this example, when the search is performed, the results will be displayed as follows:

Notice that the Reference Number field is now displayed in the new position that has been set.
Document Version Search Option (Override)
For this view to be displayed, the selected Search Template must have a Document Version search field and its Document Version Search Options must also have been set when the Search Template was Created or later Edited.
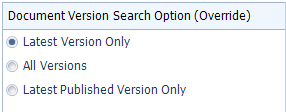
The Search Template is configured to search for all versions of a document, the latest version only or the latest Published version of a document. However, this setting can be overridden by selecting an option below.
The selection made here is remembered until the Search Template is closed. When the Search Template is next loaded, the original setting is used again.
Select one of the options to override the default setting for which versions of the documents are returned in the search.
Latest Version Only – only the latest version of a document which matches the search criteria is returned in the search.
All Versions – all versions of a document which matches the search criteria are returned in the search.
Latest Published Version Only – only the latest version of a document which matches the search criteria is returned in the search.
Click the Show or Hide the Searching Panel icon to return to the Searching Panel display. As required, click Start Search to begin (or repeat) a search with the changed settings.
Select Depots to Search
For this view to be displayed, the Searching Client user must have been given View Storage permission in Management Studio (See “Permissions” for more information) and the selected Search Template must have had the Depot Search Selection option selected (see “Depot Search Selection”) when the Search Template was Created or later Edited.
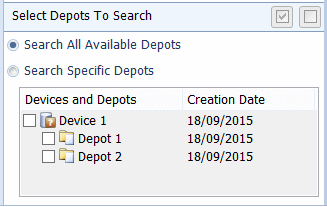
By default, the Search All Available Depots option is selected.
If required, select the Search Specific Depots option and manually select one or more of the available depots. This can help reduce the search time.
Click the Show or Hide the Searching Panel icon to return to the Searching Panel display. If required, click Start Search to begin (or repeat) a search with the changed settings.
Show or Hide the Locked Documents Panel
Select this icon to display or hide the Locked Documents panel.

When a document has been checked out, it is locked.
This prevents multiple users from editing a document at the same time.
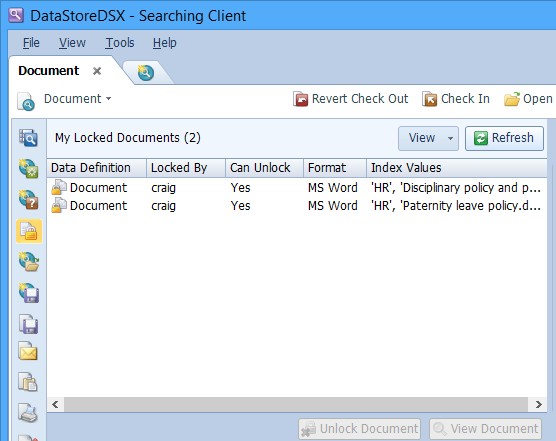
The Locked Documents panel enables users to view a list of documents that they have locked or that someone else has locked.
By default, only the documents which have been locked by the current user are displayed.
Select a document in the list and right-click to display the Options menu.

Unlock Document
The selected document can be Unlocked. Select Unlock Document to check in the document and discard any changes. This makes the document available for other users.
You will always be able to unlock your own locked documents. If you do not have the required access control to Undo other users’ document check-outs, the Unlock Document menu option will not be available.
View Document
The selected document can be Viewed. Select View Document to display the document in a new search tab.
If you do not have the required access control to View documents and pages, Restricted is displayed instead of the document.
Locked Documents Panel
The information displayed in the Locked Documents panel is described in Table 182.
Table 182. Terminology: Searching Client Locked Documents Panel
|
Term |
Meaning |
||
|---|---|---|---|
|
My Locked Documents/ All Locked Documents |
Indicates whether just the documents locked by the current user are listed, or whether all the documents locked by any user are listed. The number of documents listed is shown in brackets. |
||
|
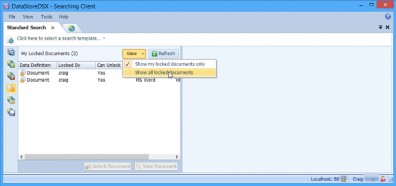
View |
Select the View menu to change which locked documents should be listed. Select one of the options from the menu:
Show my locked documents only – list only the documents which the current user has locked. Show all locked documents – list all the documents which have been locked by any user. |
||
|
Refresh |
Click to refresh the list of locked documents. |
||
|
Data Definition |
The name of the Data Definition used to store the document. |
||
|
Locked By |
The name of the DataStoreDSX user who has locked the document (by checking it out). |
||
|
Can Unlock |
Yes – you have the required access control permission which allows you to unlock this document. No – you do not have the required access control permission to allow you to unlock this document. |
||
|
Format |
The document format. For example, MS Word. |
||
|
Index Values |
The Index Values for this document. |
||
|
Unlock Document |
Click the Unlock Document button to discard any changes made to the document. The document is checked in, making it available for other users to edit.
|
||
|
View Document |
Click the View Document button to view the selected document in a new tab. |
Load Previously Saved Search Criteria
When search criteria have been saved to a file, the file can be loaded so the search can be re- executed.

This icon enables the user to load a previously saved search criteria file and re-execute the selected search.
Click the Load search criteria button and then click the Browse button and navigate to the location of the saved search file. Saved search files have the .datastore extension. Select the file and click Open. The current search tab is loaded with the saved Search Template and the criteria which were saved. Click Start Search to re-execute the search.
If the Search Template used in the saved criteria has been changed since the search criteria file was saved, the following warning is displayed.
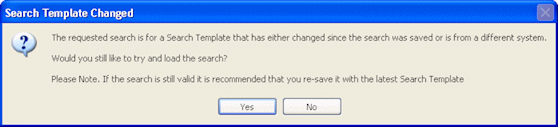
If you decide to load it anyway, the latest version of the Search Template is selected in Searching Client and any saved field values that match existing fields are populated. Please note that, when this happens, the result might not be consistent with the search you saved.
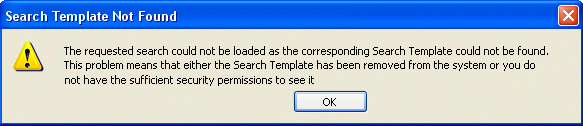
The load will fail, however, if the Search Template for the saved search is not on the system (that is, it has been deleted) or you do not have permission to view it.
Save Currently Configured Search Criteria
This icon enables the user to save the currently set up search criteria to a file.

This option is only available when search criteria have been set up.
Click the Save search criteria button and then click the Browse button and navigate to the directory in which you want to save the file containing the current search file. Saved search files have the .datastore extension. Enter a file name and click Save. The current search is saved. A saved search can be loaded and re-executed – see “Load Previously Saved Search Criteria”.
Export Search Results
Click this icon to open the Export Search Results window.

The search results can be exported to various formats.
This option is only available to users who have Export data from DataStore applications permission set to Allow. See “Permissions”.
This button enables the user to export part (or all) of the documents containing the current search results.
For example, consider a document which contains the bank statements of several customers. In the following example, a document contains nine pages:
Customer 1 page 1 of bank statement
Customer 1 page 2 of bank statement
Customer 1 page 3 of bank statement
Customer 1 page 4 of bank statement
Customer 2 page 1 of bank statement
Customer 2 page 2 of bank statement
Customer 3 page 1 of bank statement
Customer 3 page 2 of bank statement
Customer 3 page 3 of bank statement
Although a search may be used to search for a particular customer’s bank statements (Customer 2), if the user exports all the pages of all the search results, they will export all the bank statements contained in the files which included the selected customer (all nine pages in the example above).
To export Customer 2’s statements only, search for Customer 2, then select All Results and Current Page.
When the Export Search Results button is clicked, the Export Search Results window is displayed.
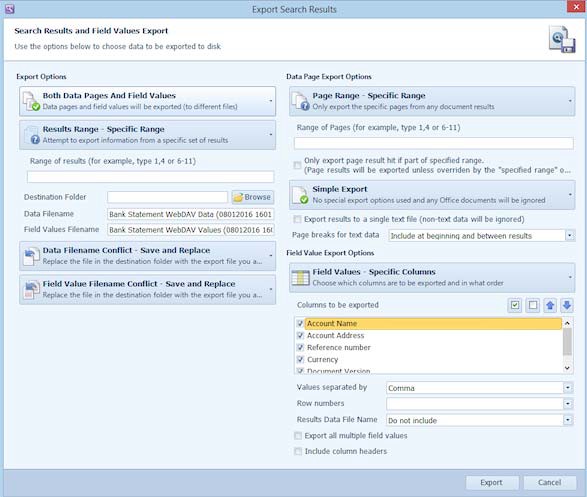
The Export Search Results Export Options window is described in Table 183.
Table 183. Terminology: Export Search Results - Export Options
|
Term |
Meaning |
|---|---|
|
Export Options |
|
|
Export Data Pages Only |
Exports only the search results data. |
|
Export Both Data Pages and Field Values |
Exports search results data and field values. |
|
Export Field Values Only |
Exports only the search results field values. |
|
Export Currently Selected Result |
Exports only the currently selected search result. |
|
Export All Results |
Exports all the search results found. |
|
Export Specific Range of Results |
Exports the search results defined here. Enter the result number(s) to be exported and/or the range of search results to be exported, separated by a comma. For example, to export search results 1-20, excluding search results number 8 and number 10, enter: 1-7, 9, 11-20 |
|
Destination Folder (Browse) |
Navigate to the location where you would like to save the selected results (the Destination Folder). |
|
Data Filename |
Only available when ‘Export Data Pages Only’ or when ‘Export Both Data Pages and Field Values’ is selected. In this text box, if required, enter a new file name for the exported data file. Multiple files will have _1, _2, etc., appended to the file name: filename_1, filename_2, etc. |
|
Field Values Filename |
Only available when ‘Export Field Values Only’ or when ‘Export Both Data Pages and Field Values’ is selected. In this text box, if required, enter a new file name for the exported field values file. Multiple files will have _1, _2, etc., appended to the file name: filename_1, filename_2, etc. |
|
Data Filename Conflict - Save and Replace |
Only available when ‘Export Data Pages Only’ or when ‘Export Both Data Pages and Field Values’ is selected. The exporter will overwrite the existing data file. |
|
Data Filename Conflict - Save but Keep Both Files |
Only available when ‘Export Data Pages Only’ or when ‘Export Both Data Pages and Field Values’ is selected. The exporter will re-name and save the exported data file and retain the existing file. |
|
Data Filename Conflict - Don’t Save |
Only available when ‘Export Data Pages Only’ or when ‘Export Both Data Pages and Field Values’ is selected. The exporter will not export or save the data file. |
|
Field Value Filename Conflict - Save and Replace |
Only available when ‘Export Field Values Only’ or when ‘Export Both Data Pages and Field Values’ is selected. The exporter will overwrite the existing field values file. |
|
Field Value Filename Conflict - Save but Keep Both Files |
Only available when ‘Export Field Values Only’ or when ‘Export Both Data Pages and Field Values’ is selected. The exporter will re-name and save the exported field values file and retain the existing file. |
|
Field Value Filename Conflict - Don’t Save |
Only available when ‘Export Field Values Only’ or when ‘Export Both Data Pages and Field Values’ is selected. The exporter will not export or save the field values file. |
|
Field Value Filename Conflict - Append |
Only available when ‘Export Field Values Only’ or when ‘Export Both Data Pages and Field Values’ is selected. The exporter will save the exported field values file with its original filename (if it exists) and add (append) the changed field values to the file. |
The Export Search Results Data Page Export Options window is described in Table 184.
Table 184. Terminology: Export Search Results - Data Page Export Options
|
Term |
Meaning |
||
|---|---|---|---|
|
Data Page Export Options |
|||
|
Document Results - All Pages |
Exports all search results data pages. |
||
|
Document Results - Currently Selected Page |
Exports only the currently displayed search results data page. |
||
|
Document Results - Specific Range of Pages |
Exports the search results data pages defined here. Enter the result page number(s) to be exported and/or the range of search result pages to be exported, separated by a comma. For example, to export search result pages 1-20, excluding search result pages number 8 and number 10, enter: 1-7, 9, 11-20 |
||
|
Only export page result hit if part of specified range |
Only available when Currently Selected Page or Specific Range of pages is selected. When selected: When a page range is specified, the search result is exported only when it is part of the specified page range. If the search result is on a page which is not within the specified page range, the page range for that search result is not exported. When cleared: For Page-level search results the specified range of pages is exported regardless of whether the search result falls within that page range. For Document-level search results the specified range of pages is exported. |
||
|
Simple Export |
Documents retrieved by the search are exported as separate files. When this option is selected, MS Office documents are not included in the exported results. |
||
|
Include Office Documents |
All documents retrieved by the search are exported as separate files. When this option is selected, MS Office documents are included in the exported results and they will be exported in their original format, in their entirety. (i.e. previously entered page ranges will be ignored for MS Office documents.) |
||
|
Export to PDF |
All documents retrieved by the search are exported as PDF files. The Results Data is exported to individual PDF files using the file name provided, with _1, _2, _3, etc., appended. For example filename_1.pdf, filename_2.pdf, filename_3.pdf, etc.) |
||
|
Export Results to a single text file (non text data will be ignored) |
Only available when Simple Export or Include Office Documents is selected. All documents retrieved by the search are exported as a single text file and all non-text data is ignored.
|
||
|
Page breaks for text data |
Only available when Simple Export or Include Office Documents is selected.
|
||
|
Include attachments in output PDF file |
Only available when Export to PDF is selected. When selected, the attachments are included in the PDF documents. When cleared, attachments are omitted from the PDF documents. |
||
|
Export output data to a single PDF file |
Only available when Export to PDF is selected. When selected, all the Results Data are exported to a single PDF file using the file name provided. |
||
|
Include overlays |
Only available when Export to PDF is selected. When selected, all overlays are exported with the results PDF file. When cleared, overlays are not exported with the results PDF file. |
||
|
Include style sheets |
Only available when Export to PDF is selected. When selected, all style sheets are exported with the results PDF file. When cleared, style sheets are not exported with the results PDF file. |
||
|
Include watermarks |
Only available when Export to PDF is selected. When selected, all watermarks are exported with the results PDF file. When cleared, watermarks are not exported with the results PDF file. |
||
The Export Search Results Field Value Export Options are described in Table 185.
Table 185. Terminology: Export Search Results - Field Value Export Options
|
Term |
Meaning |
|---|---|
|
Field Value Export Options |
|
|
Field Values - All Columns |
Exports the field values in their set order for all columns from the selected results. |
|
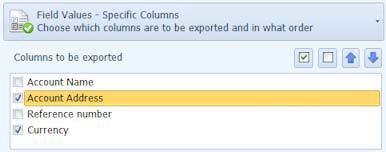
Field Values - Specific Columns |
Exports the field values for columns you have selected and in the order you want, from the selected results. By default, all columns are selected. Select the columns you want to export and use the Up and Down buttons to move the search fields to the order (position) you require.
(The field displayed at the top of the list will be displayed as the first column on the left-hand side and the field displayed at the bottom of the list will be displayed as the last column on the right-hand side.) |
|
Values Separated By |
Select the Delimiter Option from the drop-down list. Comma The delimiter is the character used to separate entries (field data values) in the exported file. |
|
Row numbers |
Select a Row Number Option from the drop-down list. Do not include – Row numbers are not used. Include at result level – Each new result has a new row number. Include at Index set level – Rows which are in the same Index set have the same row number. Include at field value level – Each new field value has a new row number. (This option can be used with Export all multiple field values, see below.) |
|
Results Data File Name |
Select a Data File Name Option from the drop-down list. Do not include – Results Data Filename is not included in the output. Include data file name in the output - Results Data Filename is included in the output. Include data file path in the output - Results Data File Path is included in the output. |
|
Export all multiple field values |
When selected, when a field has more than one value, all the values are exported. When cleared, when a field has more than one value, the first value only is exported. For example, if the field Address contains three values (each one a line of the address), you will probably want all of the address exported and will therefore want this option to be selected. |
|
Include column headers |
Includes the field names as the column headers in the exported file. This option can help to make the exported data easier to understand. |
Email Search Results
Click the Email Search Results icon to export the search results data as an email attachment.

The Email Search Results Export Options window is described in Table 186.
Table 186. Terminology: Email Search Results - Export Options
|
Term |
Meaning |
|---|---|
|
Email Export Options |
|
|
Export Data Pages Only |
Exports only the search results data. |
|
Export Both Data Pages and Field Values |
Exports search results data and field values. |
|
Export Field Values Only |
Exports only the search results field values. |
|
Export Currently Selected Result |
Exports only the currently selected search result. |
|
Export All Results |
Exports all the search results found. |
|
Export Specific Range of Results |
Exports the search results defined here. Enter the result number(s) to be exported and/or the range of search results to be exported, separated by a comma. For example, to export search results 1-20, excluding search results number 8 and number 10, enter: 1-7, 9, 11-20 |
|
Data Filename |
Only available when ‘Export Data Pages Only’ or when ‘Export Both Data Pages and Field Values’ is selected. In this text box, if required, enter a new file name for the exported data file. Multiple files will have _1, _2, etc., appended to the file name: filename_1, filename_2, etc. |
|
Field Values Filename |
Only available when ‘Export Field Values Only’ or when ‘Export Both Data Pages and Field Values’ is selected. In this text box, if required, enter a new file name for the exported field values file. Multiple files will have _1, _2, etc., appended to the file name: filename_1, filename_2, etc. |
The Email Search Results Data Page Export Options are described in Table 187.
Table 187. Terminology: Email Search Results - Data Page Export Options
|
Term |
Meaning |
||
|---|---|---|---|
|
Email Data Page Export Options |
|||
|
Document Results - All Pages |
Exports all search results data pages. |
||
|
Document Results - Currently Selected Page |
Exports only the currently displayed search results data page. |
||
|
Document Results - Specific Range of Pages |
Exports the search results data pages defined here. Enter the result page number(s) to be exported and/or the range of search result pages to be exported, separated by a comma. For example, to export search result pages 1-20, excluding search result pages number 8 and number 10, enter: 1-7, 9, 11-20 |
||
|
Only export page result hit if part of specified range |
Only available when Currently Selected Page or Specific Range of pages is selected. When selected: When a page range is specified, the search result is exported only when it is part of the specified page range. If the search result is on a page which is not within the specified page range, the page range for that search result is not exported. When cleared: For Page-level search results the specified range of pages is exported regardless of whether the search result falls within that page range. For Document-level search results the specified range of pages is exported. |
||
|
Simple Export |
Documents retrieved by the search are exported as separate files. When this option is selected, MS Office documents are not included in the exported results. |
||
|
Include Office Documents |
All documents retrieved by the search are exported as separate files. When this option is selected, MS Office documents are included in the exported results and they will be exported in their original format, in their entirety. (i.e. previously entered page ranges will be ignored for MS Office documents.) |
||
|
Export to PDF |
All documents retrieved by the search are exported as PDF files. The Results Data is exported to individual PDF files using the file name provided, with _1, _2, _3, etc., appended. For example filename_1.pdf, filename_2.pdf, filename_3.pdf, etc.) |
||
|
Export Results to a single text file (non text data will be ignored). |
Only available when Simple Export or Include Office Documents is selected. All documents retrieved by the search are exported as a single text file and all non-text data is ignored.
|
||
|
Page breaks for text data |
Only available when Simple Export or Include Office Documents is selected.
|
||
|
Include attachments in output PDF file |
Only available when Export to PDF is selected. When selected, the attachments are included in the PDF documents. When cleared, attachments are omitted from the PDF documents. |
||
|
Export output data to a single PDF file |
Only available when Export to PDF is selected. When selected, all the Results Data is exported to a single PDF file using the file name provided. |
||
|
Include overlays |
Only available when Export to PDF is selected. When selected, all overlays are exported with the results PDF file. When cleared, overlays are not exported with the results PDF file. |
||
|
Include style sheets |
Only available when Export to PDF is selected. When selected, all style sheets are exported with the results PDF file. When cleared, style sheets are not exported with the results PDF file. |
||
|
Include watermarks |
Only available when Export to PDF is selected. When selected, all watermarks are exported with the results PDF file. When cleared, watermarks are not exported with the results PDF file. |
||
The Email Search Results Field Value Export Options are described in Table 188.
Table 188. Terminology: Email Search Results - Field Value Export Options
|
Term |
Meaning |
|---|---|
|
Email Field Value Export Options |
|
|
Field Values - All Columns |
Exports the field values in their set order for all columns from the selected results. |
|
Field Values - Specific Columns |
Exports the field values for columns you have selected and in the order you want, from the selected results. By default, all columns are selected. Select the columns you want to export and use the Up and Down buttons to move the search fields to the order (position) you require.
(The field displayed at the top of the list will be displayed as the first column on the left-hand side and the field displayed at the bottom of the list will be displayed as the last column on the right-hand side.) |
|
Values Separated By |
Select the Delimiter Option from the drop-down list. Comma The delimiter is the character used to separate entries (field data values) in the exported file. |
|
Row numbers |
Select a Row Number Option from the drop-down list. Do not include – Row numbers are not used. Include at result level – Each new result has a new row number. Include at Index set level – Rows which are in the same Index set have the same row number. Include at field value level – Each new field value has a new row number. (This option can be used with Export all multiple field values, see below.) |
|
Results Data File Name |
Select a Data File Name Option from the drop-down list. Do not include – Results Data Filename is not included in the output. Include data file name in the output - Results Data Filename is included in the output. Include data file path in the output - Results Data File Path is included in the output. |
|
Export all multiple field values |
When selected, when a field has more than one value, all the values are exported. When cleared, when a field has more than one value, the first value only is exported. For example, if the field Address contains three values (each one a line of the address), you will probably want all of the address exported and will therefore want this option to be selected. |
|
Include column headers |
Includes the field names as the column headers in the exported file. This option can help to make the exported data easier to understand. |

Copy Search Results

Click the Copy Search Results icon to open the Copy Field Values To Clipboard window.
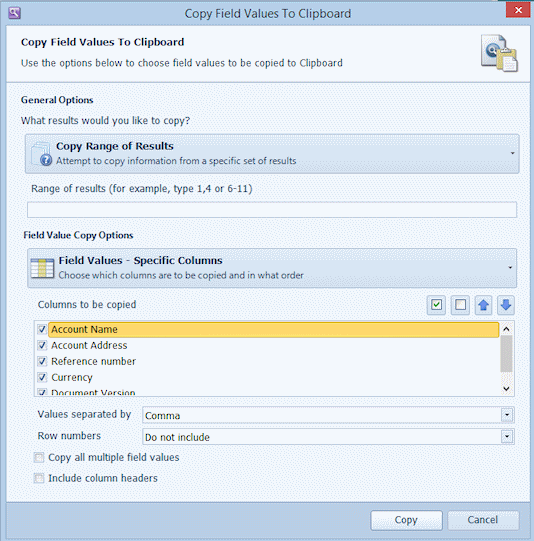
The Copy Search Results Copy Field Values To Clipboard window is described in Table 189.
Table 189. Terminology: Copy Search Results - General Options
|
Term |
Meaning |
|---|---|
|
Copy General Options |
|
|
Copy Currently Selected Result |
Copies only the currently selected search result to the clipboard. |
|
Copy All Results |
Copies all the search results found to the clipboard. |
|
Copy Range of Results |
Copies the search results defined here. Enter the result number(s) to be copied and/or the range of search results to be copied, separated by a comma. For example, to copy search results 1-20, excluding search results number 8 and number 10, enter: 1-7, 9, 11-20 |
The Copy Search Results Field Value Copy Options are described in Table 190.
Table 190. Terminology: Copy Search Results - Field Value Copy Options
|
Term |
Meaning |
|---|---|
|
Field Value Copy Options |
|
|
Field Values - All Columns |
Copies the field values in their set order for all columns from the selected results. |
|
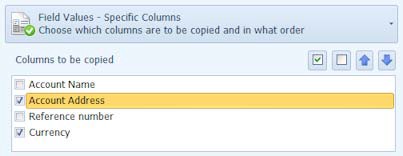
Field Values - Specific Columns |
Copies the field values for columns you have selected and in the order you want, from the selected results. By default, all columns are selected. Select the columns you want to export and use the Up and Down buttons to move the search fields to the order (position) you require.
(The field displayed at the top of the list will be displayed as the first column on the left-hand side and the field displayed at the bottom of the list will be displayed as the last column on the right-hand side.) |
|
Values Separated By |
Select a Delimiter Option from the drop-down list. Comma The delimiter is the character used to separate entries (field data values) in the copied file. |
|
Row numbers |
Select a Row Number Option from the drop-down list. Do not include – Row numbers are not used. Include at result – Each new result has a new row number. Include at Index set – Rows which are in the same Index set have the same row number. Include at field values – Each new field value has a new row number. (This option can be used with Copy all multiple field values, see below.) |
|
Copy all multiple field values |
When selected, when a field has more than one value, all the values are copied. When cleared, when a field has more than one value, the first value only is copied. For example, if the field Address contains three values (each one a line of the address), you will probably want all of the address exported and will therefore want this option to be selected. |
|
Include column headers |
Includes the field names as the column headers in the copied file. This option can help to make the copied data easier to understand. |
Print Search Results
Click the Print Search Results icon to open the Print Search Results window.

The Print Search Results window enables you to select which search results should be printed.
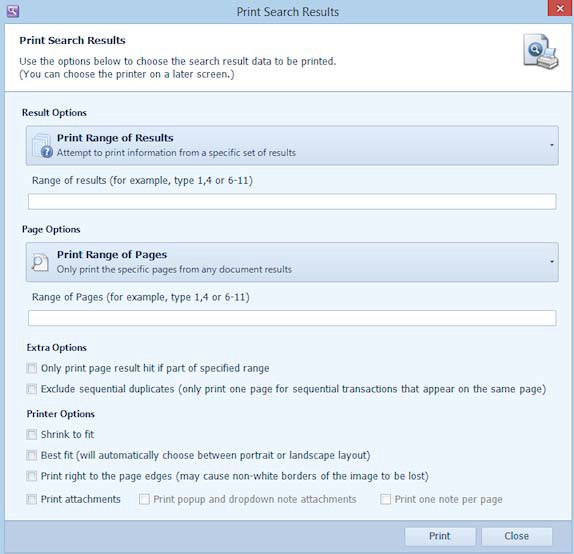
The Print Search Results - Result Options are described in Table 191.
Table 191. Terminology: Print Search Results - Result Options
|
Term |
Meaning |
|---|---|
|
Result Options |
|
|
Print Currently Selected Result |
Prints only the currently selected search result. |
|
Print All Results |
Prints all the search results found. |
|
Print Range of Results |
Prints the search results defined here. Enter the result number(s) to be printed and/or the range of search results to be printed, separated by a comma. For example, to print search results 1-20, excluding search results number 8 and number 10, enter: 1-7, 9, 11-20 |
The Print Search Results - Page Options are described in Table 192.
Table 192. Terminology: Print Search Results - Page Options
|
Term |
Meaning |
||
|---|---|---|---|
|
Page Options |
|||
|
Print All Pages |
Prints all search results data pages. |
||
|
Print Current Page |
Prints the currently displayed search results data page. |
||
|
Print Range of Pages |
Prints the entered range of search results data pages. For example, 1-3, 6-9 prints results 1, 2, 3, 6, 7, 8 and 9.
|
||
|
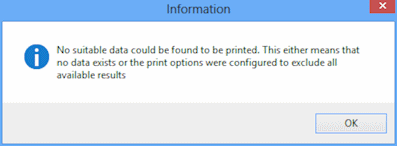
Print content match pages only |
When available, prints the search result pages containing sub- search results and/or content full text search results. See “Text Sub-Search” for information about sub-searches and “Content Full Text Search” for information about content full text searches. When this option is selected but a sub-search or full-text search has not been performed, the following window will be displayed:
|
||
The Print Search Results - Extra Options are described in Table 193.
Table 193. Terminology: Print Search Results - Extra Options
|
Term |
Meaning |
||||
|---|---|---|---|---|---|
|
Extra Options |
|||||
|
Only print page result hit if part of specified range |
This option is not available when Print content match pages only has been selected: When selected: when a page range is specified, the search result is printed only when it is part of the specified page range. If the search result is on a page which is not within the specified page range, the page range for that search result is not printed. When cleared: for Page-level search results, the specified range of pages is printed regardless of whether the search result falls within that page range. For Document-level search results, the specified range of pages is printed.
|
||||
|
Exclude sequential duplicates (only print one page for sequential transactions that appear on the same page) |
This option is not available when Print content match pages only has been selected: When selected, when transaction search results are printed and several sequential Transactions can be found on a single page, that page is printed just once.
When cleared, when transaction search results are printed and several sequential Transactions are found on a single page, that page is printed once for each Transaction search result.
|
||||
The Print Search Results - Printer Options are described in Table 194.
Table 194. Terminology: Print Search Results - Printer Options
|
Term |
Meaning |
|---|---|
|
Printer Options |
|
|
Shrink to fit |
When selected, pages that are more than 100% of the selected paper size (and margin setup) will be reduced in size to fit the selected page size and margins. When cleared, pages that are more than 100% of the selected paper size (and margin setup) will be printed. However, parts of the document may be missing. |
|
Best fit. (Will automatically choose between portrait or landscape layout) |
When selected, pages that are more (or less) than 100% of the selected paper size (and margin setup) will be reduced (or enlarged) to best fit the selected page size and margins. When cleared, pages that are the incorrect orientation for the printer setup will be printed. However, parts of the document may be missing. |
|
Print right to the page edges (May cause non- white borders of the image to be lost) |
When selected, all of the selected pages' margin settings will be ignored and the results will be printed up to the edge of the selected page size. |
|
Print attachments |
When selected, prints the page with attachments. The contents of Notes can be printed by selecting Print popup and dropdown note attachments. |
|
Print popup and dropdown note attachments |
Only available when Print attachments is selected: When selected, prints the entire contents of Notes, Drop-down Notes and or Rich Text Notes. |
|
Print one note per page |
Only available when Print popup and dropdown note attachments is selected: When selected, prints each attached Note on a separate page. For example, if you had two notes on a data page, 3 pages would be printed. The 1st page would be your Data page and the 2nd and 3rd pages would be your 1st and 2nd notes. |
If you select a Transaction search result and then select a different page from the thumbnails, if you then select Print and select Current page, the following window might be displayed.
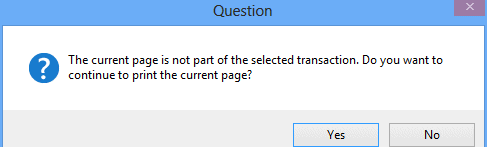
Select Yes to print the current page, even though it does not contain the selected Transaction search result. Select No to return to the Print Search Results window. If you now change the selection from Current page to All pages, you will print all the pages containing the selected Transaction, even though you do not have the correct page selected.
Modify Index Values
Click the Modify Index Values icon to open the Modify Field Values window.

If the Modify Index Values icon is not displayed, you do not have Permissions to allow you to Modify Field Values. See “Permissions” for more information.
If the Modify Index Values icon is displayed, but, when you click it you see the message: 'You do not have permissions to modify index field values. Please contact a system administrator for access.' you have not been given the correct Access Control Permissions for the Data Definition(s) associated with the current Search Template to allow you to modify the index values of the current search results. See “Control Access to this Data Definition” for more information.
This window enables you to do one of the following (depending on the type of search performed and the search result selected).
- Modify all the document-level index values of the selected search result.
- Modify all the page-level index values of the selected search result.
- Re-index the selected search result against a different Data Definition using manually entered values (not values which are automatically extracted from the document).
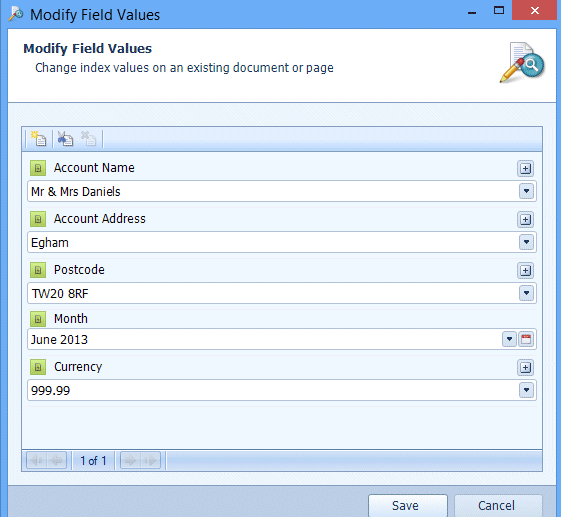
When a page-level search is performed, the following window is displayed.
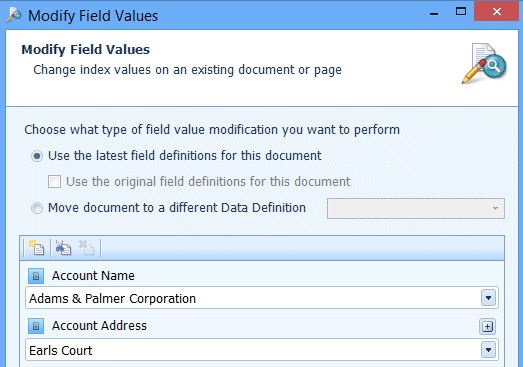
When a document-level search is performed and a search result is selected which has one or more page-level indexes, the following window is displayed.
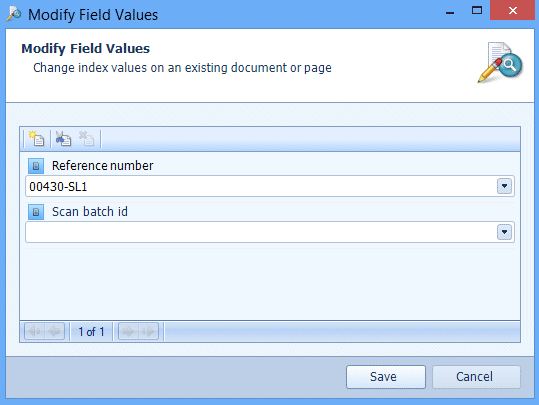
When a document-level search is performed and a search result is selected which has no page- level indexes, the following window is displayed.
The Modify Field Values window is described in Table 195.
Table 195. Terminology: Modify Field Values
|
Term |
Meaning |
||
|---|---|---|---|
|
Use the latest field definitions for this document |
Select this option to modify the index field values shown. The latest (newest) version of the Data Definition is used unless Use the original field definitions for this document is selected (see below).
|
||
|
Use the original field definitions for this document |
Select this option to use the same version of the Data Definition as was used to index the current values. Clear this option to use the latest (newest) version of the Data Definition when modifying the index fields.
This option is only displayed when a document-level search has been performed and the selected search result has no page- level indexes. |
||
|
Move document to a different data definition |
Select this option to re-index the document using the selected Data Definition. Select the Data Definition you want to use from the drop-down list. The document-level fields for the selected Data Definition are displayed. Enter the required values for each of the document-levels fields in the new Data Definition. If you select a Data Definition which has a document-level index field which automatically extracts the data from the file and this field has the option Field value can be manually overridden cleared, you will not be able to enter a value for that field. Only document-level index fields which are entered manually (not automatically extracted from a document) or have the option Field value can be manually overridden selected can be used to re-index the selected search result. The value in a document-level index field which is based on a Custom Field Type which is also used in the new Data Definition (as a Document-level field) are automatically copied in to the new Data Definition field. (This value can be edited if required.)
This option is only displayed when
|
||
|
New Index Set
|
Click the New Index Set button to create a new set of Index values. |
||
|
Clear Index Set
|
Click the Clear Index Set button to clear (delete) the values in the current Index Set. The Index Set remains, enabling you to enter new values. |
||
|
Delete Index Set
|
Click the Delete Index Set button to delete the current Index Set.
|
||
|
Field Value |
Edit the field value as required and click Save to keep the changes or Cancel to discard the changes.
|


Click Save to keep the changes or Cancel to discard the changes.
Quick Export to Excel
Only displayed if the Search Template has the Quick Export option selected. See “Quick Export”.
Click the Quick Export icon to export of all the search result field values.
If a field has multiple values, only the first value is exported unless the option Export all multiple field values is selected (see “Configure Quick Export to Excel”).
Column headers are not included unless the Include column headers option is selected (see “Configure Quick Export to Excel”).
Row numbers are not used unless a Row numbers option is set (see “Configure Quick Export to Excel”).

Configure Quick Export to Excel
Click the black triangle icon below the Quick Export icon to configure Quick Export options.
The Quick Export of Search Results window is displayed.
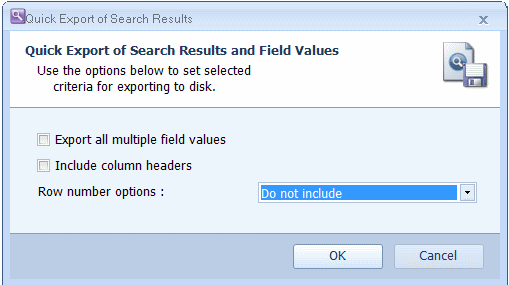
The Quick Export of Search Results window is described in Table 196.
Table 196. Terminology: Quick Export Of Search Results
|
Term |
Meaning |
|---|---|
|
Export all multiple field values |
When selected, when a field has more than one value, all the values are exported. When cleared, when a field has more than one value, the first value only is exported. For example, if the field: Address contains three values (each a line of the address), you will probably want all the address exported and will want this option selected. |
|
Include column headers |
Includes the field names as the column headers in the exported file. This option makes the exported data easier to understand. |
|
Row number options: |
Select the Row Number Option from the drop-down list. Do not include – Row numbers are not used. Include at result – Each new result has a new row number. Include at Index set – Rows which are in the same Index set have the same row number. Include at field values – Each new field value has a new row number. |