
Home Ribbon Buttons
When the Home tab is selected, the Home ribbon is displayed.

Note: Click on a button in the graphic above to go to the relevant topic.
Save
Save Scanned Documents
When you have finished scanning all the documents, click Save Scanned Documents to import the scanned documents in to Indexing Studio, ready for Indexing. The Scanning window is closed and you are returned to the Indexing Studio window.
Scan
Scan All
Click on Scan All to scan all the sheets in the feed tray of the active scanner.
Scan One
Click on Scan One to scan a single sheet in the feed tray of the active scanner.
Stop Scan
Click on Stop Scan to cancel the current scan.
Preview
When the Preview button is active, it is highlighted and when multiple documents are scanned, the last 6 documents are displayed in a preview window.
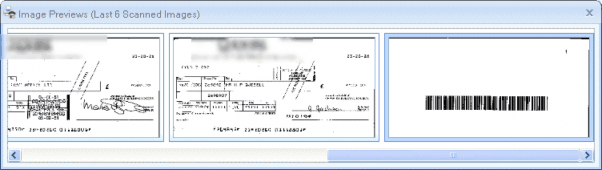
Note: When just one document is scanned, the Preview window is not displayed. When the Preview button is not active, the Preview window is not displayed.
Scanner Settings
The name of the active scanner is shown in the text box. A different scanner can be selected by clicking the scanner name to display a drop-down list of configured scanners. Select the scanner you want to use from the list.
![]()
Add Scanner Setting
 Click the Add Scanner Setting button to open the New Scanner Setting window.
Click the Add Scanner Setting button to open the Scanner Setting window.
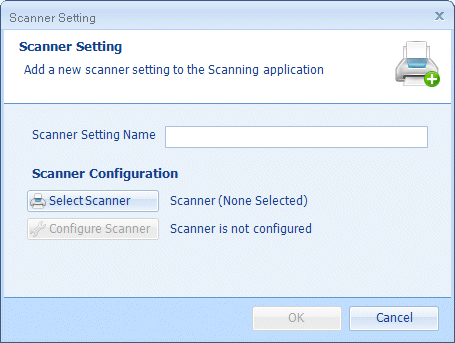
The Scanner Settings are described in Table 172.
Table 172. Terminology: Scanner Setting
|
Term |
Meaning |
||
|---|---|---|---|
|
Scanner Setting Name |
Enter a name for the scanner you are adding. Maximum 100 characters. |
||
|
Select Scanner |
Click Select Scanner to see a list of supported scanners. Select Show only connected scanners to list only those scanners which are currently connected and powered on.
|
||
|
Configure Scanner |
Click Configure Scanner to display the configuration window for the selected scanner. |
Edit Scanner Setting
 Click the Edit Scanner Setting button to open the Edit Scanner Setting window for the active scanner.
The Edit Scanner window enables you to change the settings for:
- Scanner Setting Name
- Select Scanner
- Configure Scanner
See Table 172, “Terminology: Scanner Setting” for information on these settings. Change the fields as required. Click OK to save the changes made or Cancel to leave the Edit window without saving the changes.
Delete Scanner Setting
 Click the Delete Scanner Setting button to delete the active scanner setting.
A window is displayed asking you confirm you want to delete the active scanner.
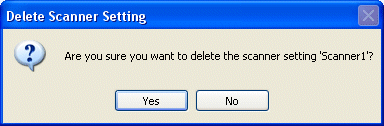
Click Yes to delete the scanner setting or No to close the window without deleting the active scanner.
Configure Scanner
 Click the Configure Scanner button to open the scanner configuration window.
Make changes to the configuration of your scanner, as required.
Import Scanner Settings
Click the Import Scanner Settings button to import a file containing previously exported scanner settings.
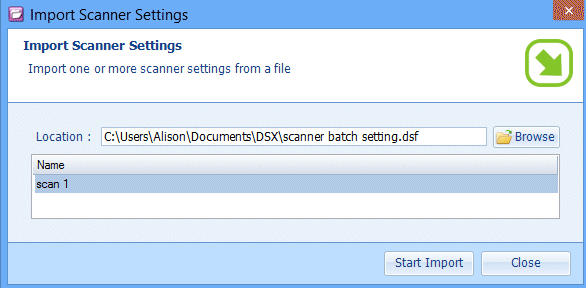
Click Browse and navigate to the folder containing the exported scanner settings. Select the file and click Open to add the scanner settings in the file to the import list. Select the Scanner settings you want to import. (Use Ctrl and the mouse pointer to select non-sequential scanner settings.) When you have selected all the scanner settings files you want to import, click the Start Import button.
Note: If a scanner setting with the same name already exists, the imported scanner setting is saved with the date and time appended to the name. This name can be changed by selecting the scanner setting and clicking the Edit Scanner Setting button. See “Edit Scanner Setting” for more information.
Export Scanner Settings
Click the Export Scanner Settings button to export one or more scanner settings to a file.
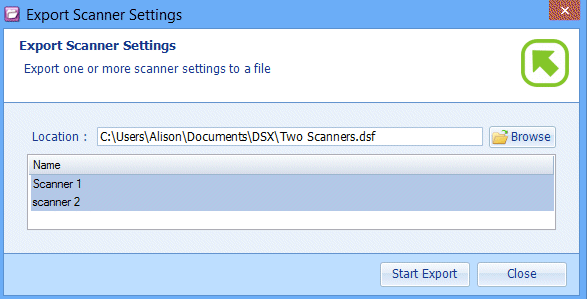
Click Browse and navigate to the folder you want to use to store the exported scanner settings. Click Save. Select the scanner settings you want to export. (Use Ctrl and the mouse pointer to select non-sequential scanner settings.) When you have selected the Scanner Setting(s) you want to export, click the Start Export button. Alternatively, click Close to close the Export Scanner Settings window without exporting the scanner settings.
A message is displayed indicating the scanner settings were successfully exported. Click OK to close the message.
Batch Settings
Batch Settings are used to collate documents based on job separator values or a barcode value.
The name of the active batch setting is displayed in the text box. A different batch setting can be selected by clicking the batch setting name to display a drop-down list of configured batch settings. Select the batch setting you want to use from the drop-down list or None if you do not want to use batch settings.
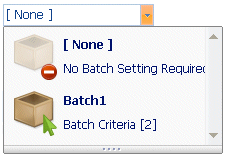
Add Batch Setting
 Click the Add Batch Setting button to open the Batch Setting window.
The Batch Setting window is displayed. Enter a name for the new Batch Setting.
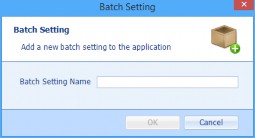
Click OK to save the Batch Setting name and configure the Batch settings or Cancel to exit without creating a new Batch setting. If you enter a name which is already in use, you see the following warning.
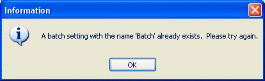
Enter a different name for the new Batch Setting and click OK. The Batch Setting Window is opened.
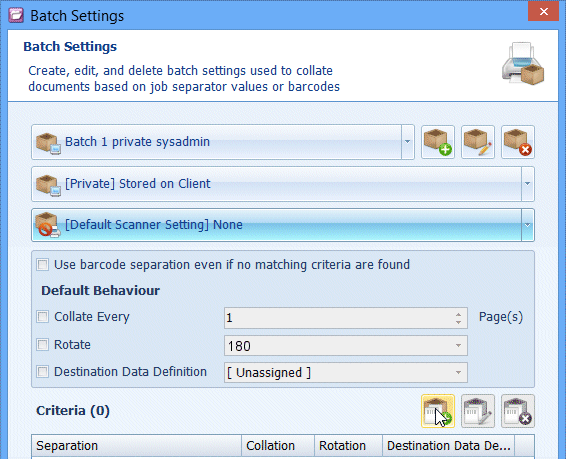
Batch Settings Window
The Batch Setting Window enables you to select a Batch Setting, edit an existing Batch Setting or create a new Batch Setting.

The Batch Setting you are creating is shown (Batch 1 in the above example).
The Batch Settings are described in Table 173.
Table 173. Terminology: Batch Settings
|
Term |
Meaning |
||
|---|---|---|---|
|
Batch setting name |
The batch setting is displayed.
|
||
|
Private or Public |
Select whether the current batch setting will be Public or Private.
|
||
|
Default Scanner Setting |
Select the scanner setting you want to be used with the selected Batch Setting. Click to display a list of configured Scanner Settings. Select the required setting.
See “Scanner Settings” for information on adding a Scanner Setting. |
||
|
Use barcode separation even if no matching criteria is found |
When selected, the Behaviour settings are applied (see Table 174), even when no matching barcode or Job Separator is found. |
||
|
Default Behaviour |
|||
|
Collate Every |
When no criteria are matched, sets the number of pages which are grouped together as a single document. |
||
|
Rotate |
When no criteria are matched,
|
||
|
Destination Data Definition |
When no criteria are matched, [ Unassigned ] – No Data Definition is assigned to the Criteria. OR Select a Data Definition from the drop-down list. This Data Definition is then assigned to the Criteria. |
||
Click the Add Criteria button to define the Criteria for the Batch Setting.
The Batch Criteria window is displayed.
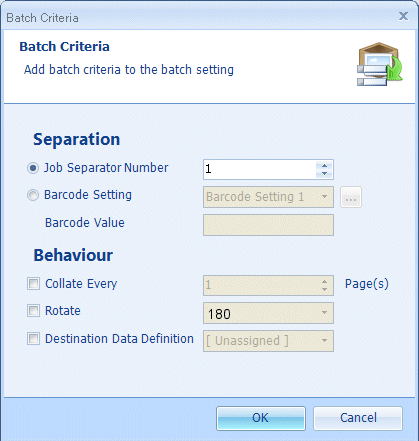
The Batch Criteria settings are described in Table 174.
Table 174. Terminology: Batch Criteria
|
Term |
Meaning |
||
|---|---|---|---|
|
Separation |
|||
|
Job Separator Number |
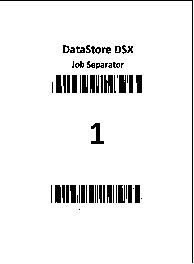
Enter the DataStore®DSX Job Separator page being used for this Criteria. See “Open Job Separators” for information on how to print DataStore®DSX job separator sheets. Range 1–10. See example below.
|
||
|
Barcode Setting |
Select Barcode Settings and either select a named barcode setting from the drop-down list, or click the … (ellipsis) button to open the Barcode Manager window. See “Barcode Manager”. The Barcode Settings are used to define the Separators for the scanned pages. When the defined Barcode Settings are found, the next sheet is the first page of a new document. |
||
|
Barcode Value |
Enter the Barcode Value for which you want the scanner to search. When the defined Barcode Value is found, the next sheet is the first sheet of a new document. |
||
|
Behaviour |
|||
|
Collate Every |
Sets the number of pages which are grouped together as a single document.
Alternatively, if the number of pages defined by Collate Every is scanned without encountering a Job Separator, a new document is started. |
||
|
Rotate |
|
||
|
Destination Data Definition |
[ Unassigned ] – No Data Definition is assigned to the Criteria. OR Select a Data Definition from the drop-down list. This Data Definition is then assigned to the Criteria. |
||
Ten DataStore®DSX Job Separator pages are provided. For example, Sheet 1 is shown below.
Barcode Manager
The Barcode Manager window is used to create specific Barcode Settings.
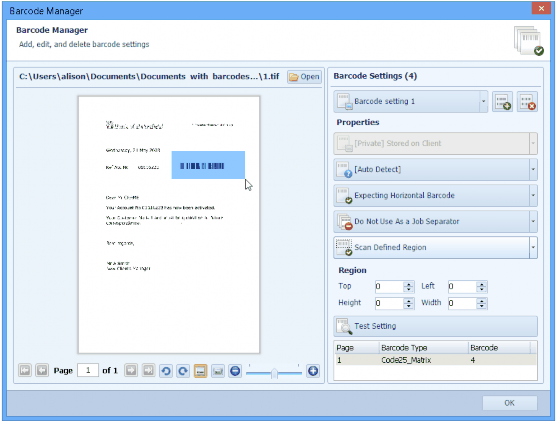
The Barcode Manager settings are described in Table 175.
Table 175. Terminology: Barcode Manager
|
Term |
Meaning |
||
|---|---|---|---|
|
Open |
By default, the document which is currently selected in Indexing Studio is opened as the test document for the Barcode Setting. To change the test document, click Open and browse to the folder containing the required document, then click Open to view the selected document. Using a test document enables you to define the region of the document where the barcode is expected to be and test the setting. |
||
|
Navigation controls |
Document navigation controls are displayed below the test document.
|
||
|
Name of Barcode Setting |
Select the name of the Barcode Setting you wish to edit from the drop-down list. |
||
|
Properties |
|||
|
Private or Public |
Select one of the following:
|
||
|
Barcode Type |
Select one of the following: Auto-Detect – The software will automatically detect the type of barcode.
|
||
|
Orientation |
Select one of the following: Expecting Horizontal Barcode – All vertical Barcodes are ignored. |
||
|
Job Separator? |
|
||
|
Scan Full Page? |
|
||
|
Region |
When Scan Defined Region is selected, define the region by entering the values (in pixels) for the parameters:
Alternatively, use the mouse pointer to select the area on the test document (see Open, above) where the barcode is expected to be located. |
||
|
Test Setting |
This button is active when a test document has been opened. See Open, above, for more information. Click the Test Setting button to determine whether the defined Region contains a barcode.
When no barcodes are found in the defined region on any of the pages of the test document, No barcodes found is displayed. |
||
|
OK |
When you have completed (and tested) your setup, click OK to save your settings and close the Barcode Manager window. |
||
Add Batch Setting
 Click the Add Batch Setting button to create a new Batch Setting.
See “Add Batch Setting”.
Edit Batch Setting
 Click the Edit Batch Setting button to change the name of the active Batch Setting.
See Table 173, “Terminology: Batch Settings” for details on the settings which can be changed.
Delete Batch Setting
 Click the Delete Batch Setting button to delete the active Batch Setting.
Set Default Batch Setting
 Click the Set Default Batch Setting button to set the active Batch setting as the default Batch setting.
Note: Different Default Batch Settings are set for the Import window and for Scanning.
When a Scanning or Import Default Batch Setting is configured, this setting will be automatically selected every time Scanning or the Import window is opened. as appropriate. When a Default Batch Setting is configured, the Default button is highlighted.
When the Default Batch Setting is not configured for Scanning, the currently selected Batch Setting is used for scanning performed from Indexing Studio and from the Scanning Window. However, when a Default Batch Setting is not configured for Import, no Batch setting is applied when the Import window is opened.
Rotation Options
No Rotate
Do not rotate the next scanned image.
Rotate 90
Rotate the next scanned image 90 degrees clockwise.
Rotate 180
Rotate the next scanned image 180 degrees clockwise.
Rotate -90
Rotate the next scanned image 90 degrees anticlockwise.
Collation Options
Barcode Separation
When selected (the button is highlighted), when a barcode is scanned, the next (and subsequent) pages which are scanned are stored in a new document.
Note: This is unavailable when a Batch Setting is selected.
Collate All/Collate Every
Collate All causes all newly scanned or imported pages (as appropriate) to be put in a single document.
When Collate Every X is selected, X pages are scanned or imported (as appropriate) in to a document. The next X pages are scanned or imported in to a new document. This continues until all the pages have been scanned or the whole document has been imported. X is an integer between 1 and 100.
Note: Collation Options are unavailable when a Batch Setting is selected.
Specify Collation Value
Values between 1 and 10 can be selected from the drop-down menu. To select a value greater than 10, click the Specify Collation Value... button and use the up and down arrows to select the required value. Click OK to use the entered value or Cancel to ignore the value.
Booklet Mode
When a booklet is removed from the binding and made ready for scanning, the first page and the last page are on the same sheet of paper. When the Booklet Mode button is selected (the button is highlighted), the scanned sheets are automatically split in to two pages and reordered so they are displayed in the correct order. See “Scanning a Booklet” for an example.