
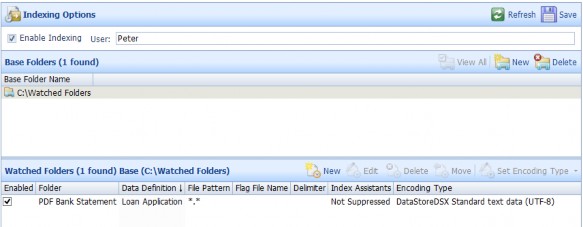
Automated Indexing Options
Automated Indexing Options is the area of Management Studio where you can set up and manage the Automated Indexing of files from Watched Folders.
A Watched Folder is associated with a Data Definition, which is used to Index the file. Watched Folders are created to hold files which will be imported automatically into DataStore®DSX.
Note: After they have been successfully imported and indexed, all files are deleted from the watched folder.
Files from Watched Folders are Indexed in created date order with the oldest file being automatically Indexed first.
The Automated Indexing Options are described in Table 27.
Table 27. Terminology: Automated Indexing Options
|
Term |
Meaning |
||
|---|---|---|---|
|
Enable Indexing |
When selected, the automatic importing and Indexing of files from Watched Folders is enabled for each Watched Folder which is "Enabled”. When cleared, the automatic importing and indexing of files from Watched Folders is unavailable. |
||
|
User |
The DataStore®DSX user account used to perform automated indexing. If an invalid user name is entered, DataStore®DSX uses the user account used to configure the Automated Indexing Options. |
||
|
Base Folders |
Base Folders contain sub-folders which are used to hold the files you want to automatically import and index.
|
||
|
Watched Folders |
|||
|
New |
Click to create a new Watched Folder for the selected Base Folder. See Table 28 for details on the options. |
||
|
Edit |
Click to edit the selected Watched Folder. See Table 28 for details on the options. |
||
|
Delete |
Click to delete the selected Watched Folder. |
||
|
Set Encoding Type |
Click to select an encoding type for one or more Watched Folders. There are four options to choose from:
If the selected Watched Folders are not encoded, the option to set the chosen encoding is available. If the selected Watched Folders are already encoded, the option to overwrite the existing encoding is available.
|
||
|
Enabled |
When selected, the Watched Folder is enabled and, when "Enable Indexing” is also selected, the contents of the Watched Folder will be imported, indexed and stored in DataStoreDSX. When cleared, the Watched Folder is unavailable. The contents of the watched Folder will remain in the Watched Folder until both "Enable Indexing” is enabled and this option is selected. |
||
|
Name |
Shows the names of the configured Watched Folders. |
||
|
Data Definition |
Shows the Data Definitions used to Index the files imported and Indexed from the configured Watched Folders. |
||
|
File Pattern |
Shows the file patterns defining which files in the configured Watched Folders will be imported and Indexed. |
||
|
Flag File Name |
If configured, shows the flag files which must be present for the items in the configured Watched Folders to be imported and Indexed. This can either be the name of the flag file or the file pattern. For example, either start.start or flagfile.txt. |
||
|
Delimiter |
If configured, shows the delimiters (comma or tab) used in the Bulk Image Import files. |
||
|
Index Assistants |
|
||
|
Encoding Type |
Shows the encoding type set against the selected Watched Folders, see “Set Encoding Type” for the available selections. |
Note: When Enable Indexing is selected, you must have at least one Watched Folder configured.
If you delete all Watched Folders, Enable Indexing is automatically cleared and Watched Folder Indexing is unavailable.
Watched Folder Configuration
The Watched Folder options are described in Table 28.
Table 28. Terminology: Automated Indexing Options – New Watched Folder
|
Term |
Meaning |
||||
|---|---|---|---|---|---|
|
Enable this watched folder |
When selected, the Watched Folder is enabled and, when "Enable Indexing” is also selected, the contents of the Watched Folder will be imported, indexed and stored in DataStoreDSX. When cleared, the Watched Folder is unavailable. The contents of the watched Folder will remain in the Watched Folder until both "Enable Indexing” is enabled and this option is selected. |
||||
|
Folder |
Click and, in the Choose Watched Folder window, navigate to and select the required watched folder. For example, if the base directory is
|
||||
|
Data Definition button |
Click and, in the Data Definition Selection window, navigate to and select the required Data Definition. |
||||
|
File pattern |
Enter the file type suffix for the type of files you want to import (the default is *.txt). (If required, several file patterns can be listed.)
|
||||
|
Flag File (Optional) |
If required, enter a flag file description. This enables you to delay importing the files until a particular Flag File is found. This is useful if you are downloading a set of files and don’t want to start importing files until the entire set has been successfully downloaded. You would download the required files to the configured Watched Folder location, then copy the Flag File. Once the Flag File is detected, importing starts, the downloaded files are Indexed and the Flag File is deleted.
|
||||
|
Optimise |
|
Pre-Conversion Configuration
Note: The pre-conversion options are only available when no Image import options are set. The following pre-conversions are available:
- EncodingPreConversion converts text into UTF-8 encoding. It has a single int32 property, InputCodePage, specifying the code page of the data to be converted.
- UniconPreConversion uses Unicon to transform a file. It has a single string property, ScriptFileName, containing the full path to the Unicon script file to use.
- AsposePreConversion converts Word documents to PDF, before they are indexed.
Note: .doc files created with Microsoft Word 97 and later and all .docx files, can be converted to PDF.
The Pre-conversion Configuration options are described in Table 29.
Table 29. Terminology: Automated Indexing Options – Pre-Conversion Configuration
|
Term |
Meaning |
|---|---|
|
|
Add icon. Click to add the item to the list. |
|
|
To change a pre-conversion's position in the list, select it and use the Up/Down arrows to re-position it. |
|
|
To remove a pre-conversion from the list, select it in the list and click the red Delete button. |
Image Import 
Image Import is also known as Bulk Image Import since Watched Folders are used to automatically import large quantities of files.
Licence required: Bulk Image Import requires a licence. If you cannot access the options described here, contact support@mitratech.com about purchasing a licence.
Note: The following option is only available when no Pre-conversion options are set. The Image Import options are described in Table 30.
Table 30. Terminology: Automated Indexing Options – Image Import
|
Term |
Meaning |
||
|---|---|---|---|
|
Delimiter |
When selected, bulk image import is enabled. From the drop-down list, select the required delimiter from the list of available delimiters, currently Tab and Comma. This delimiter is used in the Bulk Import file which defines the bulk image import. See “Bulk Image Import File Format” and “Automated Indexing Watched Folders, Bulk Image Import” for more information. When cleared, bulk image import is unavailable. |
||
|
Suppress Index Assistants |
When Bulk Image import is enabled (that is, a Delimiter is configured), setting this option prevents Indexing Assistants from being run when the files are imported and Indexed from the Watched Folder.
When cleared, Indexing Assistants (configured for the selected Data Definition) are run when files are imported and Indexed from the Watched Folder. |
||
|
Suppress zero byte files |
Zero-byte files cannot be automatically indexed. When Suppress zero byte files is selected, zero-byte PDF or text files are deleted. When Suppress zero byte files is cleared, zero-byte PDF or text files are moved to the .error folder.
|