
Automated Indexing, Watched Folders, Convert To PDF
Licence required: Automated Indexing requires a licence. If you do not see the options described here, contact support@mitratech.com about purchasing a licence.
Create a Data Definition with PDF Positions
To easily create the Data Definition with PDF positions, copy the Bank Statement created earlier. Open the copied version, rename it and replace the text positions with PDF Positions.
- Select the Data Definition Bank Statement in the tree view. Right-click on it and select Copy and Open for Edit from the menu.
- With General Properties selected, click in the Name field and enter PDF Bank Statement.
- Select the Sample Document(s) tab and click Open. Browse to the location of a sample Word bank statement. The Convert Document(s) window is opened and the Word document’s file type is automatically detected.
- The Output Type is set to PDF.
- In this example, all the pages in the Sample Document will be converted to PDF so ensure Range of Pages to Convert has All Pages selected. Click OK.
- The Word bank statement is converted to PDF format and the PDF document is displayed as the Sample Document.
- Select the Index field Account Name. At the bottom of the Sample Document(s) tab select the Positions tab.
- Add a PDF Position. Use the mouse pointer to draw a rectangle around the account name on the PDF bank statement. Make sure the rectangle is large enough to display the longest possible account name on a bank statement.
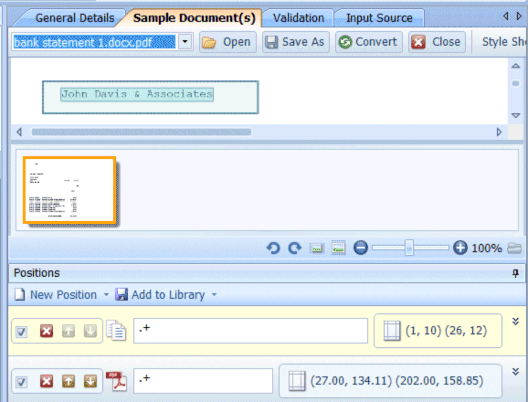
- Delete the old Text Position
 by clicking the icon showing an X in a red box.

- Repeat steps 7 – 9 for the remaining fields in the Data Definition that you require for the PDF Bank Statement Data Definition.
- Save the Data Definition, Publish it and create an associated Search Template.
Configure Watched Folder Options
- In the tree view, expand Configuration and select Automated Indexing Options.
- Select the Enable Indexing tick-box.
- From the Base Folders pane, click New and browse to the base directory which contains all the Automated Indexing Watched Folders you will be using. For example, you might have a base folder C:\Automated Indexing watched folders which contains sub-directories named after each of the Data Definitions you are using for Automated Indexing from Watched Folders.
- In the User text box, enter the username of the user you want to be displayed in the Audit Logs as performing the Automated Indexing. If you enter an invalid username, DataStore®DSX will use the username you are currently logged in as.
- In the Watched Folders section, click New to open the Watched Folder Configuration window.
- To enable the Watched Folder, select the option Enable this watched folder.
- Select the Choose Watched Folder button and, in the Choose Watched Folder window, navigate to and select, the required watched folder. In this example, the base folder is C:\Automated Indexing watched folders and you have a Data Definition named PDF Bank Statement, so create the directory C:\Automated Indexing watched folders\PDF Bank Statement and then set this as the Watched Folder.
Caution: All items successfully imported into DataStore®DSX and Indexed are immediately deleted from the Watched Folder.
- Click the Choose Data Definition button and, in the Data Definition Selection window, navigate to and select the required Data Definition (PDF Bank Statement in this example).
- Enter a File pattern for which to search. In this example, the bank statements which will be imported and Indexed are all Microsoft Word files so enter the pattern *.* to ensure both .doc and .docx files are converted to PDF.
Note: .doc files created with Microsoft Word 97 and later and all .docx files, can be converted to PDF.
- In this example, no flag-file is set so leave the Flag File (Optional): text box blank.
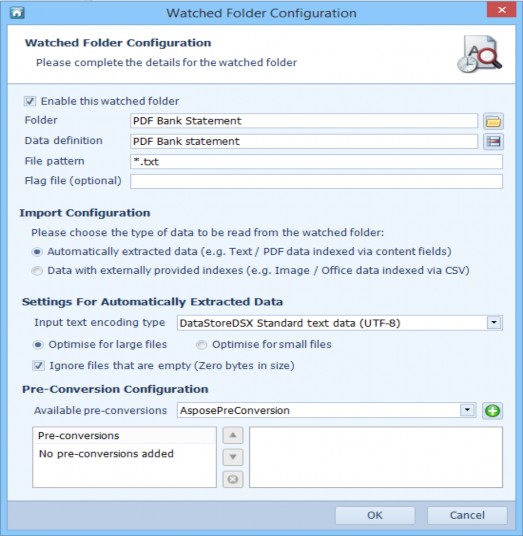
- There are two choices of data types that can be read from the watched folder in the Import Configuration selection:
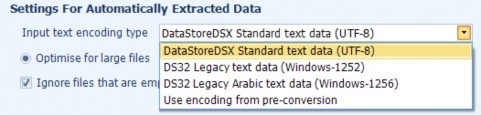
- Automatically extracted data. With this option selected, the Settings For Automatically Extracted Data selection is visible. This selection lets you predefine the input text encoding type for text and PDF data indexed via context fields.
- Data with externally provided indexes. With this option selected, only the Settings For Externally Indexed Data selection is available. This selection lets you choose between a Tab or a Comma delimiter in Images and Office data indexed in CSV files. See “General Properties – Storage Formats” for more information.
- In Settings For Automatically Extracted Data there are four choices available to pre- define the character encoding type; The default setting is UTF-8.
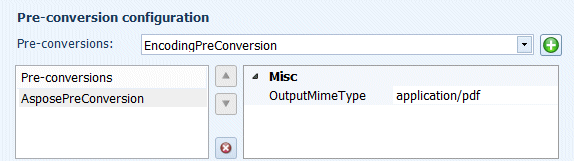
- Next, add the PDF Pre-conversion Configuration. With AsposePreConversion selected in the Pre-conversions list, click the add button.
- AsposePreConversion will be displayed in the Pre-conversions list.
- No other options need to be set. Click OK to exit the Watched Folder Configuration window and then click Save to save the Automated Indexing Options settings.
- Copy (or move) the Word bank statements to the Watched Folder C:\Automated Indexing watched folders\PDF Bank Statement.
- The files are removed from the Watched Folder. To check they have been imported and Indexed successfully, open Searching Client and select the PDF Bank Statement Search Template. Search for the data you have just imported to make sure it was successful.
Note: If you need to index Word files which have been converted to PDF with index values which are provided in a CSV file, use the example below to index the Word files using index values provided in a CSV file. But ensure the Data Definition is configured to store files as PDF. See “General Properties – Storage Formats” for more information on storing files in PDF format after they have been indexed.