
Automated Indexing
Automated Indexing is the area in the tree view of Management Studio’s Indexing section used for managing the automatic (i.e. unattended) importing and storing of documents from Management Studio.
Note: You must have Permission to perform Automated Indexing. If your do not have permission, Automated Indexing may not be displayed in the tree view. See “Users and Groups” and “Permissions Inheritance” for more information.
The Automated Indexing process automatically takes a data file (transforming it when necessary), then:
- Indexes it
- Stores the resulting file and its index values in the application.
Open Management Studio and log in.
- Select and expand Indexing in the tree view then click Automated Indexing.
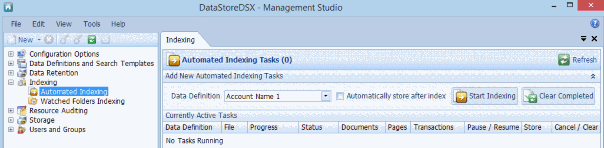
- From under the Indexing tab on the right-hand side of the window, select the Data Definition you want to use with Automated Indexing from the drop-down list.
Note: Only Data Definitions with at least one Content Field (that is, an Index field whose value is automatically extracted from the document) are available for Automated Indexing.
Note: Automated Indexing cannot be used to populate User Supplied Fields. Therefore, Data Definitions containing only User Supplied Fields will not be available for Automated Indexing.
- If required, select Automatically store after index. The Automated Indexing process is very much quicker when this is selected.
- Click Start Indexing.
- A window enables you to browse to the folder containing the documents you want to Index. Select the folder, then select the files you want to Index.
- To select a consecutive list: click on the first file, hold down the keyboard’s Shift key, then click on the last file.
- To select a non-consecutive list: click on the first file, hold down the keyboard’s Ctrl key, then click on each additional file you require.
- Click Open. The files are imported and Indexed and, if Automatically store after index is selected, stored.
- If Automatically store after index is not selected, a small number of files are imported and Indexed. Further files cannot be imported and indexed until one or more of the Indexed files are stored. A new file is imported as an Indexed file is stored. Click the Store button to store a file.
- Click Clear Completed to clear the whole list of completed files, or click Clear for each individual file.