Assigning a Style Sheet to a Data Definition
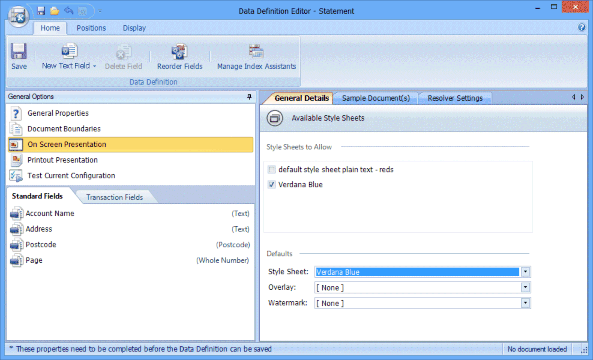
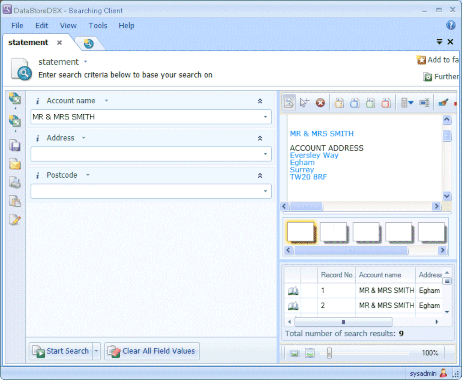
The Style Sheet Verdana Blue will be used when viewing (but not for printing) search results for the Data Definition Statement.
- Click on Data Definitions in the tree view, then right-click and select the Data Definition you want to edit. In this example, select the Data Definition Statement, right-click on it and select Edit from the menu.
- Select On Screen Presentation from the General Options pane.
- Under Style Sheets to Allow select Verdana Blue.
- In the Defaults section of the pane, select Verdana Blue from the drop-down list.

- Save the Data Definition to make the Style Sheet changes take effect.
Note: It is not necessary to Publish the Data Definition to make Style Sheet changes take effect.
Note: It is advisable to use the same font and page size for both the Printout Presentation and On Screen Presentation settings. This ensures when pages with Attachments are printed, they look the same as in Searching Client.
- To see the effect the Style Sheet Verdana Blue has on Searching Client, open Searching Client and use the Data Definition Statement to search for results. (This example assumes you have created a Search Template for the Data Definition Statement.)

- If no search results are displayed (but know that documents have been indexed using the selected Data Definition), make sure you have the correct Access Control permissions configured. See “Create ACLs for Data Definitions” for an example.
Using Resolver Settings
Resolver Settings allow you to use specific Style Sheets, Overlays and/or Watermarks when certain conditions are met. In this example, create a Watermark and then create a Resolver Setting which uses this Watermark when the Postcode field has no value.
Create a Watermark
- In the Data Definition Editor, select On Screen Presentation from the General Options pane. Then select the Sample Document tab. (If there are no Sample Documents open, you must open one now or you will not be able to view the Watermark.)
- Select the Watermark tab at the bottom of the pane. Click New to add a new Watermark.

- In the Name box, type in the watermark’s name. In this example, type in No Postcode.
- In the Text box, type in the watermark’s text. In this example, type in No Postcode!.
- The Watermark is displayed near the top of the Sample Document. Change the font size by clicking the Browse button (...) and selecting the required font and size.
- Change the location of the Watermark on the page by entering values in the Top and Left boxes. These values define the location of the Watermark as being the number of pixels from the top of the page and from the left of the page. Alternatively, select the Watermark on the Sample Document (by clicking on the red circle above the Watermark text) and drag it to the required position.
- Change the rotation of the Watermark either by entering a value (in degrees) in the Rotation box or by selecting the Watermark on the Sample Document (by clicking the red circle above the Watermark text) and rotating it a required.
Create a Resolver Setting
Having created the Watermark, the next step is to create the Resolver Setting.
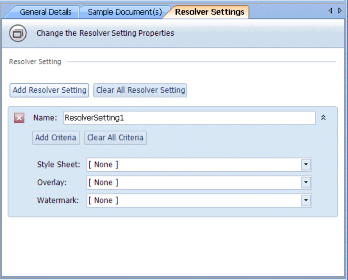
- Select the Resolver Settings tab. Click the Add Resolver Setting button.

- In the Name box, type in the Resolver Setting name. In this example, type in No Postcode.
- Click the Add Criteria button. Click on Please select the field to be used and select Postcode from the drop-down list.
- Click on Has the value and select Does not have a value. The Resolver Setting is now configured to be used when the field Postcode has no index value.
- Click on [ None ] beside Watermark and select No Postcode from the drop-down list.
The Resolver Setting configuration is complete and the Data Definition should now be saved. Once a Search Template has been created, when a User performs a Search (in Searching Client) using the Bank Statement Search Template, if a Bank Statement is returned which does not have a value for Postcode, that search result will be displayed with the No Postcode Watermark.

