
Example: Banking
This example shows you how to create the following Search Template:
Licence required: Document Inventory, Search Assistants and Scanning each require a licence. If you do not see the options described here, contact support@mitratech.com about purchasing a licence.
Document Inventory is configured in a Search Template using Custom Field Types, Search Assistant fields, an external database table and Document Inventory configuration.
- A Custom Field Type will be created which will be used by the primary business entity. A second Custom Field Type can be created for a secondary business entity, if required. The Primary business entity is the criterion used to retrieve the Document Inventory items. If provided, a Secondary business entity provides an alternative search criterion for retrieving Document Inventory items. The primary and secondary business entities must be related in some way. In the example below, the primary business entity is the Account Number and the secondary related business entity is the Customer Number.
- A Data Definition must be created for each type of document which will be scanned into DataStoreDSX. The Data Definition must contain a field which uses either the Custom Field Type used for the Primary or the Custom Field Type used for the Secondary business entity so it can be linked to the Document Inventory Search Template.
Note: The Data Definition must contain one of these fields, but it must not contain fields for both the Primary and Secondary business entity, as this configuration is not supported.
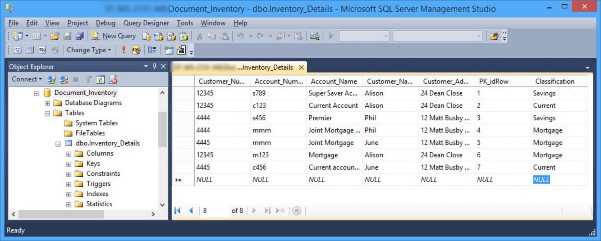
- The external database table or view must be created which defines the data associated with the Primary and Secondary business entities. For example, the table could contain the account number, the type of account (Mortgage, Savings, Current) the customer number and the customer’s name and address.

- The different types of accounts are specified in the external database table (by the Classification column, in the example above).
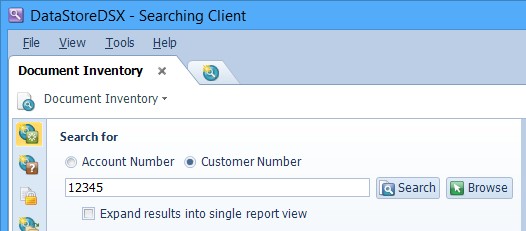
- Information fields can be defined for each Document Inventory item. The information is retrieved from the external database. In the example below, when the Customer Number is searched, the customer name and address information is displayed. The information fields are linked to columns in the external database table or view.
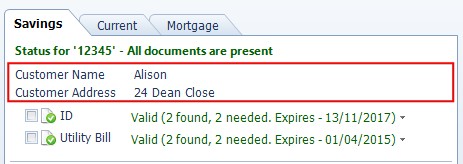
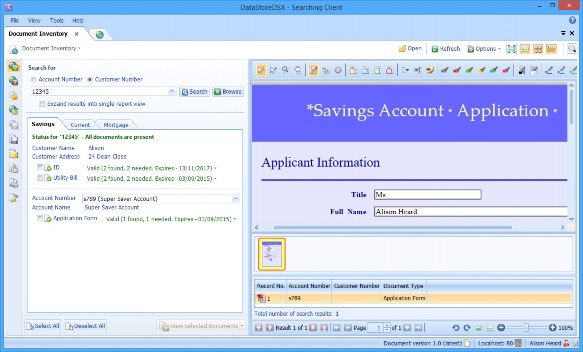
- The inventory items are configured for the Primary and (if used), Secondary business entity for each Account type. When a search is performed on an account number and the details of a Joint Account are returned, the list of required documents is displayed. For each document, a green icon indicates the document is in the system, a blue icon indicates there are not enough of the specified document type, a yellow icon indicates a document has expired and a red icon indicates no documents of the specified type are in the system for the specified account. The Expiry date indicates the earliest date when one of the documents of the specified type will no longer be valid. In the example below, all the required documents are present and valid.
- Finally, the search specification must be configured for the Search Template. This defines how information is displayed in Searching Client. If the correct Search Specification is not configured, the Document Inventory is not displayed in Searching Client.
Create the Custom Field Types
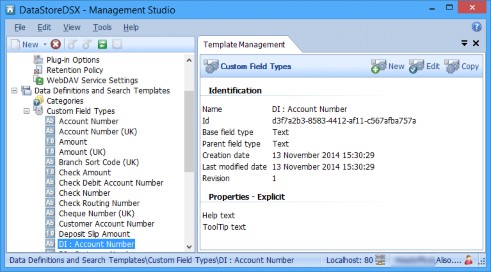
In this example, there are three different types of account and each account number field is based on a Custom Field Type called DI : Account Number.
- Create a Text Custom Field Type called DI : Account Number.
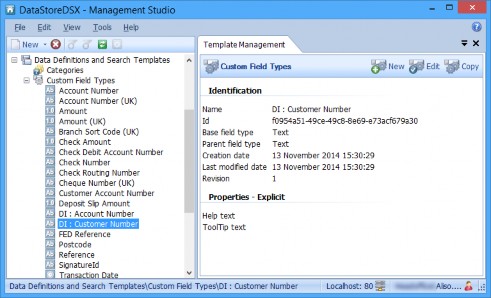
- Create a Text Custom Field Type called DI : Customer Number. Add Validation, if required. Save the Custom Field Type.
Note: The DI : prefix is not required – it is added simply to help identify the Custom Field Types as those used for Document Inventory.
Create the Data Definitions
A Data Definition is needed for each type of document which can be accepted as part of the application. In this example, Data Definitions are required for the following documents:
- Passport
- Utility Bill
- Application Form
- Birth Certificate
- Driving Licence
The document expiry date is configured as a period after the Data Definition’s Document Date. The Document Date must be set for all Data Definitions which are used to index documents which will be part of Document Inventory and which will have an expiry date. However, the Document Date can be omitted for Data Definitions that are part of Document Inventory that will not require an expiry calculation (that is, the associated Inventory Items will have the expiry set to Will Not Expire).
Note: When the Document Date is set to Month accuracy, the 1st of the month is assumed in the document expiry calculations. When the Document Date is set to Year accuracy, the 1st day of the year is assumed in the document expiry calculations.
The Document Type is used to identify the type of document being scanned and stored in DataStoreDSX. The Document Type must be set for all Data Definitions which are used to index documents which will be part of Document Inventory.
In this example, the Document Inventory configuration contains a primary business entity (Account Number) and a secondary business entity (Customer Number). Therefore, each Data
Definition must contain either a Customer Number field, based on the Custom Field Type
DI : Customer Number or an Account Number field, based on the Customer Field Type
DI : Account Number.
The following sections contain example Data Definitions for these documents.
Passport Data Definition
The Data Definition used to store passports must have three fields: Passport Number, to identify the passport; Customer Number, to link the stored passport to the customer; and Passport Expiry Date to store the date the passport is no longer valid.
- Create a new Data Definition and give it the name DI : Passport. (The prefix DI : is used to help identify the Data Definition as one used for Document Inventory.)
- Create a Document-level Text field called Passport Number. Select Mandatory (field must be completed for item to be valid) to ensure a passport cannot be stored in DataStoreDSX unless a passport number is entered.
- Make sure Values are extracted automatically (not externally provided) is cleared because the index values will be entered manually by the person scanning the documents.
- Create a Document-level field called DI : Customer Number. Click on the Type and select the Custom Fields tab. Select DI : Customer Number from the list. Select Mandatory (field must be completed for item to be valid) and make sure Values are extracted automatically (not externally provided) is cleared.
- Create a Document-level Date and Time field called Passport Expiry Date. Select Day Accuracy. Select Mandatory (field must be completed for item to be valid) and make sure Values are extracted automatically (not externally provided) is cleared.
- Next, configure the Document Date. For this Data Definition, the Document Date is the passport expiry date. Select General Properties and click on No document date source configured next to Document Date.
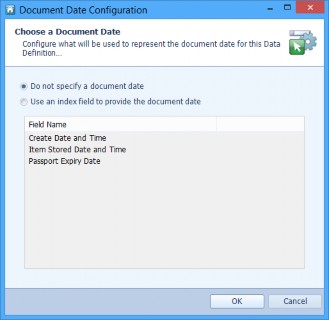
- Select Use an index field to provide the document date and select the field Passport Expiry Date from the list of Date and Time fields. Click OK.
- Passports are proof of ID so the Document Type must be set to ID. Click on No document type source configured. Select Use a specific value and type ID in the text box. Click OK.
- Save and Publish the Data Definition.
Utility Data Definition
The Data Definition used to store utility bills must have three fields: Utility Bill Type, to identify the type of utility bill provided; Customer Number, to link the stored utility bill to the customer; and Utility Bill Date to store the date the utility bill was issued to the customer.
- Create a new Data Definition and give it the name DI : Utility Bill. (The prefix DI : is used to help identify the Data Definition as one used for Document Inventory.)
- Create a Document-level Text field called Utility Bill Type. Select Mandatory (field must be completed for item to be valid) to ensure a utility bill cannot be stored in DataStoreDSX unless a utility bill type is entered.
- Make sure Values are extracted automatically (not externally provided) is cleared because the index values will be entered manually by the person scanning the documents.
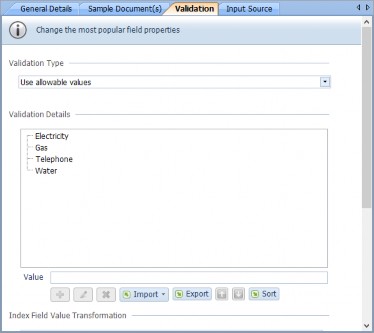
- Select the Validation tab and select Use allowable values for the Validation Type. Add the following utility bill types:
- Electricity
- Gas
- Telephone
- Water
- Create a Document-level field called DI : Customer Number. Click on the Type and select the Custom Fields tab. Select DI : Customer Number from the list.
- Select Mandatory (field must be completed for item to be valid) and make sure Values are extracted automatically (not externally provided) is cleared.
- Create a Document-level Date and Time field called Utility Bill Date. Select Day Accuracy.
- Select Mandatory (field must be completed for item to be valid) and make sure Values are extracted automatically (not externally provided) is cleared.
- Next, configure the Document Date. For this Data Definition, the Document Date is the date the utility bill was issued. Select General Properties and click on No document date source configured next to Document Date.
- Select Use an index field to provide the document date and select the field Utility Bill Date from the list of Date and Time fields. Click OK.
- The Document Type must be set to Utility Bill. Click on No document type source configured. Select Use a specific value and type Utility Bill in the text box. Click OK.
- Save and Publish the Data Definition.
Application Form Data Definition
The Data Definition used to store application forms must have two fields: Account Type, to identify the type of account the application form is for and Account Number to link the stored application form to the account number.
- Create a new Data Definition and give it the name DI : Application Form. (The prefix DI : is used to help identify the Data Definition as one used for Document Inventory.)
- Create a Document-level Text field called Account Type. Select Mandatory (field must be completed for item to be valid) to ensure an application form cannot be stored in DataStoreDSX unless an account type is entered.
- Make sure Values are extracted automatically (not externally provided) is cleared because the index values will be entered manually by the person scanning the documents.
- Select the Validation tab and select Use allowable values for the Validation Type. Add the following account types:
- Current
- Mortgage
- Savings
- Create a Document-level field called DI : Account Number. Click on the Type and select the Custom Fields tab. Select DI : Account Number from the list.
- Select Mandatory (field must be completed for item to be valid) and make sure Values are extracted automatically (not externally provided) is cleared.
- For this Data Definition, the Document Date is the date the document is scanned in to DataStoreDSX. Select General Properties and click on No document date source configured next to Document Date. Select Use an index field to provide the document date and select the field Create Date and Time from the list of Date and Time fields. Click OK.
- The Document Type must be set to Application Form. Click on No document type source configured. Select Use a specific value and type Application Form in the text box. Click OK.
- Save and Publish the Data Definition.
Birth Certificate Data Definition
The Data Definition used to store birth certificates must have two fields: Registration Number to identify the birth certificate and Customer Number to link the stored birth certificate to a customer.
- Create a new Data Definition and give it the name DI : Birth Certificate. (The prefix DI : is used to help identify the Data Definition as one used for Document Inventory.)
- Create a Document-level Text field called Registration Number. Select Mandatory (field must be completed for item to be valid) to ensure a birth certificate form cannot be stored in DataStoreDSX unless a registration number is entered.
- Make sure Values are extracted automatically (not externally provided) is cleared because the index values will be entered manually by the person scanning the documents.
- Create a Document-level field called DI : Customer Number. Click on the Type and select the Custom Fields tab. Select DI : Customer Number from the list.
- Select Mandatory (field must be completed for item to be valid) and make sure Values are extracted automatically (not externally provided) is cleared.
- Create a Document-level Date and Time field called Birth Certificate Expiry Date. Select Day Accuracy.
- Next, configure the Document Date. For this Data Definition, the Document Date is the birth certificate expiry date. Select General Properties and click on No document date source configured next to Document Date. Select Use an index field to provide the document date and select the field Birth Certificate Expiry Date from the list of Date and Time fields. Click OK.
- Birth certificates are proof of ID so the Document Type must be set to ID. Select General Properties and click on the Document Type. Select Use a specific value and type ID in the text box. Click OK.
- Save and Publish the Data Definition.
Driving Licence Data Definition
The Data Definition used to store driving licences must have three fields: Driving Licence Number, to identify the driving licence; Customer Number, to link the stored driving licence to the customer; and Driving Licence Expiry Date to store the date from which the driving licence is no longer valid.
- Create a new Data Definition and give it the name DI : Driving Licence. (The prefix DI : is used to help identify the Data Definition as one used for Document Inventory.)
- Create a Document-level Text field called Driving Licence Number. Select Mandatory (field must be completed for item to be valid) to ensure a driving licence cannot be stored in DataStoreDSX unless a driving licence number is entered.
- Make sure Values are extracted automatically (not externally provided) is cleared because the index values will be entered manually by the person scanning the documents.
- Create a Document-level field called DI : Customer Number. Click on the Type and select the Custom Fields tab. Select DI : Customer Number from the list.
- Select Mandatory (field must be completed for item to be valid) and make sure Values are extracted automatically (not externally provided) is cleared.
- Create a Document-level Date and Time field called Driving Licence Expiry Date. Select Day Accuracy.
- Select Mandatory (field must be completed for item to be valid) and make sure Values are extracted automatically (not externally provided) is cleared.
- Next, configure the Document Date. For this Data Definition, the Document Date is the driving licence expiry date. Select General Properties and click on No document date source configured next to Document Date. Select Use an index field to provide the document date and select the field Driving Licence Expiry Date from the list of Date and Time fields. Click OK.
- A driving licence is proof of ID, so the Document Type must be set to ID. Select General Properties and click on the Document Type. Select Use a specific value and type ID in the text box. Click OK.
- Save and Publish the Data Definition.
Access Controls
The new Data Definitions must have the correct access controls to allow Indexing Studio users to use them. Access controls can be assigned using Categories, by setting the default access controls for new Data Definitions, or by setting access controls on each Data Definition. Please refer to “Create ACLs for Data Definitions” for examples on setting access controls for Data Definitions.
Create the External Database Table or View
This database table must follow the format described below:
- Every row must be identified by PK_idRow which can be either an Int or BigInt.
- Integers can be passed through.
- Floating point numbers need to be converted to “DECIMAL(28, 10)”
- DateTime fields must be split in the following way:
- <ColumnName>
- <ColumnName>_Date
- <ColumnName>_Time
- Strings must be collated as Latin1_General_CI_AI.
- The database View must be on the same server as the DataStoreDSX database, but we advise it is in a different database.
This example uses the following table:
Configure Document Inventory in the Search Template
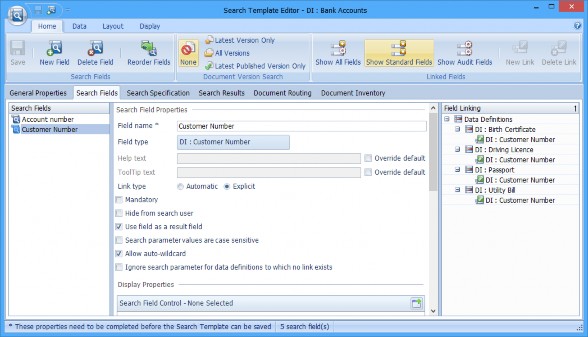
Create the Primary and Secondary Fields
- Create a Search Template and Name it DI : Bank Accounts.
- Create a Primary Field called Account Number. Click on the Field type and select the Custom Fields tab and select the Custom Field Type you created for the account number, DI : Account Number.
- Next, link the field. Select the Link type Explicit and, from the panel on the right, expand the Data Definition DI : Application Form and right-click on the field DI : Account Number and select Create link from selected field to link the Data Definition field to the field in the Search Template.
- Create a Secondary Field called Customer Number. Click on the Field type and select the Custom Fields tab and select the Custom Field Type you created for the customer number, DI : Customer Number.
- Next, link the field. Select the Link type Explicit and, from the panel on the right, expand the Data Definition DI : Birth Certificate and right-click on the field DI : Customer Number and select Create link from selected field to link the Data Definition field to the field in the Search Template.
- In a similar way, link the Customer Number search field to the field DI : Customer Number in the Data Definitions DI : Driving Licence, DI : Passport and DI : Utility Bill.
Create the Inventory Names and Information Fields
The inventory name field is required to determine, in this example, the type of bank account for which the data is being retrieved and, therefore, the information (from the external database) which needs to be displayed.
The Information fields are the fields used to display the information from the external database. The information fields are Search Assistant fields.
In this example, the inventory name field and all the information fields are Text fields.
- Create a field called Inventory Name. Click on the Field type and select the Search Assistants tab and select Search Assistants Text from the list. Click OK.
- Create a field called Account Name. Click on the Field type and select the Search Assistants tab and select Search Assistants Text from the list. Click OK.
- In a similar way, create the fields Customer Name and Customer Address, setting the Field type to Search Assistant Text for each.

- Save the Search Template.
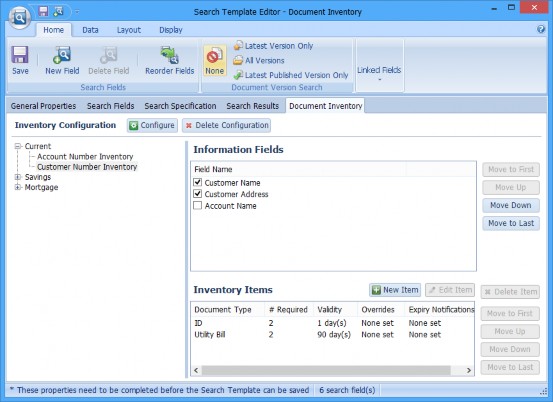
Document Inventory Configuration
- Click on the Document Inventory tab and click Configure.

- The Document Inventory Configuration window is opened.
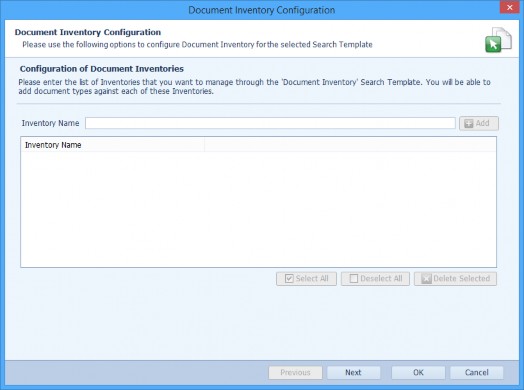
- In this example, the Inventory Names are Current, Savings and Mortgage. Add each of these to the list of Inventory Names by typing the name in the Inventory Name text box and clicking Add to add the name to the list.
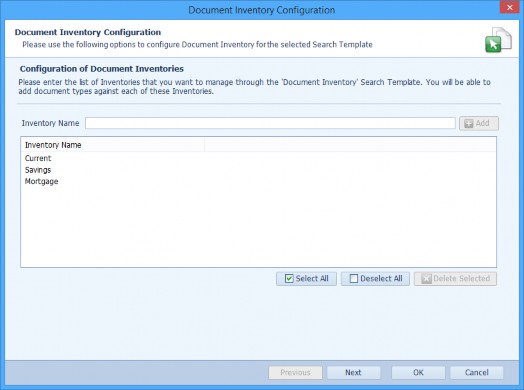
Note: The inventory names added here must exactly match the values displayed in the external table, including capitalization.
- When all the required Inventory Names have been added, click Next.
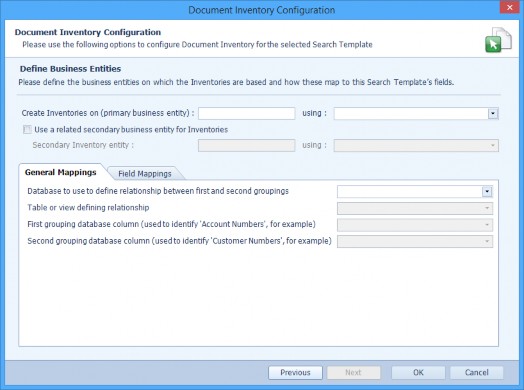
- In this example, the first business entity is the Account Number. Type Account Number in the text box beside Create Inventories on (primary business entity) and then click on the drop-down list and select Account Number (DI : Account Number) from the list.
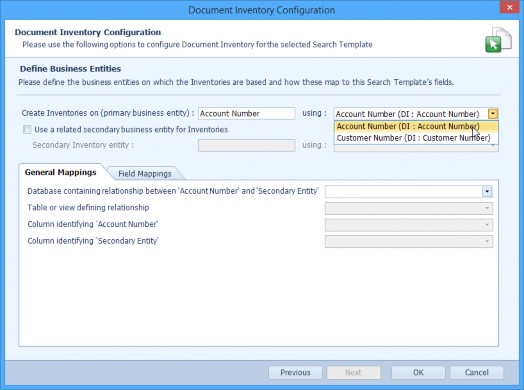
Note: The Search Field used for the business entities can be of Type Text or Whole Number, only. Therefore, only Text or Whole Number Search Fields are displayed in the drop-down list.
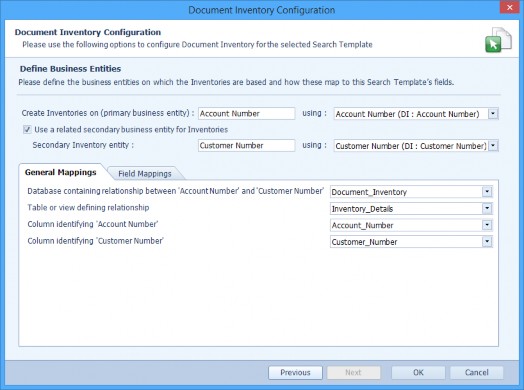
- Select the option Use a related secondary business entity for Inventories. Type Customer Number in the text box beside Secondary Inventory entity. Then select DI : Customer Number from the drop-down list.
Note: The Search Field used for the business entities can be of Type Text or Whole Number, only. Therefore, only Text or Whole Number Search Fields are displayed in the drop-down list.
General Mappings
The General Mappings section configures the links to the external database.
- Click on the drop-down list next to Database containing relationship between ‘Account Number’ and ‘Customer Number’ and select the database which contains the table or view you created earlier.
- Click on the drop-down list next to Table or view defining relationship and select the table or view you created earlier.
- Click on the drop-down list next to Column identifying ‘Account Number’ and select the name of the column which stores the account numbers.
- Click on the drop-down list next to Column identifying ‘Customer Number’ and select the name of the column which stores the customer numbers.
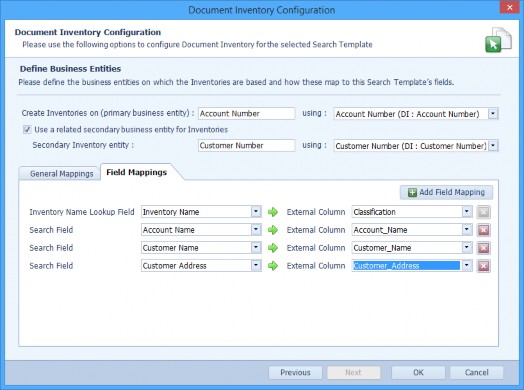
Field Mappings
The Field Mappings section configures the links between the Inventory Name lookup field and Information fields and columns in the external database.
- The first field mapping is between a Search Template Search Assistant field and the column in the external database which identifies the different Inventories. In this example, the Search Template fields is called Inventory name and the column in the external database is called Classification. Select the Inventory Name field from the Inventory Name Lookup Field drop-down list and then select the name of the column in the external database from the External Column drop-down list.
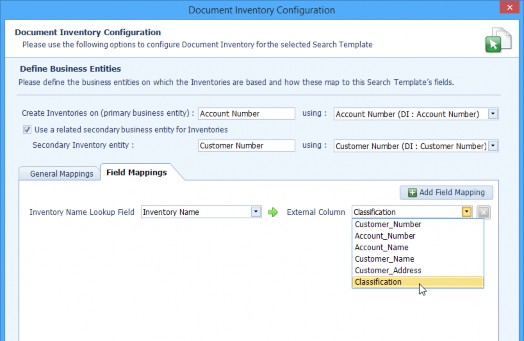
- If you want extra information from the external database to be displayed, use the Add Field Mappings button to add more mappings between Search Template Search Assistant fields and columns in the external database. In this example, click Add Field Mapping and select Account Name from the Search Field drop-down list, then select Account_Name from the External column drop-down list.
- In a similar way, map the Search Assistant field Customer Name to the Customer_Name column. Then map the Search Assistant field Customer Address to the Customer_Address column.
- Click OK.
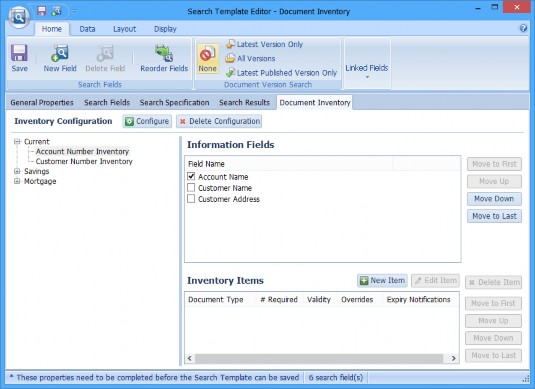
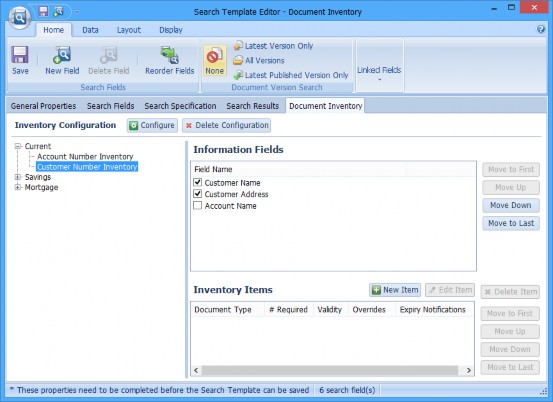
Configure the Information Fields
The Inventory Names have now been configured so the information fields displayed with each Inventory can be added.
- Select the Inventory Current and click the + icon to show the first and (if configured) second business entity for the Inventory. Select Account Number Inventory.
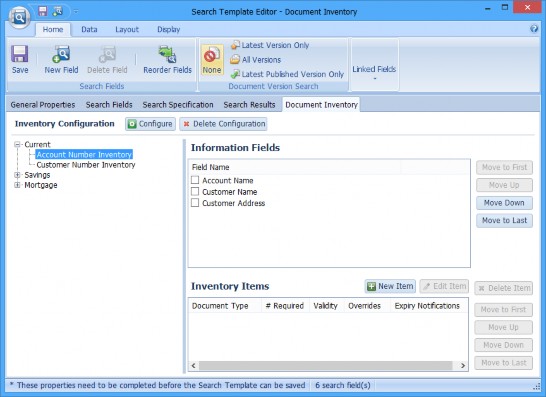
- When the account number is searched and results are returned, the Account name is also displayed. Select Account Name.
- Select Customer Number Inventory. When the customer number is searched and results are returned, the Customer Name and Customer Address are displayed. Select Customer Name and Customer Address. In this example, we want the Customer Name to be displayed before the Customer Address so make sure the Customer Name is displayed in the list above the Customer Address.
- Repeat these steps for the components of the Inventories Savings and Mortgage accounts.
Configure the Inventory Items
The final step of the Document Inventory configuration is to add the Inventory Items to each Inventory.
Add Inventory Items to the Account Number Inventory
- Expand the Inventory Current and select Account Number Inventory. Click the New Item button. The New Document Inventory Item window is displayed.
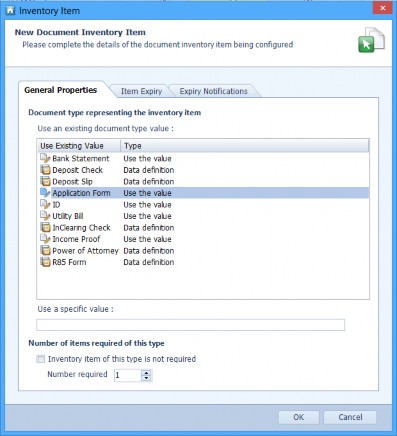
- In the Data Definition created for the application form, the Document Type was set to Application Form. Therefore, select Application Form from the list.
- Only one application form is required, so leave Number of items required on this type set to 1.
- Select the Item Expiry tab.
- The application form expires 6 months after it is submitted to the bank. The Document Date for the Data Definition DI : Application Form was set to the date the application form was stored in DataStoreDSX. Therefore, set the Item expires to 6 Month(s) after the Document Date and time.
- In this example, do not change any settings for the Members Who Can Override Expiry.
- In this example, do not change any settings for the Expiry Notifications.
- Click OK to close the window.
Add Inventory Items to the Customer Number Inventory
- With the Inventory Current expanded, select Customer Number Inventory. Click the New Item button. The New Document Inventory Item window is displayed.
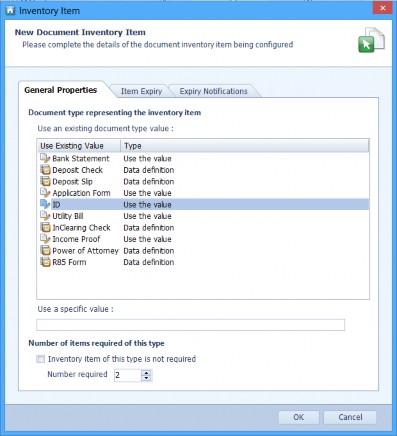
- The Document type representing the inventory item field identifies the Document Type that is required. In the Data Definition created for passports, driving licences and birth certificates, the Document Type was set to ID. Therefore, select ID.
- Two forms of ID are required, so set the Number of items required on this type set to 2.
Note: Select the option Inventory item of this type is not required when items are optional. That is, the Document Inventory may be valid even when no items of this type are present.
- Select the Item Expiry tab.
- The forms of ID (passport and driving licence) expire when the expiry date is reached. The Document Date for the Data Definitions DI : Passport and DI : Driving Licence were set to the expiry dates. Therefore, set the Item expires to 0 Day(s) before the document date and time to ensure the ID expires on the same day as the expiry dates.
- In this example, do not change any settings for the Members Who Can Override Expiry.
- In this example, do not change any settings for the Expiry Notifications.
- Click OK to close the window.
- Next, add a utility bill to the Customer Number Inventory. With Customer Number Inventory selected, click the New Item button. The New Document Inventory Item window is displayed.
- In the Data Definition created for the utility bill, the Document Type was set to Utility Bill. Therefore, select Utility Bill.
- Two utility bills are required, so set Number of items required on this type set to 2.
- Select the Item Expiry tab.
- The utility bills expire when the 90 days after the utility bill was issued. The Document Date for the Data Definition DI : Utility Bill was set to the date the utility bill was issued. Therefore, set the Item expires to 90 Day(s) after the document date and time.
- In this example, do not change any settings for the Members Who Can Override Expiry.
- In this example, do not change any settings for the Expiry Notifications.
- Click OK to close the window.
Add Inventory Items to Savings and Mortgage Inventories
Repeat the steps above, adding the required documents to
- Savings
- Account Number Inventory
- Customer Number Inventory
- Mortgage
- Account Number Inventory
- Customer Number Inventory
Save the Search Template.
Set the Search Specification
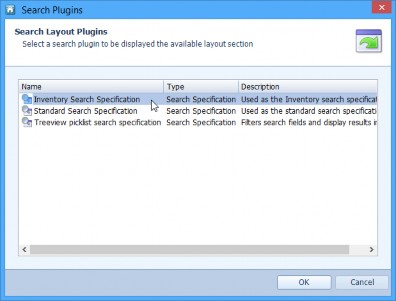
- Select the Search Specifications tab in the Search Template Editor.
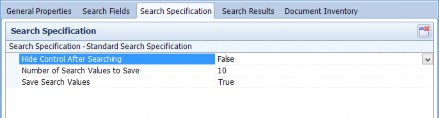
- The standard search specification is selected by default. Document Inventory requires the Document Inventory search specification. Click the red cross icon to remove the standard search specification. Then click the green + icon to add the document inventory search specification.

- The Search Plug-ins window is displayed. Select the Inventory Search Specification and click OK.
- The Inventory Search Specification can be hidden after the Searching Client user selects the required documents and clicks View Selected Documents. To do this, click on the arrow beside False and select True from the drop-down list.

- Save the Search Template. It is ready to use in Searching Client.