
Custom Fields
Administrators can add custom fields to several screens and modules in CMO. This page details how to create custom fields and assign them to various screens in CMO. Custom fields will appear on mobile devices, but cannot be created on mobile devices.
Create a New Custom Field
- Log in and navigate to the Admin module, then select Custom Fields from the sidebar menu.
- Click New.
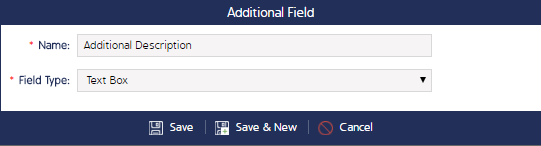
- Create a Field Name and select the field type. Depending on the field type, additional configuration might be necessary.
Note: The links at the bottom of this page describe what each Field Type is and how to configure it.
- Click Save.
- The next steps are to assign the new custom field to a module or screen. See the instructions below for further detail.
Assign the Custom Field to a Screen
Custom fields must be assigned to specific screens after they've been created.
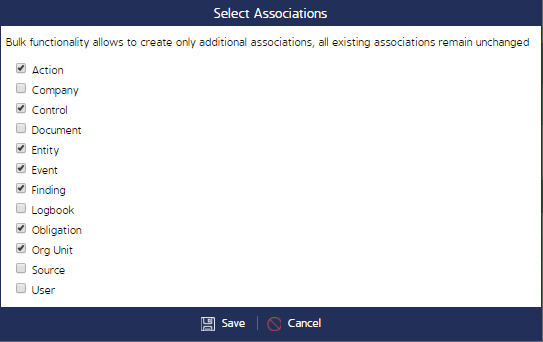
- From the Custom Field register, click the checkbox next to a custom field.
- Click the Associate icon (at the bottom of the screen or in the far right column).
- Check all of the places in CMO where you want this field to appear. Click Save when finished.
Note: One field can be assigned to multiple screens at a time.
- The last step in this process is to make the field accessible for users to use. See the instructions below for further detail.
Make the fields accessible
- After you've assigned the new field to a screen in the application, you need to make it accessible for users to interact with.
- At the top of the custom field register, click the module you assigned the field to.
If you assigned it to more than 1, you'll have to repeat this process for each module. For example, if a new field is assigned to Users and Org Units.

- Find the field you want to edit and click the Edit (pencil) icon on the far right side of the table.
- In the Editable By drop-down, select the Roles that can edit the field. Then, check or uncheck the options at the bottom of the pop-up.
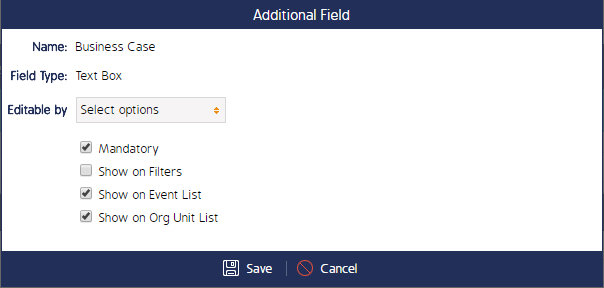
- Click Save when finished.
Editing Custom Fields
Once a custom field is created, you can only edit the name of the field. You cannot change the type of field it is.
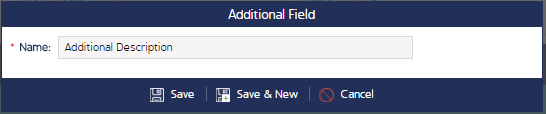
To edit a custom field's name, navigate to the Admin > Custom Fields screen and click the Edit (pencil) icon. Edit the name of the field then click Save.
Use the icons on the Custom Field register to Edit, Associate (to a module), and Delete custom fields.

There are several different options for the type of field that can be created. Each option is defined in the links below, along with specific instructions, exceptions, and caveats associated with each option.