
Expenses
Typically, expenses include the cost of the merchandise bought and the cost of the services received, for example, office supplies, transportation, phone calls, and meals.
Two types of expenses exist:
- Project-specific — Associated with a particular project.
- Global — Not associated with projects.
All expenses can post against certain accounts according to the posting criteria you set for each individual account. See Posting an Expense.
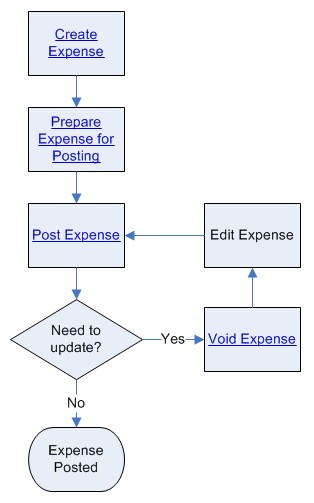
The following flowchart illustrates how you can use expenses.
Expense Entry Tool
You can also add multiple expenses at the same time. The Expense Entry Tool allows you to enter and post multiple expenses into the system, all from one screen. TeamConnect creates the corresponding individual records automatically for each expense. See Working with the Expense Entry Tool.
Expense Record Pages
Two expense-specific pages exist:
- The General page lets you enter information about the expense, such as a Description, Date, Contact who is responsible for an expensed item, Unit Price, and Quantity.
- The Transactions page displays a history of the expense's posting and voiding statuses.
Viewing Expenses
You can view expenses by browsing expense collections. Alternatively, you can search for an expense, for example, from the Custom Search page.
See Viewing Collections of Records and Searching for Specific Records for more information.
To view expenses
- Click the All button.
- Click the Expenses link under the tab bar.
The recently viewed accounts are listed in the right pane. To open an account record, click an account link in the Name column.
A summary for each expense in a collection displays in a list pane to the right. - To open an expense, in the right pane, click an expense name link.
For more information about the areas on the Expenses List page, see User Interface.
Creating or Editing an Expense
You can create or edit an expense manually using a blank expense record, or a wizard that guides you through the process step-by-step. You can also create an expense record by using an existing expense record as a template. See Copying a Record for more information.
When you purchase merchandise or services necessary for conducting your business, you enter them as expenses into TeamConnect. Once you enter expenses, you can perform the following tasks:
- Post expenses against the respective accounts.
- Track expenses by certain projects and by specific vendors.
There can only be one expense item for each expense record. To make multiple expense entries, see Working with the Expense Entry Tool.
You can create expenses in the following locations:
- On the Expenses List page.
- On a project's Expenses page.
- Using the Expense Entry Tool on the All page.
Using a Wizard
Your system administrator may provide one or more wizards to help you create new expenses using a guided, step-by-step process. A wizard may be one of the available options or the only option.
If a wizard is your only option, when you click New the wizard opens. Complete the required fields on each page, and then click Next to progress to the end of the wizard. When you click Finish at the end of the wizard, the record is available in the appropriate list view and collection. See Viewing Expenses or Viewing Collections of Records for more information.
Note: If a wizard is your only option, and you want to use a existing expense record to create a new account record, a wizard will not open. A blank expense record opens and you can complete the fields manually. See Copying a Record for more information.
Creating or Editing an Expense Manually
Use the expense General page to begin manually creating an expense record. Once you save the record, you can edit it at any time.
Note: Your company may allow you to create an expense using a wizard only, so the option to create an account manually may not be available. See Using a Wizard for more information.
To create or edit an expense manually
- Click the Finance tab.
- Click the Expenses link under the tab bar. The Expenses List page opens.
- Select one of the following options:
- To create an expense, click New.
- To edit an expense, click the Edit Record icon

 to the left of an expense.
- From the General page, the following fields from the Account Information section are required:
- Description
- Expense Date
- Expensed By
- (optional) To enter information in fields that have been created especially for your company:
- From the Category drop-down list, select an option. Inactive categories, if any, are displayed but cannot be selected.
- A Details section will display below Notes. Enter the appropriate information in the corresponding fields.
- (optional) To enter billing information:
- Enter a numeric value in the Unit Price field.
- Enter a numeric value in the Quantity field.
- For additional field descriptions, see Expense Information Section Field Descriptions table.
- Select a save option.
Expense General Page Field Descriptions
Some field descriptions that follow may not display based on system settings and your assigned rights. Field descriptions are listed in alphabetical order and may display in a different order in the application.
Expense Information Section Field Descriptions
|
Field (*=required) |
Description |
|---|---|
|
Category |
The expense type (category), such as Transportation, Meals, or Calls. An expense record can only be associated with one category. When you select a Category, additional fields that are related to this expense category may appear in a Details section. Some of these new fields may be required and must be completed before you can save the record. Categories are usually pre-defined by your system administrator. |
|
Contact |
The contact who is charging for the expense item. Typically, this contact is a vendor. This field value may be validated against the associated account's Vendor posting criterion. See Setting Transaction Posting Criteria. |
|
*Description |
The expense description. |
|
*Expensed by |
The user who is responsible for the expenditure. The default value is the creator's user name. For an existing expense, displays a link to the user's contact record. |
|
*Expense Date |
The Calendar icon allows selection of a date to associate with the expense, for example, when the expense was incurred or the date the record was made. The default date is the current date. |
|
Project |
The project associated with the account. The Find icon allows searching and selecting a project. This field value may be validated against the associated account's Project posting criteria. See Setting Transaction Posting Criteria. Note: A link to the project record displays. |
Expense Billing Information Section Field Descriptions
|
Field |
Description |
|---|---|
|
Posting Status |
The posting status for an expense can be one of the following:
|
|
Quantity |
The total quantity of expense items. |
|
Total |
This amount is automatically calculated by TeamConnect. Total = Quantity x Unit Price. |
|
Unit Price |
The price per unit (item) for the expense. |
Expense Notes Section Field Description
|
Field |
Description |
|---|---|
|
Notes |
Comments for the expense. Note: If you enter more than 250 characters without any spaces, you will need to scroll horizontally on the record to view all sections. |
Expense Access Information Section Field Descriptions
|
Field |
Description |
|---|---|
|
Created By |
The name of the user who created the expense. |
|
Created On |
The date that the expense was added to TeamConnect. |
|
Modified By |
The name of the user who last modified the expense. |
|
Modified On |
The date on which the expense was modified. |
Preparing an Expense for Posting
Before posting an expense, you must prepare the expense and the account associated with it. The following table describes requirements for posting.
|
Requirement |
Description |
|---|---|
|
The expense must be associated with an account. |
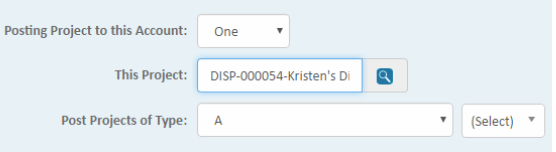
From Accounts, search for all accounts associated with the project listed on the expense. This project can be a dispute or other type of matter. If you want to post an expense to an account, it must be associated with a project. For example, enter DISP-000054 for the name value in the search. Select the account you want to post to, in this case, one with "Expenses" in the Name. For example, "Allocated - DISP-00098 - OC Expenses - 2013."
If no accounts exist for the project, create an account and specify the following fields on the Posting Criteria page.
|
|
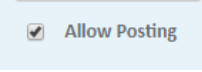
The account must allow posting. |
From the General page of the account, place a checkmark in the Allow Posting check-box if one does not exist.
|
|
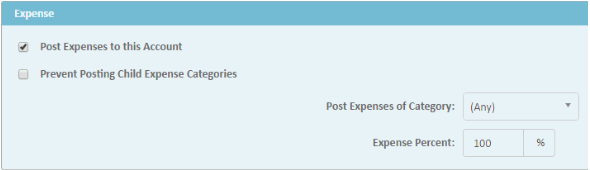
The account must allow expenses to be posted. |
|
|
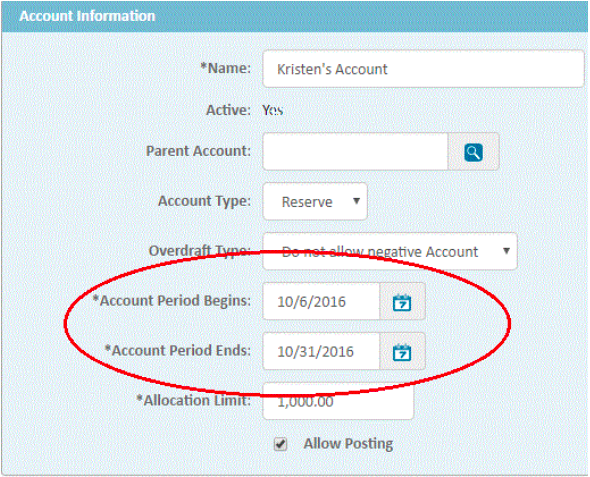
The date of the expense must be with in the account period. |
The Expense Date on the expense should be within the account period, which can be found on the General page of the associated account
|
|
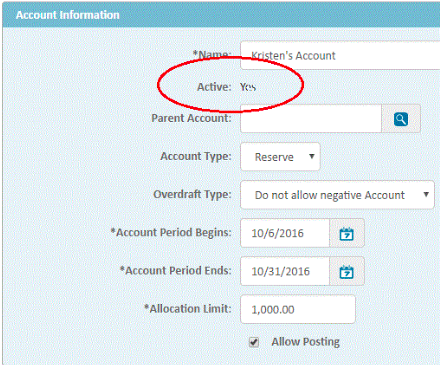
The account must be active. |
The status of the Active field on the General page of the account is Yes. See Activating or Deactivating Accounts for more information.
|
|
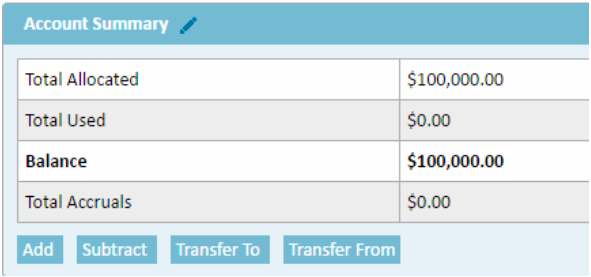
The account (or the parent's account) must have a balance of the same amount as the expense or more. |
From the Account Summary page of the account, check whether the Balance has enough funds to cover the expense. If the account has no balance, check the Account Summary page of the parent account or the parent's parent account. You can continue checking parent accounts until you find a balance. If the balance does not have enough funds, add money to one of the accounts.
|
|
The expense must include the same Involved contact that is on the account. |
From the Posting Criteria page, if the associated account specifies an Involved contact in the This Involved field, the Contact field of the expense record must include the same contact. Note: The account does not need to specify an Involved contact, even if the expense includes one.
|


Posting an Expense
When an expense posts successfully, TeamConnect debits the budget of an account associated with the expense.
Note: If TeamConnect cannot locate the appropriate budget, you may need to associate the expense with an account's budget. See Preparing an Expense for Posting.
To post an expense
- Search for an expense and open it.
- Click Post.
The account transaction displays on the Transactions page of the expense.
Note: After posting, the expense's system fields are not editable. Depending on system settings and your rights, the expense's custom fields may be editable. Click Void to void the transaction and make the system fields editable again.
Voiding Expenses
You can void an expense to clear a post transaction from the related account. The posted expense total will be credited to the related account.
To void expenses
- Search for an expense and open it.
Depending on the expense status, a Post or Void button displays on the toolbar. - Click Void.
Afterward, the corresponding account transactions will be removed from the Transactions page of the expense and associated account. - Once an expense is voided, the expense can be reposted. After the expense is voided, the expense fields can be edited. Afterward, the expense can be posted again.
Viewing Expense Transactions
Use the Transactions page to view a history of the expense posting to an account.
The Transactions page is read-only. To make changes to a posted expense, you must void the expense, modify it, and post it again. For more information, see Posting an Expense, Creating or Editing an Expense, or Voiding Expenses.
To view expense transactions
- Search for an expense and open it.
- Click Transactions in the left pane.
- Click the account name link to view the account details, if necessary.
Viewing or Creating Expense History
Use an expense's History page to create a history (containing notes about changes to the expense), view a list of history records for that expense, or perform an advanced search for a history.
For more information, see Working with Record History.
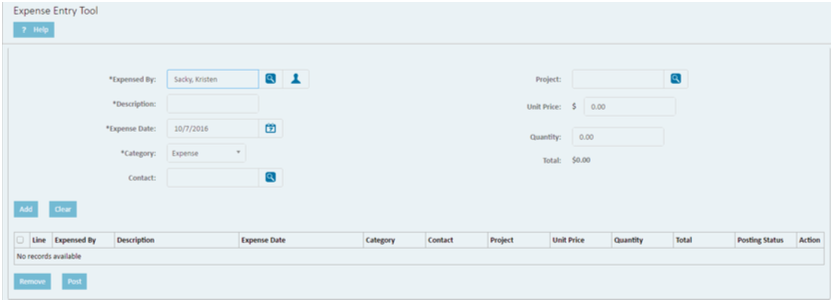
Working with the Expense Entry Tool
The Expense Entry Tool allows you to enter and post multiple expenses into the system from one screen.
Refer to the following image of the Expense Entry Tool. Click each square for more information about how you use the buttons.
Entering Expenses
The Expense Entry Tool provides a convenient way to create multiple expenses from one TeamConnect page. The Expense Entry Tool page has the standard functionality of a screen. See Working with the Expense Entry Tool for more information.
To enter expenses
- Open the Expense Entry Tool in one of the following locations:
- Click the Tools Icon in the top right corner of the screen.
Click Expense Entry Tool.
The Expense Entry Tool opens.
- Click the Tools Icon in the top right corner of the screen.
- For each expense, enter the appropriate information. See Expense Entry Tool Field Definitions for more information.
- Click Add.
- (optional) To post expenses, select the check-box to the left of the expense(s), and then click post.
Expense Entry Tool Field Descriptions
Some field descriptions that follow may not display based on system settings and your assigned rights. Field descriptions are listed in alphabetical order and may display in a different order in the application.
Expense Entry Tool Fields
|
Field (*=required) |
Description |
|---|---|
|
*Category |
The expense type (category), such as transportation, meals, or calls. |
|
Contact |
The contact who is charging for the expense item, for example, a vendor. The Find icon allows searching and selecting the contact who is charging you for the expense item. This value may be validated again an associated account's Contact posting criterion. |
|
*Description |
The expense description. Tip: To facilitate the searching process for the record, try to make the description unique and descriptive. |
|
Expense List |
The list of entered expenses. Check-boxes on the left of expense items allow selecting expenses for editing, deleting or posting. |
|
*Expensed By |
The user who is responsible for the expenditure. By default, it displays the creator's name. Note: Depending on how your version of TeamConnect is configured, this field may be a drop-down list or a Search Module. For more information, see Using Search Modules. |
|
*Expense Date |
The date when the expense was incurred or the date the record was created. The Calendar icon allows selecting the desired date for the expense. When creating an expense, the default value is the current date (when creating an expense). |
|
Post |
This button posts the selected expenses to associated accounts. See Posting an Expense for details. Note: To void a posted expense, you must open the expense record and void on the General page. See Voiding Expenses. Tip: Click the corresponding expense link in the displayed list to open its General page. |
|
Posting Status |
The posting status for an expense can be one of the following, depending on whether you clicked the Post button or not:
|
|
Project |
The project associated with the expense. The Find icon allows searching and selecting the appropriate project. This value may be validated against an associated account's Project posting criterion. |
|
Quantity |
The total quantity of expense items. |
|
Total |
This amount is automatically calculated by Team Connect: Total = Unit Price x Quantity. |
|
Unit Price |
The price per unit (item) for expense item. |
Copying Expenses
The Expense Entry Tool provides a convenient way to create additional expenses from one TeamConnect page. By copying an existing expense, you can edit necessary fields and then add the expense as a new record.
To copy expenses
- Open the Expense Entry Tool in one of the following locations:
- On an existing expense, click the Copy icon

 .
. - Edit the resulting fields as necessary.
- Click Add.
Editing Expenses
The Expense Entry Tool provides a convenient way to edit multiple expenses from one TeamConnect page.
To edit expenses
- Open the Expense Entry Tool:.
- On the table of existing expenses, under the Action column, click the Edit icon

 next to the expense to edit.
 - Make changes to fields described in Expense Entry Tool Field Definitions.
- Click OK for each updated expense.
Posting Expenses
The Expense Entry Tool provides a convenient way to post multiple expenses from one TeamConnect page.
To post expenses
- Open the Expense Entry Tool:
- To post all expenses, select the top check-box, or select the check-boxes for expenses to post.
- Click Post.
- Afterward, the corresponding account transactions will display on the Transactions page of the expense and associated account.
Deleting Expenses
The Expense Entry Tool provides a convenient way to delete multiple expenses from one TeamConnect page.
To delete expenses
- Open the Expense Entry Tool:
- To delete expenses you have created with this tool, select the top check-box or select individual check-boxes for expenses to delete.
- Click Remove.
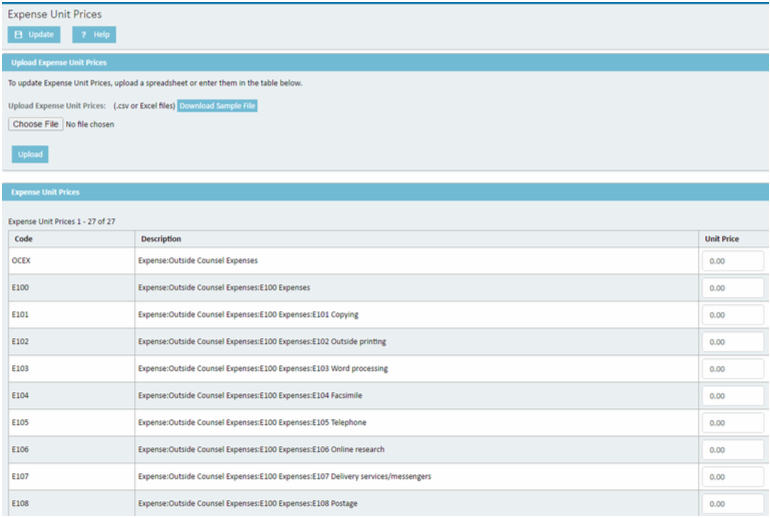
Updating Expense Unit Prices
Use the Expense Unit Prices tool to update one or more prices that are linked to active expense codes.
Note: Typically, expense codes are set up in advance and you cannot delete or change them. You cannot use this tool to add new expense codes - see your system administrator if you want to add or change codes.
You can update expense unit prices in the following ways:
- Upload a .csv or Excel file — Create a data file that contains the new prices, and then upload the file to TeamConnect.
- Enter new prices manually — Type the modified rates on the Expense Unit Prices page.
To access the Expense Unit Prices tool
- Click the Tools button in the top right corner of the page.
- Click Expense Unit Prices from the drop-down menu. The Expense Unit Prices page opens.
Creating Expense Unit Price Data Files
Before you can upload prices into TeamConnect, you must first create the file that you want to upload. You can upload an Excel spreadsheet or a .csv file.
To create an expense unit price data file
Create an Excel spreadsheet or .csv file based on the following guidelines:
- The first row must contain labels only.
- Additional rows must contain expense unit price data only
Note: TeamConnect provides a sample Excel file. To access this file, click Download Sample File on the Expense Unit Prices page. The sample file opens in Excel.
Sample Excel File
A completed expense unit price Excel file may appear as follows:

Sample .csv File
A completed expense unit price .csv file may appear as follows:
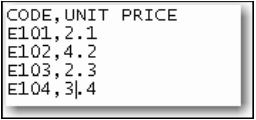
Uploading Expense Unit Price Data
Once you create the data files, you can upload them to TeamConnect.
To upload expense unit price data
- With the Expense Unit Prices page open, click Browse and locate the file that you want to upload.
- Click Upload.
The Unit Price column is updated.
Note: You can only update prices for codes that currently exist. If you try to upload prices for codes that do not exist, an error message appears and none of the unit prices are updated.
Updating Expense Unit Prices Manually
You can manually update expense unit prices on the Expense Unit Prices page.
To update expense unit prices manually
- In the Unit Price column, modify the appropriate prices.
- Click Update to save the changes.