
My Approvals
Interactive Search Views
How to configure Interactive Search View?
To configure/setup the preferred columns to the Interactive grid at My Approvals Page,
-
Login to TeamConnect.
-
Go to Setup >> Go to Object Definitions >> Invoice Object >> Search Views.
-
For the newly created search view, the interactive checkbox should be checked. The selected Search View should be Interactive only. It cannot be a combination of Interactive and any other Search Views.

- In the Search View page, click the Results Display tab.

- Enter column name (e.g., Invoice Date, Invoice Number, Requester, etc).
- Select the options in display key ().
- Any system and custom fields can be added as a column in the Result Display tab.
- Enter the order number.
- To add a column as default column, select the “Include by default” checkbox. This column is displayed in the Default columns list in the column picker panel otherwise displayed as an optional column.
Important: As we provide the functionality to add ample number of columns in TeamConnect, but the column limitation for the search view is set to 20 columns only. If the user creates a search view which exceeds the limit of 20 columns in the interactive grid and posts the invoice, an error popup display as shown in below screen capture:

Note: When a user copies a Search View from an existing Search View and uses it as an interactive, the checkbox in the "Include by default" column is initially unchecked. The user must ensure that the checkbox for the column which they want in the interactive grid as default should be checked in the “Include by default” column, otherwise there will be no column displayed in the grid as default columns and all the columns will be displayed as an optional column.
Note: When the user creates a new Search View from any existing search Search View (which is not interactive) containing "Span" column in the Result Display, the new Search View will be having the same "Span" column present. The user should ensure that the "Span" column is removed and this can be done by selecting the checkbox in General >> "Used for" section other than Interactive (as Interactive grid do not support the span anymore).
- In the Search Views page, click on the drop down of the option “Use this search view for workflow approvals” and select the newly created Interactive Search View.
- Click Save and Close.
- In the “My Approval” page, right click on the Search View section to select the Default and Optional Column.
- Hence, the interactive grid is seen as configured in the search view.
Note: Different types of records for approval are available on the “My Approval” page, but only the “invoice record” should be selected for the interactive grid.

Important Note:
When the user makes an adjustment on the rate column, it will have two values, i.e original rate (initial rate) and net rate (new rate). If the user wants to see both the initial value and the new value, then the user needs to add two different columns in the Setup >> Go to Object Definitions >> Invoice Object >> Search Views>> Result Display. Similarly, it is also applicable for unit, amount and discount.
For my Approval page, the user can have only one Search View which has been configured in setup through the “Use this search view for workflow approvals” option.
Custom field support for My Approvals
To configure/setup the custom columns to the Interactive grid at My Approvals Page,
-
Login to TeamConnect.
-
Go to Setup >> Go to Object Definitions >> Invoice Object >> Custom Fields.
-
New custom columns (e.g., list check, multi value, CF boolean) are added to the Custom Fields section as needed.
-
The Field types introduced are “Check Box”, “Multi-Value List” and “List” for the Field name “boolean_CF”, “list_cf” and “multi_list_cf” respectively.

- In the Search View section, a new interactive search view is created to view a custom interactive grid in the “My Approvals” page for the invoices.

- For the newly created search view, the interactive checkbox should be checked.

- The Result Display of the Search View should be configured with the newly created custom columns.

- Right click on the Search View section to select the Default and Optional Column.
- Hence, the interactive grid is seen as configured with the newly created custom columns (list check, multi value, CF boolean) in the Search View.
Note: Different types of records for approval are available on the “My Approval” page, but only the “invoice record” should be selected for the interactive grid.

Approving or Rejecting from My Approvals
The My Approvals page allows you to approve or reject multiple requests at once without opening each request individually. If necessary, you can also approve or rejecting requests within individual records.
To approve requests from the My Approvals page
-
Open the My Approvals page from the link in the My Approvals portal pane or by selecting Approvals from the All drop-down list on the Main menu.

- The Requests to Approve page displays with a list of requests. If necessary, select the Record drop-down and click Search to display only certain record types.
-
Click the Approve button in the Action column of the request(s) you want to approve.
-
If batch approval is enabled for your system, you can click Approve below the table to approve all the selected requests.
-
The Confirm Approval popup appears. Enter the reason for approving the request(s) in the Internal Comment field. You can enter up to 2000 characters, including spaces.
-
Click Confirm Approval.


- The Interactive grid is displayed only shows for Invoice Records.
- The below parameters are used for number range filtering to the Invoice Total (USD) column for Widget interactivity:
- Range
- >=
Invoice widget displays
All the three widgets in the grid are interactive filters.
For Invoices By Cost, displays the details with number of invoices.
- Top Vendors by Cost:
- In the Invoice of the line items, the system displays the data of the top five vendors with their respective total count. The system displays different slices for the top five vendors and the rest of the vendors are displayed in the Other slice.
- To improve the efficiency of the vendors, the top vendors are classified in different colors from largest to smallest in the Top Vendors by Cost pie-chart.
- Hover on a pie-slice, the system highlights the slice and displays a tooltip with the legend details.
- When a user clicks on any of the pie slices, the system highlights the slice and filters the grid to display only those Invoices billed by that particular Vendor.
- When a user clicks anywhere inside the widget's container, the system clears the filter and retains the original widget and grid.
Eg: For Top Vendors By Cost displays the details of Vendor, Invoice Total and Number of Invoices.
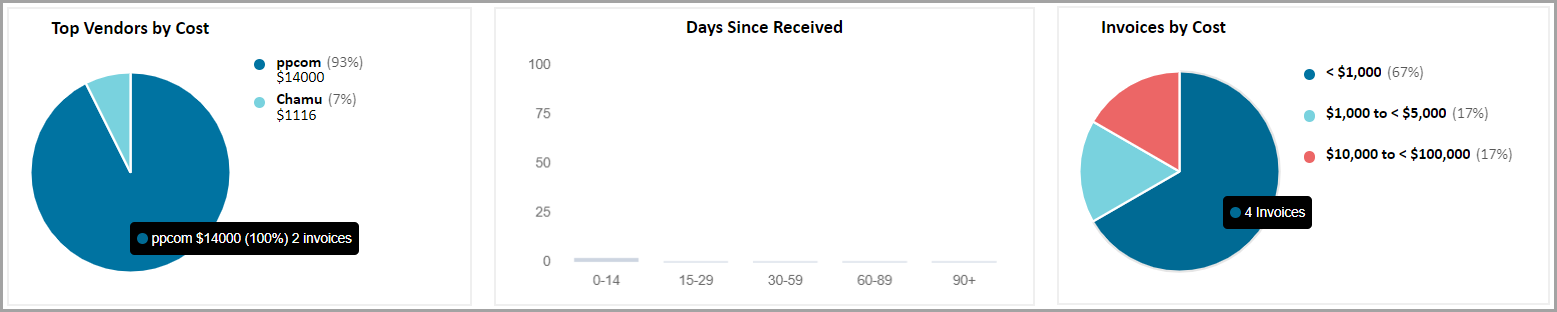
- Days Since Received" (Bar Chart)
The column displays the invoices data of Vendors to determine the age of the Invoice and also this widget is inter-dependent on data in the grid. The data in this widget is interactive based on the days selected. When the user selects the specified date range, the system displays the data related to the selected date range in the widget and the in grid as well.
Days Since Received (bar chart) is represented in the Bar chart as follows:
- X - Axis represent the days range, i.e. 0 - 14 days /15 - 29 days /30 - 59 days /60 - 90 days and 90+ days
- This widget accommodates low number invoices as well (<100). By default, the values on the Y-Axis are 1,2,3,4.
- The values on the Y-axis of the graph changes to a maximum value of the nearest Higher multiple of 4 sets as the topmost value on the Y-axis (if any of the sections in the bar graph has a value of more than 4 when the Max value is divided by 4.
- When a user clicks on any of the sections in the widget, the filter applies in the below grid and dynamically changes with the Maximum value being the Higher Nearest multiple of 4 for the selected range.

- Invoices By Cost
- Displays the invoices by its cost. In the grid, the Invoices for the widget are interactive filters.
- Hover on a pie-slice, the system highlights the slice and displays a tooltip with the legend details.
- When a user clicks on any of the pie slices, the system highlights the slice and filters the grid to display the Invoice Total (USD).
- When a user clicks anywhere inside the widget's container, the system clears the filter and retains the original widget and grid.
- The system displays the values in system currency and the symbol to match system currency:
- < $1,000
- $1,000 to < $5,000
- $5,000 to < $10,000
- $10,000 to < $100,000
- = $100,000
Note: Above values will be displayed for the user having TCE 6.3.7 version. After TCE 7.0 update, below are the values displayed in system currency and the symbol to match system currency:
- < $1,000
- $1,000 to < $5,000
- $5,000 to < $10,000
- $10,000 to < $100,000
- $100,000
The Legend is represented right side of the Pie chart.
Interactive Grid
The new Interactive grid consists of the following Column categories:
- Fixed Column
- Check Box: It is used to select single or multiple invoices on selecting the checkboxes. To select all the invoices in the grid, click on the top-most checkbox in the column header.
- Peek in: Displays the expand/collapse icon with the following line item data:
- Item
- Flag
- Date (Displays Line Item date.)
- Type (Displays type of the record)
- Category
- Timekeeper (Display's Time Keeper’s name with hyperlink. When clicked on the name hyperlink, the user is redirected to the Contact page.)
- Original Total
- Total (The order of the data in the “Total” column is in descending order)
- Warnings
- Description
- Display the Date range (start & end date) of Invoice Line Items before the View All hyperlink (navigates to invoice page when click on the hyperlink) in Peek view. The date format is configured in the backend.

- Action: Displays Approve / Reject status of an individual Invoice.
- Approve: Submits approval for the invoice on the row for the current user. On failure, fill in the failure scenario here.
- Reject: Submits a rejection for the invoice on the row for the current user. On failure, fill in the failure scenario here.
- Default Column
- Invoice: Displays the invoice number (alphanumeric) with a hyperlink to that invoice.
- Matter: Displays the matter name with a hyperlink. "Multiple Matters" text is displayed for multiple Matters without hyperlinks.
- Vendor: Displays the vendor name with a relevant icon, with a hyperlink to that contact.
- Invoice Total (USD): Displays the invoice total in USD as system currency without hyperlink.
- Line Items: Displays the count of line items in that invoice.
- Request: Displays the trigger event of request. For example: "Post Invoice for 150.00 USD".
- Requester: Displays the user name of the requester with a hyperlink to the contact.
- Approval Days Left: Displays the number of days left before the due date as per the "Approval Time Limit" that is configured in the rules in Setup.
- Date Received: Displays the received date of an invoice.
Important: We recommend using "Net Invoice Total" column overall as that will be helpful in sorting numerically vs the "Request" column which sorts alphabetically and wouldn't be good for sorting currency/numbers.
- Optional Column
- No. of Warnings: Displays the count of total warnings in the invoice.
- Last Approver: Displays the name of the last/previous approver in the invoice's workflow with a hyperlink to the contact.
- Currency: Displays the invoice currency in USD/GBP format.
- Invoice Total (Invoice Currency): Display the total amount of the Invoice in US Dollars.
- Fee Total: Displays the total amount of the fee in the invoice.
- Expense Total: Displays the total amount of expense in the invoice.
- From Collaborati: Displays the status as Yes or No.
Note: After TCE 7.0 update, the user have the freedom to set the required system and custom fields as default or custom columns, because there is no more column categorization is set. Only the fixed columns (checkbox and peek in) remains as it is.
- Introduced in TCE 7.0
- The columns are updated with Auto-size to accommodate the correct width to be visible on the screen.
- The Sticky Horizontal Scroll bar is visible on the screen when the width of all the combined columns exceeds the size of a screen.
- Users can resize the column width.
- The system fails to display the full content after columns are resized, the Ellipsis option appears in that line item.
Several things occur after you approve a request, as described in the What Happens after You Approve or Reject table.
The grid updates and persists based on the scroll bar position without reloading the page after performing any action from the Action column.
Peek In column is configurable. An admin has privileges to provide or remove access permission to view the Peek In column in the Interactive grid to the users based on the group. On selecting/deselecting the Enable Interactive grid with Peek view for My Approvals checkbox, the system displays the Peek In column for a particular group. Go to Admin > All Users > Select Member > Group Memberships > All Rights > System Rights > View > Invoice

Column Width persistence
In TCE 7.0 PB7 and above version, when a user modifies a column width, whether it is default or optional, the column width setting is saved to the user's preference and the value is saved in the database.
- If the user changes the value, their preferences will override the default configuration and will always load with the preferred configuration. The selected view will be retained even after the user uses the filters, freeze/unfreeze, clear, rearrange column, add and remove optional column and even if the user logs out.
- If the user chooses to extend the column width beyond the grid space, the horizontal scroll will be available on every load.
- When a column is disabled in the column options, the remaining columns will still apply the user preference and will not auto-fit the grid.
Note: When the grid is not auto-fit, a white space emerges, as per the user preference described above. If the user reduces the total column width to less than the grid width, white space appears which is configured by the user.
- When a column that has not been defined by the user is enabled via user preferences, it is loaded with a default value of 200 pixels.
- The "Reset Columns" button will restore the column configuration to the default grid settings, i.e., the user preferences will be restored to auto-fit columns.
Autofit Columns
(Introduced in TCE v7.2)
The Autofit Columns feature allows users to automatically adjust the width of the Interactive Grid (IG) to fit within the available page space, without affecting their grid preferences or settings. This functionality ensures that users can quickly optimize the grid's appearance without losing any preferences they have made to column widths or layout.
Note: For the Autofit Columns Icon to display, users will need to update their locale manager file.

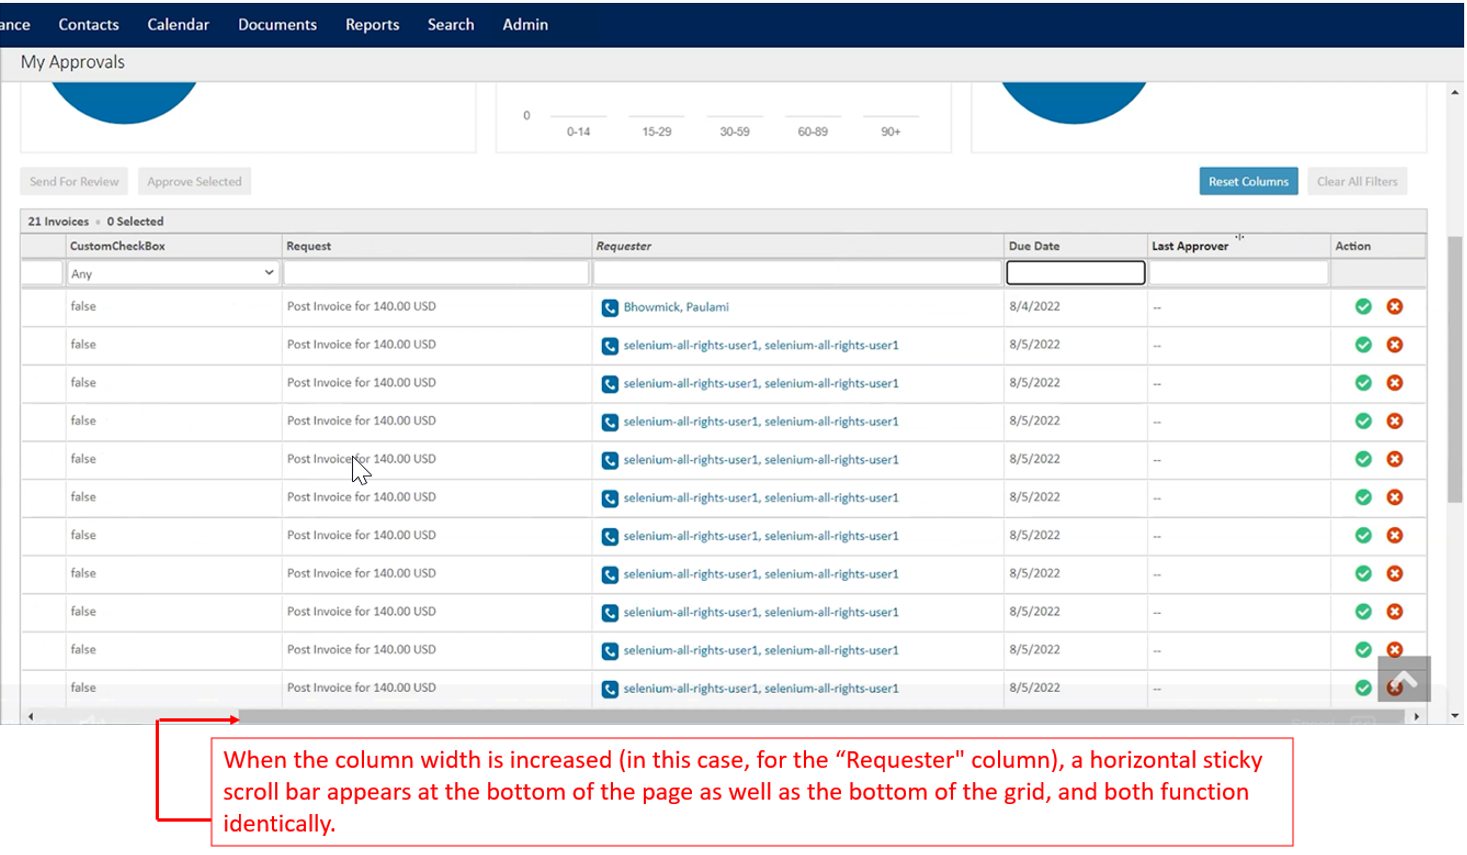
Sticky Horizontal Scroll Bar
Introduced in TCE 7.0.
Introduced Sticky horizontal scroll which displays:
- Users have the option to resize the column width in the "My Approval" page.
- If any column is manually re-sized and all the columns fail to display in the overall grid width, then a sticky horizontal scroll is visible at the My Approval page level.
- If the adjusted width of the combined columns is greater than the width of the grid, the floating horizontal scroll bar is displayed which stays with the user as they scroll vertically over the grid.
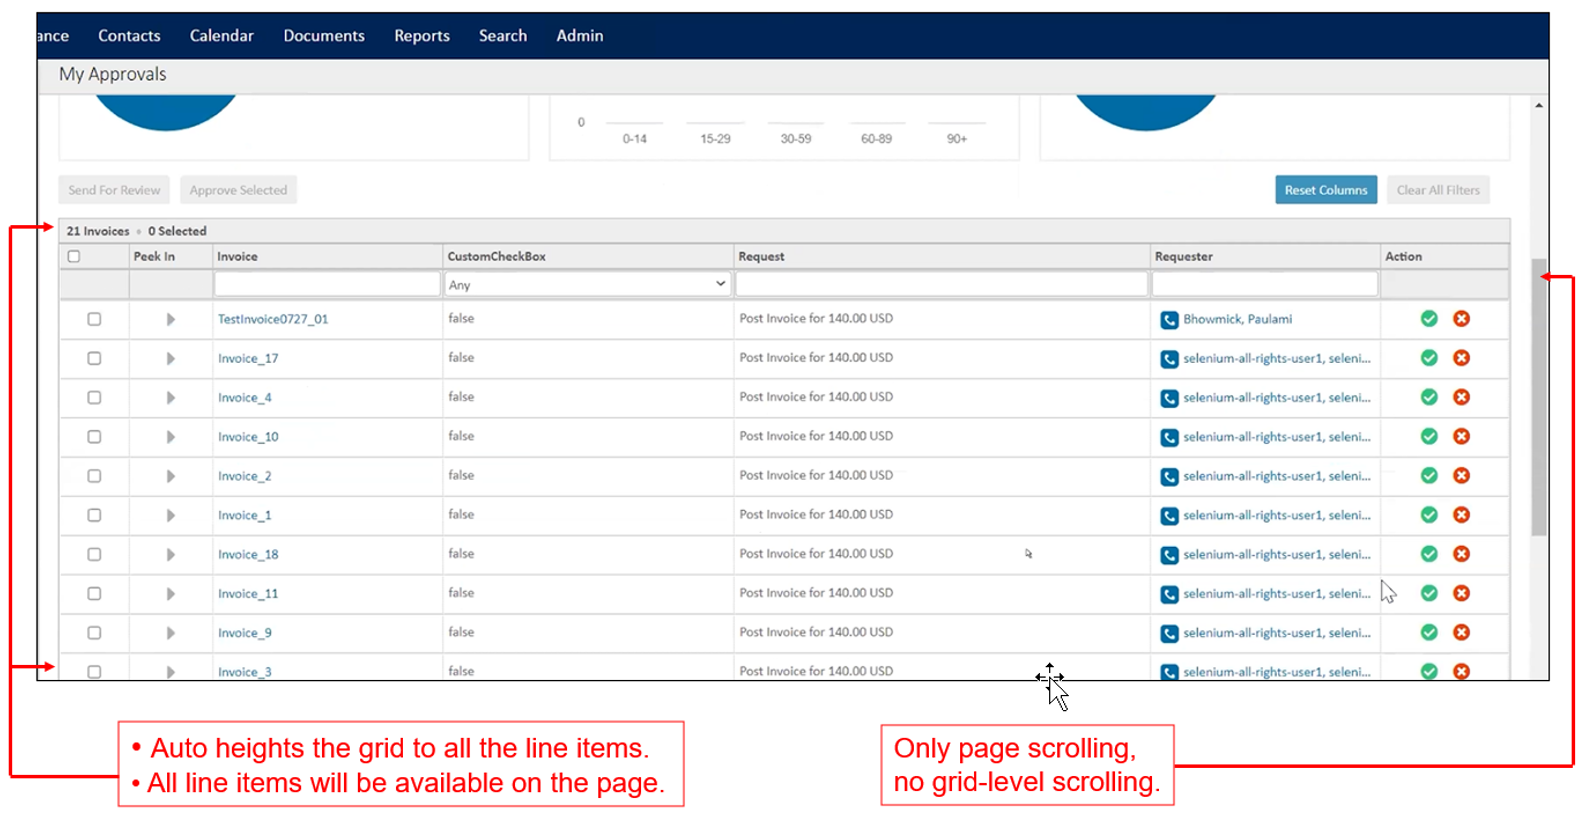
Load all Invoice line items on the page
When the user loads the specific “My Approval” page, all of the invoices are loaded on the same page. So instead of fixing the height of the grid, all the invoices on the grid will automatically load.
Regardless of how many invoices are required, it will automatically load and there will be only one level of scrolling on the page vertically/horizontally, which is called page level scrolling and there will be no secondary or tertiary level scroll within the page (no grid-level scrolling).
Additionally, starting with TCE 7.0 PB2 onwards, when the user loads a large list of invoices on the My Approvals page, an on-screen notification stating "Large approval lists will take longer to load" appears. This improves the waiting experience for the user.

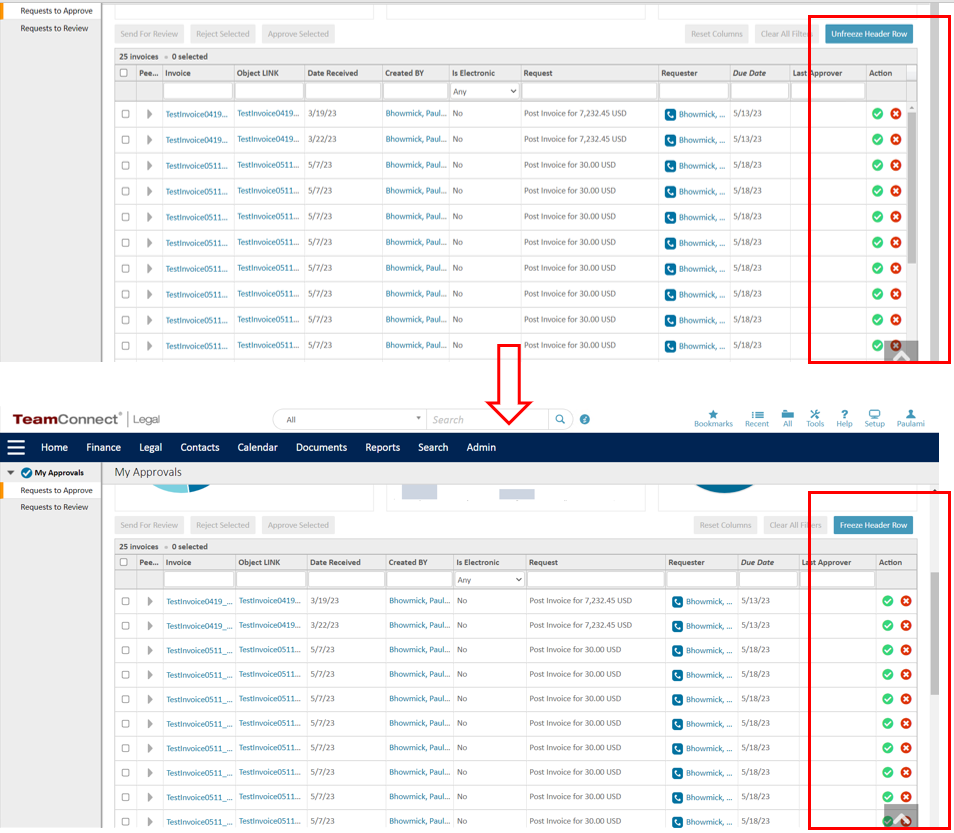
Freeze/Unfreeze Headers for My Approvals page
Introduced in TCE 7.0 PB2
When a user views a large amount of data on a single page, the header row for the My Approvals page is frozen by default, which helps the user keep track of what they are viewing. Also, the My Approval page will be equipped with dynamic sizing of the bounded box, which is dependent on user resolution, for more efficient invoice review.
- Open TeamConnect.
- Login to TeamConnect with Admin User.
- Navigate to All > Approvals. The Interactive Grid is displayed.
- The user can see that the "Unfreeze Header Row" button is displayed next to the "Clear All Filters" button.

- By default, the headers of the grid are frozen when a user scrolls.
- Once the user hover over the "Unfreeze Header Row" button, a help text is displayed as, "Unfreezing the header row loads all records at once and may reduce performance".

- When the user click on the "Unfreeze Header Row" button, the text on the button is switched to "Freeze Header Row" and all the invoices are loaded at once on the same page. Regardless of how many invoices are required, it will automatically load and there will be only one level of scrolling on the page, which is called page level scrolling and there will be no secondary or tertiary level scroll within the page (no grid-level scrolling).
NOTE: The same is true when the user switches between interactive views. Each user's preference for Freeze/Unfreeze Header Row will be saved in relation to the interactive views they have chosen.
- It should be noted that the user setting of Freeze/Unfreeze Header for My Approvals page persists for further sessions also i.e. when the user click on the "Unfreeze Header Row" button, the text on the button is switched to "Freeze Header Row" and all the invoices are loaded at once on the same page and when user logout & login again and navigate to All > Approvals, the user setting from previous session persists, i.e., text on the button is "Freeze Header Row" and all invoices are still displayed on the same page at the same time.

NOTE: When a filter is applied using Bar Graph and the user switches from Freeze Header to Unfreeze Header or vice versa, the "Clear All Filter" button will be disabled. It should be noted that the filters are reset when the user switches between the Freeze and Unfreeze options.
NOTE: When the header row is frozen, there will be visible white space in the grids if there are less than 6 or fewer line items. However, there is no visible white space when the header row is unfrozen.

Multi-List filtering
Introduced in TCE 7.0.
- The Interactive grid is provided with multi-list column filtering with smart-search option.
- Interactive grid multi-list column filtering should filter invoices that have all the comma-separated values entered in the filter criteria.
- When searching for values that are multi-select fields, the ',' must not be included as part of the Search String.
- The ',' symbol must act as a string separator for the Search criteria.
- The search strings which are separated by ',' must have the AND condition when searching for multiple strings. For Ex. if the user enters the search string as India, Singapore, then the grid must fetch results for all line items where the multi-select field has values of both India AND Singapore.
- When the text is matched to values on any invoice, the matched string must be highlighted in ‘Yellow’ color.
- The help text on the tool-tip is displayed hovering on the search field to identify that a field has the multi-search feature.


Note:The search operation will be performed only when a user enters 2 or more characters. So in the instance that the user enters first 2 letters of India as 'In', the search will be performed only for the string ‘In' & whatever invoices match it will be shown.
Important: If the user entered the third country (for example: Norway) which is no where in the list, the user should ensure that even the entries with 'India, Singapore' will not be displayed.

To approve request in Bulk
To approve a high volume of invoices in bulk (single or multiple invoices):
- Select one or more invoices from the grid.
- Click Approve Selected button.

- A pop-up Confirm Approval page appears
- Enter the reason for approving the request(s) in the Internal Comment field.
- Click Confirm Approval.

- A confirmation validation message/error message is displayed on top of the page.
To reject requests from the My Approvals page
-
Go to the My Approvals page using the link in the My Approvals portal pane on your home page or by selecting Approvals from the All drop-down list on the Main menu.
The Requests to Approve page displays with a list of requests. If necessary, select the Record drop-down and click Search to display only certain record types. - Click the Reject button in the Action column of the request(s) you want to approve.
If batch approval is enabled for your system, you can click the Reject Selected button below the table to reject all the selected requests.
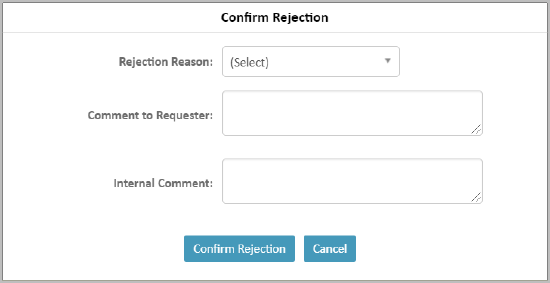
The Rejection Confirmation window displays. Depending on whether this is the final rejection of the request and whether the request is for an invoice record, you may see up to three fields: the Internal Comment field, a Rejection Reason drop-down list, and a Comments to Requestor field. - Enter the reason for rejecting the request(s) in the Internal Comment field. These comments display in the Approval History.
- If the Rejection Reason field displays, select a rejection reason.
- If the Comments to Requestor field displays, enter comments. You can enter up to 2000 characters, including spaces.
- Click Confirm Rejection.
To reject request in Bulk
To reject a high volume of invoices in bulk (single or multiple invoices):
- Select one or more invoices from the grid.
- Click Reject Selected button.

- A pop-up Confirm Rejection page appears.
- Select the Rejection Reason from the drop-down list.
- Enter reason in Comment to Requested and Internal Comment text field.
- Click Confirm Rejection.
- A confirmation validation message/error message is displayed on top of the page.
NOTE: The user should be aware that when an invoice is rejected, the updated number of invoices in the record dropdown is not updated, but rather it is displayed above the interactive grid.


To reset the columns
When an Optional Column added to the grid,
- Right click on any of the column
- Reset Columns button highlights.
- Click Reset Columns button or uncheck the checkbox from the list.

To send for Review
To sent the invoices (single or multiple invoices) for review:
- Select one or more invoices from the grid.

- Click Reject Selected button.
- A confirmation validation message/error message is displayed on top of the page.
Note: The "Send For Review" button will only work when the invoice is posted and if the user has enabled the send for review setting in the setup.
For more information, click here.
Digest Email Setting for Invoice Approval
Digest Email settings is used to set up email notification to be sent on an interval basis to remind the approver to act on a specific action, such as Approve/Overdue Disbursement.
Email reminders send the emails to the individual based on the time intervals set within the configuration. For example, the email can be sent to an employee if the invoice was submitted seven days ago and the approver has not approved it yet.
On configuring the Email Notifications settings, the user will receive an email notification with hyperlink. Clicking on the hyperlink redirects the user to the filtered view of My Approvals page.

- On clicking the hyperlinks that are connected to 9 values (number values included in the digest email), the system redirects to the My Approvals page with the relevant filters applied to the grid. The user is able to update the ranges used in their email digest. By default, Admin sets the Upper Limit and Lower Limit ranges for Pending Invoices by Date Received, Total Cost and Approval Days Left.
- Display a full list of invoices if the filtered column is not present in the grid.
NOTE:
- If the filtered column ("<name of the column field>") is not present on the grid, displays an error message on top of the grid.
- If the interactive grid is disabled, a warning message is displayed, “You do not have the new interactive grid-enabled for the invoice approvals page. To view a filtered view of invoice approvals, please contact your system administrator to enable the new interactive grid.”
- Users are redirected to the My Approvals section with the same banner message if the user does not have access to the Invoices object or there are no invoices for approvals.
- A subscribed user receives the digest email as long as they have pending Invoices.
Error Messages in Digest Email:
Below are the validation messages displayed in the email digest:
-
Displays an error message upon clicking Update, “Please input only positive integer values in the upper and lower limit fields for the configuration of ranges in the email digest”.
-
Display an error message for Date Received, “Upper limit for Pending Invoices by Date Received range for the configuration of ranges in the email digest should not be less than the lower limit”.
-
Displays an error message for empty validation, “<field name> for Pending Invoices by Date Received range is required for the configuration of ranges in the email digest”.
-
-
For Total Cost, displays an error message, “Upper limit for Pending Invoices by Total Cost range for the configuration of ranges in the email digest should not be less than the lower limit”.
-
Displays an error message for empty validation, “<field name> for Pending Invoices by Total Cost range is required for the configuration of ranges in the email digest”.
-
-
For Approval Days Left, displays an error message, “Lower limit for Pending Invoices by Approval Days Left range for the configuration of ranges in the email digest should not be less than the upper limit”.
-
Displays an error message for empty validation, “<field name> for Pending Invoices by Approval Days Left range is required for the configuration of ranges in the email digest”.
-
-
Displays an error message if either of the columns Approval Days left/Due Date or Invoice Amount or Date Received is not added on the Results display of the My Approvals, “The column <name of the column field> is not available in your interactive grid for invoice approvals. To view a filtered view of invoice approvals, please select the <name of the column field> column from the right-click column configuration menu, or contact your system administrator to enable it”.
Configurable Sections
Refer to My Approvals - Admin Guide.