
Child Workflows
The Child workflow property is a relationship-level property that lets you configure a relationship to initiate a secondary (child) workflow. You can also specify values from the parent workflow to prepopulate form fields in the child workflow.
To configure a child workflow:
- Select the workflow relationship you wish to trigger a child workflow.
- Click the
 Child workflow button in the Workflow Page toolbar.
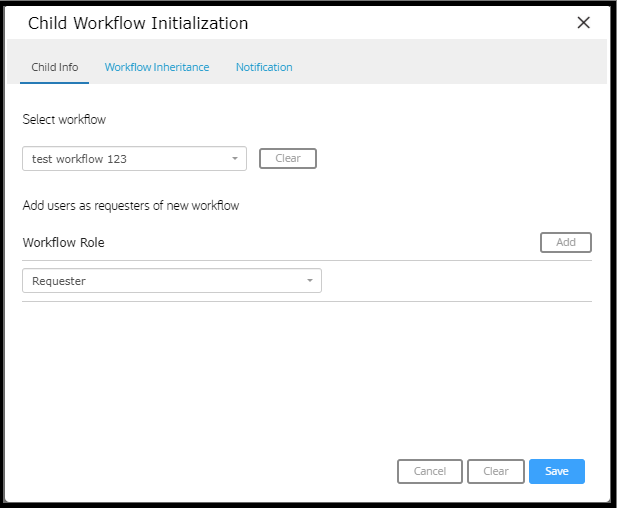
- The Child Workflow Initialization dialog displays.
- The Child Workflow Initialization dialog displays.
- Select the Child info link.
- The Child Info page displays.
- The Child Info page displays.
- Select the desired child workflow from the Select workflow menu.
- Click the Select workflow menu then enter two or more characters of the workflow name. The Select workflow menu refreshes as you type to display the workflows that match your search term.
- Select the desired workflow.
- Use the Workflow Role menu to specify the users to be designated as requester of the child workflow.
- The Workflow Role menu lists all workflow roles configured for the parent workflow. By default, the Requester option is selected in the Workflow Role menu. If desired, you can select a different workflow role.
- To add additional requesters:
- Click the Add button. An additional Workflow Roles menu displays. Select the desired workflow role.
- To delete a requester, click the
.jpg?revision=1&size=bestfit&width=11&height=11) icon for the desired requester.
icon for the desired requester.
- If desired, specify workflow field inheritance options for the child workflow.
- When all desired options have been specified, click the Save button to save the child workflow.
- The Child Workflow Initialization dialog closes, and the
.jpg?revision=1) symbol displays to the left of the relationship name to confirm configuration for triggering a child workflow.
symbol displays to the left of the relationship name to confirm configuration for triggering a child workflow.
- The Child Workflow Initialization dialog closes, and the
To configure workflow inheritance options:
NOTE
The Workflow inheritance page lets you prepopulate form fields in the child workflow with content taken from fields in the parent workflow.

- Select the Workflow inheritance link on the Child Workflow Initialization dialog.
- The Workflow Inheritance page displays.
- The Workflow Inheritance page displays.
- Click the Add button.
- The Workflow Inheritance entry fields display.
- The Workflow Inheritance entry fields display.
- Select the child workflow field you wish to prepopulate with content from the parent workflow from the Child menu.
- Select the parent workflow field containing the data to be used to prepopulate the selected child workflow field from the Parent menu.
- Repeat steps 2 through 4 to configure additional inheritance options.
- To delete an inheritance option, click the
.jpg?revision=1) icon for the desired option
icon for the desired option
- To delete an inheritance option, click the
NOTE
In the Workflow Dashboard, the status of a child workflow displays as Pending Submission