
Workflow Notifications
What are Notifications?
The Notifications property lets you configure the emails that are sent to workflow participants throughout the workflow. There are two types of notifications: Next action notifications and Informational notifications. When you create a Next action notification, you define the content of the email notification sent to the user responsible for completing the next stage of the workflow. On the other hand, Informational notifications can be sent to any participant in the workflow.
Configuring Notifications
On the top menu options, hover over  Business Automation and click Designer. To the left of the desired workflow, click the ellipses icon and click Load, then follow the steps below:
- Select the workflow relationship for which you wish to configure a notification.
- Click the
 Notifications button in the Workflow Page toolbar.
- The Workflow notifications dialog displays.
- The Workflow notifications dialog shows the Next action notification and any Informational notifications configured for the relationship
- Click the Add button to add a new Informational notification, or, click an edit link to edit the Next action notification or an existing Informational notification.
- The Workflow notifications dialog refreshes to display the notification entry fields.
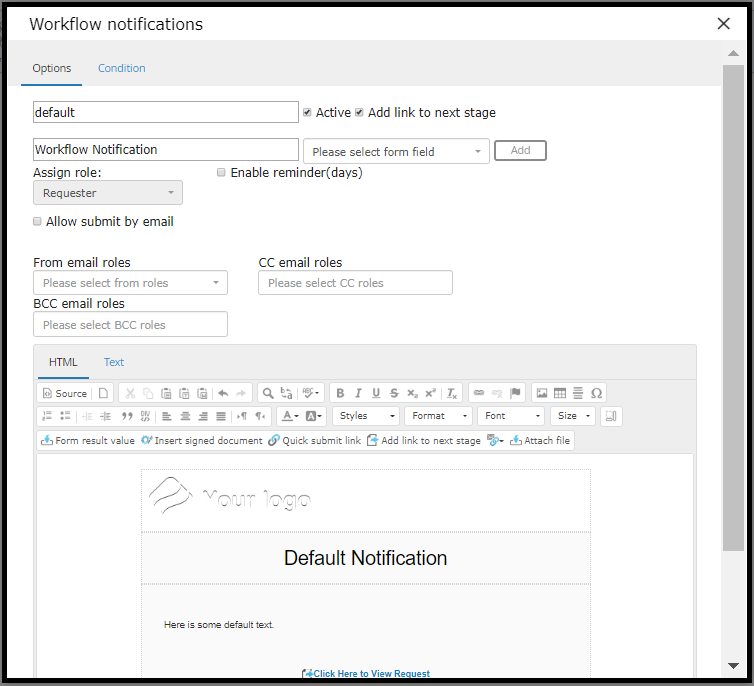
- If desired, select a template for the notification from the Load from template menu.
- The Load from template menu lists all notification templates saved for the active workflow. If no templates are associated with the active workflow, the Load from template menu is not displayed.
- Enter a name for the notification in the Please enter notification label text box.
- Enter subject line for the notification email in the Please enter notification email subject text box.
- Use the Please select form field menu to use content taken from one or more form fields in the subject line.
- The Please select form field menu lists all form fields for the associated workflow.
- Select the desired form field from the Please select form field menu, then click the Add button. The name of the selected form field (e.g., {{element 3}}) is added to the Please enter notification email subject text box at the current cursor location.
- Repeat as necessary to add additional form fields to the subject line.
- Use the Please select form field menu to use content taken from one or more form fields in the subject line.
- Select the user to receive the Informational notification from the Assign role menu.
- The Assign role menu lists all user roles defined for the associated workflow.
- NOTE: The Assign role menu is active only when you are configuring an Informational Notification. When configuring a Next action notification, the email is sent to the next participant in the workflow by default.
- Use the From email roles menu to select the role (email address) from which all emails in the workflow will appear when sent to individual users.
- For example, if you determine the From email role to be a registered user named John Smith, whose email address is john.smith@email.com, then all workflow participants will receive notifications regarding the workflow from john.smith@email.com.
- Select the users to be CC’d or BCC’d on the notification from the CC email roles and BCC email roles menus.
- Enter the notification message. Note that you can incorporate information previously submitted into a webform into your notification. To accomplish this, use the Form result value properly to populate the body of the email (see Additional Notification Features – Form Result Value for more information).
- When all notification content has been configured as desired, click the Save button to save your changes.
Additional Notification Features
Reminder
Reminders can be set for Next Action notifications and Informational notifications. Click the box next to 'Enable reminder(days)' to show the reminder day selection. A reminder notification with 'Reminder' affixed to the original subject line will be sent every # days until action is taken on the notification and/or the subsequent stage is submitted.
Note: Reminder emails are not tracked in the email logs nor do they contain the original attachments.
Allow Submit by Email
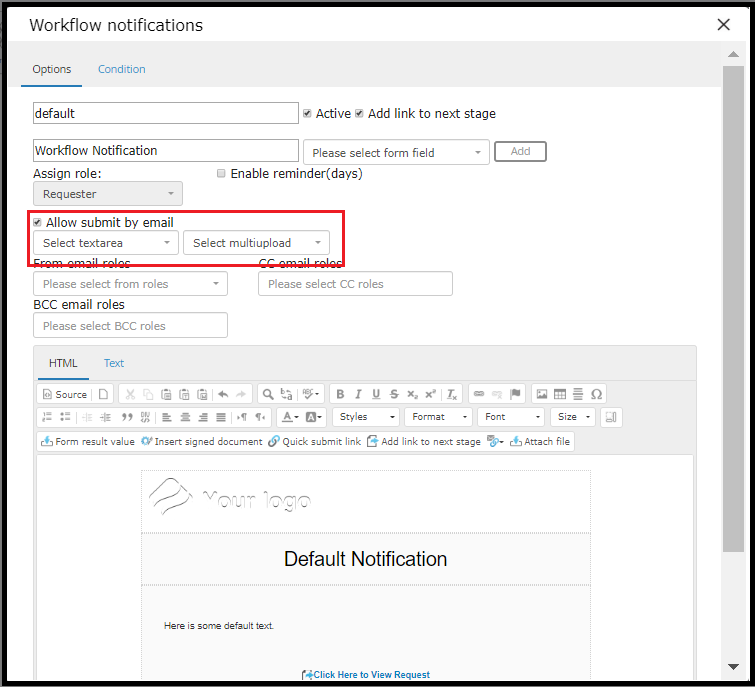
Allow Submit by Email is available for use with Next action notifications only.
The Allow submit by email property lets a participant to respond to the email, and ensures that the response is submitted into the workflow. For example, if a user responds to an email notification with an uploaded file, Allow submit by email ensures that the file can then be inserted into the workflow.
.jpg?revision=1&size=bestfit&width=464&height=54)
To allow a user to submit a response by email, select the Allow submit by email checkbox. Once the checkbox is selected, use the Select textarea and Select multiupload menus to identify the type(s) of information that can be submitted.
- If the user will submit a text response, use the Select textarea menu to define an area text box within the workflow that will map to the response. Then, when a user responds to the email notification with text, their response will be sent to the specified area text box.
- If the user will upload one or more files as a response, use the Select multiupload menu to select a multi-upload field that will receive the uploaded files.
Troubleshooting Tip -Mailboxes have to be setup for the your production and staging instances for this feature to work. One of the first things that needs to be verified if feature is not working. If not setup, hosting team will set it up.
Form Result Value
Form result value is available for use with Next action notifications and Informational notifications.
Form result value is a property in the notification HTML Builder that pulls information from the webform into your email. It can be used to show a participant exactly what has been submitted, such that the participant does not need to log into TAP to learn about what has been addressed. You can add one or more elements from the webform to your email.
To populate your email:
- Select
 Form result value to display the Add element dialog.
 - Choose the element (form field information) you would like to populate into your email from the first drop down menu.
- Choose a format for the selected element from the second dropdown menu; Add as html or Add as text.
- If you wish to populate the information without the title of the form field, select the Exclude form field title checkbox.
- Click the OK button to add the element to your email.
.jpg?revision=1&size=bestfit&width=283&height=229)
Quick Submit Links
Quick submit links allow users to quickly take an action from within the email notification. For example, if an end user is required to simply approve or deny a request, the can review the email and either approve or deny from within the email without the need to log in to TAP.
When an end user clicks a Quick submit link, the user is required to confirm his or her submission on a subsequent page. A logo appears on the confirmation page, and the custom “Thank You” page from the workflow displays after confirmation.
To configure a Quick submit link:
- Select
 Quick submit link to display the Add new action link dialog.
 - Enter a name for the Quick submit link in the Link text text box. The name should be something that the end-user will understand, such as “I approve” or “Approve.”
- The text should also map to a question that the user would otherwise answer from the webform; such as the question “Do you approve?” Select the desired source question from the Please select dropdown. Next, select the value that you wish to map to the link.
- To add an additional value, click the Add new value button.
- Click the OK button to add the link to your email.
.jpg?revision=1&size=bestfit&width=364&height=314)
Note:
- Anyone who has access to the notification containing a Quick Submit link is able to use the Quick Submit feature. Use caution when including additional recipients on a notification with Quick Submit.
| When to use Allow Submit by Email | When to use Quick Submit Links |
| There is only one following stage and the condition is default. This feature can capture a text field value and a multi-file upload file that will be sent as a part of the submission email to the WF. However there is no field to capture the condition of the stage. Hence it is recommended to use this only when there is one condition leading to the next stage. | There are multiple relationships with different conditions leading to different stages. For each quick submit link, the condition can be specified while configuring it. Hence it helps navigate to the right stage depending on the click in the email. Also it can capture any number of conditions. |
Add link to next stage
When you select  Add link to next stage, you make it possible for a participant to jump into the TAP webform by clicking the link.
- Select
 Add link to next stage to display the Link to next stage dialog.
 - Enter the text for the link (the text that you wish the user to read) in the Next stage link text text box.
- Click the OK button to add the link to your email.
- Add link to next stage can only be created in the next action notifications and its predefined. We cannot add the next stage link to the information notifications.
.jpg?revision=1&size=bestfit&width=170&height=152)
Link to the Audit Trail
You can give the user an easy way to access the Audit Trail by providing a link in the email notification. To insert this link, select the link icon, then click Audit trail link.
Email Import Link
You can give the user a means to send a response to the Communications section of the workflow by including an Email import link. When the end user clicks this link, a new email opens that will be sent directly to the Communications > Email section of the workflow, accessed in the Audit Trail.
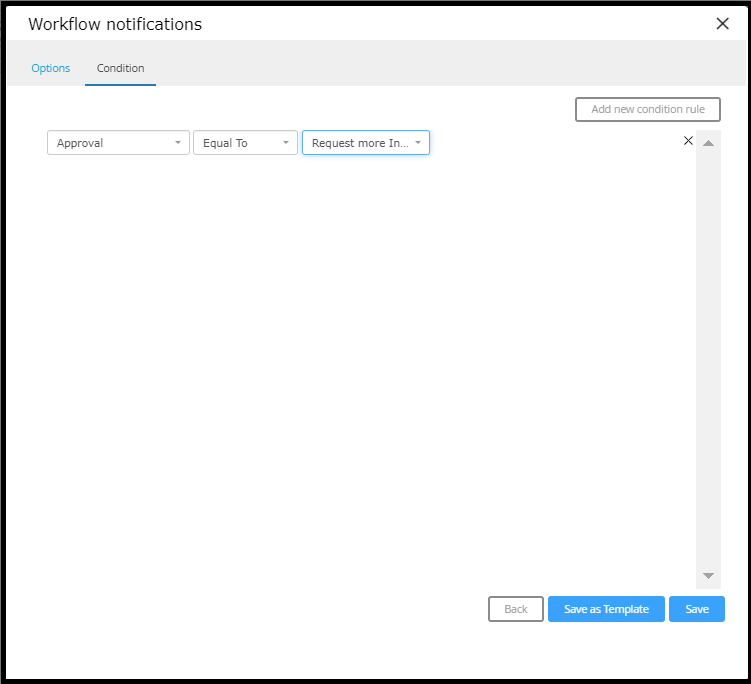
Conditions
Workflow Notifications are subject to Notification Conditions. In some cases, you may wish to send a notification only if a certain stage level condition has been met. For example, you may wish to send an information notification to a Finance Manager under the condition that someone request’s more than a certain amount of money. If a notification should only be sent if a certain condition has been met, implement a condition rule. Select the Condition tab on the Workflow notifications dialog and add the appropriate rule. Once added, this rule will ensure that only when the condition is met will the associated email notification be sent.
Stage Notifications
Stage notifications are configured in the same way that relationship notifications are configured. There are two major differences:
-
Stage level notifications must be triggered using a button form field. When configuring a stage notification, a user must link that notification to an existing button field. The notification will only be sent when that button field is triggered on the form.
-
Stage level notifications cannot contain links to the form. Since they are triggered at the stage level and not when the stage is initiated, they do not qualify as ‘next action’ notifications and so do not have the link to next stage property enabled in the html editor. Note: Collaboration stage notifications are an exception and CAN contain links to the form. These are not the same as stage level notifications though and will be covered as part of the collaboration stage documentation.
Other than that, the notifications can be configured in exactly the same way as relationship notifications.
NOTE: If you are not receiving email notifications , one of the reasons could be because of email ID bounced issues. Getting your email domain white listed would resolve that problem