
System Data
To access System Data, select the System tab.
Likelihood
To edit Likelihood descriptions, select the System tab, select System Data and select Likelihood from the menu. The values displayed here are displayed when a User is Viewing a Risk or entering a new Risk and clicks the … button to the right of the Likelihood field on the Ratings tab.

Click the Edit link text beside the Likelihood you want to edit. You can edit the Name and you can edit the Description. Click Save to save your changes, or Cancel to discard your changes. Repeat for other Likelihood descriptions, as required.
For Triage matrix you will have to swap the descriptions so that 1 is Almost certain and 5 is Rare.
Consequence
The Consequence descriptions are not normally changed. However, if you decide they should be changed, click the System tab, select System Data and then select Consequence from the menu. Click on the Select link text beside the Consequence description you want to edit.
Edit the fields, as required.
The information on this screen is displayed in tabular form when a User clicks the … button to the right of the Consequence field on the Rating tab when viewing a Risk or entering a new Risk.
If you are using Enterprise Rating or using different cut-off values across the enterprise, delete any cut-off values from this table.
For a Triage matrix, you will have to swap the descriptions so that 1 is Catastrophic and 5 is Insignificant.
Up to 13 aspects of Consequence are provided (for example, on the screen above, these are: Health & safety, Financial, Customers, Infrastructure and so on). These labels can be renamed. Select the System tab, select System Data and select Consequence from the menu. Click the Rename Consequence Labels button.
Caution: Before you rename any Labels, create a backup of the database.

For each Label you want to change, enter a new Label in the second text box and then click Go for that row. Continue until you have renamed all the Consequence Labels you want to change.
Consequence Factor Setup
It is possible to create Risk Type Factors for the inherent (assessed) Consequence ratings. Instead of entering a single value for the Consequence ratings, you can enter several. When several values are entered, the highest rating is then used. (See “Using Likelihood And Consequence Factors” on page 64 on how to use Consequence and Likelihood factors once they have been configured.)
There are two ways to configure Consequence Factors: automatically or manually. To configure Consequence Factors automatically, see “Automatic Consequence Factor Setup” below. To configure Consequence Factors manually, see “Manually Create Consequence Factors” on page 64.
Automatic Consequence Factor Setup
Consequence Factors can be created automatically from the Consequence details. See “Consequence” on page 61 for more information on the Consequence details.
On the System tab, select System Data and select Consequence Factor Setup from the menu.
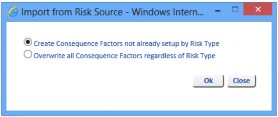
- Select Create Consequence Factors not already setup by Risk Type to create Consequence values for Risk Types which have not already had values configured.
- Select Overwrite all Consequence Factors regardless of Risk Type to create Consequence values for all Risk Types, overwriting any Consequence values already created.
A dialog is displayed when the Consequence Factors have been created.
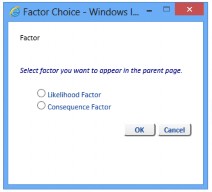
To see the Consequence Factors which have been created, click the Manage tab, select Reference Data and select Risk Types from the menu. Click on the Factors link text beside the Risk Type for which you want to review and select Consequence Factor from the dialog. In this example, the Risk Type Human Failure is selected. The Consequence Factors which were created automatically, are displayed.

Manually Create Consequence Factors
To create Likelihood and Consequence Factors manually, select the Manage tab, select Reference Data and select Risk Types from the menu.
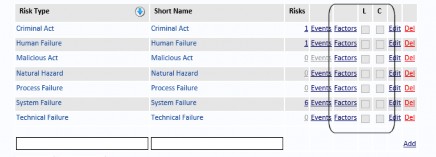
Click the Factors link text next to the appropriate Risk Type (for example, Criminal Act) and select Consequence Factor.
By default, there are no Consequence Factors configured.
Click the Add Factor button to configure the factors, for the selected Risk Type (Criminal Act in this example). Enter a name for the factor (Financial, in this example) and descriptive text for each of the ratings: Very High, High, Medium, Low and Very Low.

Repeat these steps to add as many other Factors as required.
Then repeat these steps for other Risk Types for which you want to create Consequence Factors.
Using Likelihood And Consequence Factors
When Likelihood and/or Consequence Factors have been configured, (Factors) appears beside the Likelihood and/or Consequence fields (on the Rating tab of the Risk Form). Click (Factors) to open the Formula table. Enter Rating values for each of the configured Factors. Click the Recalculate Formula button to calculate the Rating. The highest entered Rating is used. Click the Use Rating button to populate the Likelihood or Consequence field with the calculated value.
Rating
To edit the Risk Rating definitions, select the System tab, select System Data and select Rating from the menu.
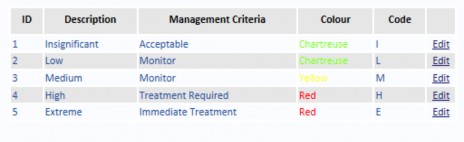
This information is included in a table which is displayed when the … button is clicked to the right of the Rating field when a Risk is viewed or a new Risk is entered.
The ID cannot be changed. (The ID is displayed as Code when the … button is clicked to the right of the Rating field when a Risk is viewed or a new Risk is entered.)
The Description can be changed. (The Description is displayed as the Risk Rating when the … button is clicked to the right of the Rating field when a Risk is viewed or a new Risk is entered.)
The Management Criteria can be edited. (The Management Criteria is displayed as the Rating when the … button is clicked to the right of the Rating field when a Risk is viewed or a new Risk is entered.)
You can change the Colour associated with each Risk Rating. This colour is used when results are returned from a Risk Search and the SART columns are displayed. It is also used in matrices and charts.
For a Triage matrix you will have to swap the descriptions so that 1 is Extreme and 5 is Negligible. For a 4-level Triage matrix, make sure there are just entries for IDs 1-4, going from Extreme to Low.
Willingness
To edit the Willingness definition, select the System tab, select System Data and select Willingness from the drop-down menu.
To change a Willingness Name, select Edit next to the one you want to alter. You are now able to change the name field.
When you have finished typing the new name, select Save to keep the change or Cancel to revert back to the current name.
Note: The Willingness numerical value in the left column cannot be changed.
Impact
To edit the Impact definition, select the System tab, select System Data and select Impact from the drop-down menu.

To change an Impact Name, select Edit adjacent to the one you want to alter. You are now able to change the name field.
When you have changed the new name, select Save to keep the change or Cancel to revert back to the current name.
Note: The Impact numerical value in the left column cannot be changed.
Appetite Matrix
The Appetite Matrix is a 4x4 matrix. That is, four levels of Willingness and four levels of Impact which then calculates an overall rating. The default levels are:
Willingness (see “Willingness” on page 65)
- Very Unwilling
- Unwilling
- Willing
- Very Willing
Impact (see “Impact” on page 66)
- Insignificant
- Minor
- Moderate
- Major
Appetite Rating is displayed as numbers and text with corresponding colour highlights. The default settings can be configured to a users requirements, see “Changing The Appetite Rating Colour” on page 68 and “Changing The Appetite Rating Name” on page 68.
Changing The Appetite Rating Level
Select Edit to the right of the Appetite Rating you want to alter. From the drop down list of list you can choose a new level to associate with the Appetite Rating.

When you have changed the Appetite Rating level, select Save to keep the change or Cancel to revert back to the previous level.
- Selecting the Edit the Willingness button will open the Willingness Definitions page, see “Willingness” on page 65.
- Selecting the Edit the Impact button will open the Impact Definitions page, see “Impact” on page 66.
- Selecting the Edit the Appetite Rating button will open the Appetite Rating Definitions page, see “Appetite Rating” on page 67.
Appetite Rating
The Appetite Rating Name and Colour can be configured from the System tab, select System Data and then select Appetite Rating from the drop-down menu.

Note: The ID numerical value in the left column cannot be changed. The Code column to the right of the Colour column is not utilised in Appetite Rating.
Changing The Appetite Rating Colour
Select Edit adjacent to the colour you want to alter. From the drop down list of colours you can choose a new colour to associate with the Appetite Rating.
Select Save to keep the change or Cancel to revert back to the previous colour.
Changing The Appetite Rating Name
Select Edit adjacent to the Name you want to alter. You are now able to change the name field.
When you have finished typing the new name, select Save to keep the change or Cancel to revert back to the current name.
Enterprise Rating
To edit the Enterprise Rating values, select the System tab, select System Data and select Enterprise Rating from the menu.
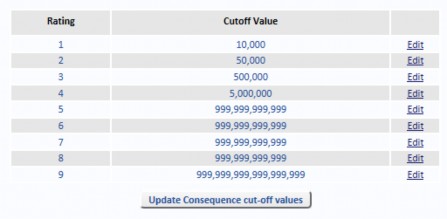
The highest level of rating must be populated with a number higher than you would ever use for Potential loss.
After updating the values, press the Update Consequence cut-off values button to update the Consequence cut-off values for the relevant levels. This means that when a User displays the Consequence pop-up when editing Risks, the value will show correctly.
For a Triage matrix, reverse the numbers and leave ratings 6-9 as zero. For a Triage matrix with 4 levels of Risk, leave ratings 5-9 as zero.
Control Effectiveness
To edit the Control Effectiveness descriptions, select the System tab, select System Data and select Control Effectiveness from the menu. (Prefix the descriptions with numbers so they sort by effectiveness.)
Select Maintain Control Effectiveness Matrix in the System Settings to automatically derive the Control Effectiveness from the Control Design and Control Implementation. When Maintain Control Effectiveness Matrix is cleared in the System Settings, the Control Effectiveness can selected from the values configured here.
Likelihood Rating Conversion
The Likelihood rating that is automatically derived is dependent on the number of Factors, and the number of Risk Rating levels.
Select the System tab, then select System Data. You can configure a table that converts factor ratings to Likelihood Ratings.
The three left columns are automatically populated from the system.
The Rare From columns are derived by counting the number of factors used.
The Administrator enters the To values for a 2-factor table, and all the From values in the 2- factor table are automatically set to the previous To value plus 1.
The To columns for 3-factor to 10-factor tables are derived by proportioning from the 2-factor table using the formula in supplied spreadsheet.
All the From values in the 3-factor to 10-factor tables are automatically set to the previous To value plus 1.
All values are rounded up so there are no decimal values.
The Administrator will be able to override the To values in the 3-factor to 10-factor tables, but provide a Reset button to reset all 3-factor to 10-factor table values.
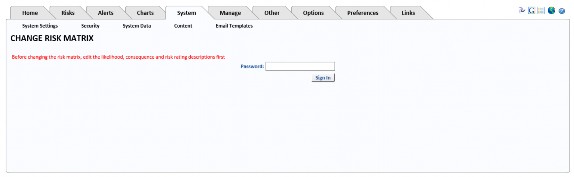
Change Matrix
Select the System tab, select System Data and select Change Matrix from the menu. Before you can access the Change Matrix page, you must first sign in. Enter the password changematrix (all one word) in the Password text box and click the Sign In button.
The default matrix is a 5x5x5 matrix. That is, five levels of Likelihood, five levels of Consequence and five levels of Risk Rating. The default levels are:
Likelihood (see “Likelihood” on page 61)
- Rare
- Unlikely
- Possible
- Likely
- Almost certain
Consequence (see “Consequence” on page 61)
- Insignificant
- Minor
- Moderate
- Major
- Critical
Rating (see “Rating” on page 65)
- Insignificant
- Low
- Medium
- High
- Extreme
Numeric Value
Select Numeric Value and click the Change Matrix button to change the settings for the Numeric Value matrix. See “Risk Matrix Options” on page 5 for more information about the selecting the type of matrix.
Edit Risk Ratings For Numeric Value Matrix
Note: This section applies only if you have selected Numeric Value for your matrix. It does not apply if you have selected a Custom or Triage matrix.
If you want to change the levels at which Risk Ratings cut in, then use Edit Risk Ratings to change the cut-off values.
Edit the Rating Level to change when a Risk Rating changes level (from Insignificant to Low, for example). The examples below show how changing these values affect the matrix.
The top settings show a Risk Rating of 0-2 is Insignificant, 3-4 is Low, 5-9 is Medium, 10-19 is High and 20 or higher is Extreme. The Risk Rating is usually calculated by multiplying the values for the Likelihood and the Consequence (see “Formula Tab” on page 35 for more information).
Activating The Matrix
If you have edited the Risk Rating levels, click the Activate the Matrix button to save your changes.
Exit all browser sessions and then restart OpRiskControl.
Select the System tab, select System Settings, then, at the bottom of any page, press Refresh System Settings.

This causes a refresh of the system settings.
Note: It is often necessary to restart IIS. If you are not able to restart IIS due to other live web applications, then Stop and Start the website itself.
To finish activating the matrix, select the Manage tab, select Risk Data and click on the option
Recalculate risk values if risk matrix altered (applies to ALL risks, ignoring filter criteria above).
Go to Dashboard to check the matrix. If the labels are not as you want them, follow instructions in “Risk Matrix Descriptions” on page 9.
Custom
Select Custom and click the Change Matrix button to change the settings for the Custom matrix. See “Risk Matrix Options” on page 5 for more information about the selecting the type of matrix.
If you select Custom or Triage and click Change Matrix, the form will expand so that you can change the intersection of Likelihood and Consequence to specify the desired Risk Rating.
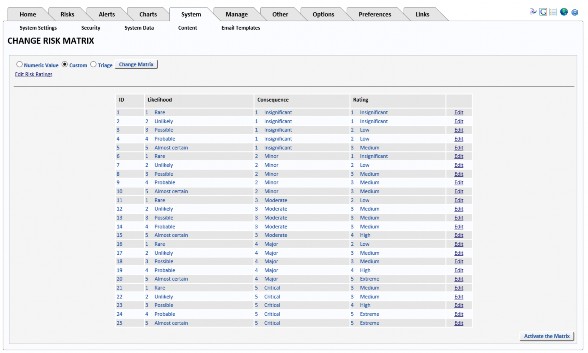
Edit the column named Rating to declare which rating you want to appear in that cell.
Triage
Select Triage and click the Change Matrix button to change the settings for the Triage matrix. See “Risk Matrix Options” on page 5 for more information about the selecting the type of matrix.
Global Translator
Note: Should you need to rename any fields once the system has gone live, please contact the Help desk for advice and guidance on how to do this.
When renaming fields, keep a note of the original name and the new name so this documentation can still be used.
Risk Status
The Risk Status short codes are:
These may be edited by selecting the System tab, selecting System Data and selecting Risk Status from the menu. Status codes that are essential to the system cannot be deleted.
Status codes can be added and deleted (unless they have been used in the system). Risks with non-system status codes are counted in the Dashboard under Other/Active and the system will not automatically process them in any way.
Structure Filter
The Structure Filter maintains the relationship between two levels of organisational structure (Division and Department).
Your database will contain separate data tables containing your organisation’s divisions and departments. Normally they are not linked in any hierarchical structure. However, your System Administrator may link them to make data entry easier.
The System Administrator may switch this filter on or off as desired using the Allow Filtering tick box at top left of the form. The System Administrator may add new relationships using the data entry fields at the bottom of this filter form.
In this example, the Division Corporate has been configured with two Departments – Corporate and Engineering. When a new Risk is created and the Division is set to Corporate, only the Departments Corporate and Engineering are available.

However, if a different Division is selected, all Departments are available because there is no other Structure defined.
Click the Add link text to create a new entry. Select the Division from the first drop-down list then select the Department from the second drop-down list. Continue until you have created the Structure you require.
Select Allow Filtering to use the Structure you have created. Clear Allow Filtering to ignore the structure you have created (that is, all Departments will be available when any Division is selected). When this option is cleared, the Structure you defined is hidden. However, it has not been deleted – it is displayed when the Allow Filtering option is selected.
Action Type
The Action Type is used to define the Action Codes which are defined by selecting the Manage tab, then selecting Reference Data and selecting Action Code from the menu. See “Action Code” on page 89 for more information.
To add a new Action Type, enter,
- a numeric value for the Order in which the new entry should appear in the list of Action Types.
- a name for the Action Type.
- a description of the Action Type.
- a description of the Time Frame. and then click the Add link text.
To delete an Action Type, click the Delete link text next to the Action Type you want to delete. You can only delete Action types you have created. System Action Types cannot be deleted. To edit the Action Type, click the Edit link text next to the Action Type you want to edit.