
System Security
The following sections describe the available RBS configuration screens. After permissions or Roles have been changed for a User, they will need to log out of Incident Manager and then log back in before the changes take effect.
Roles
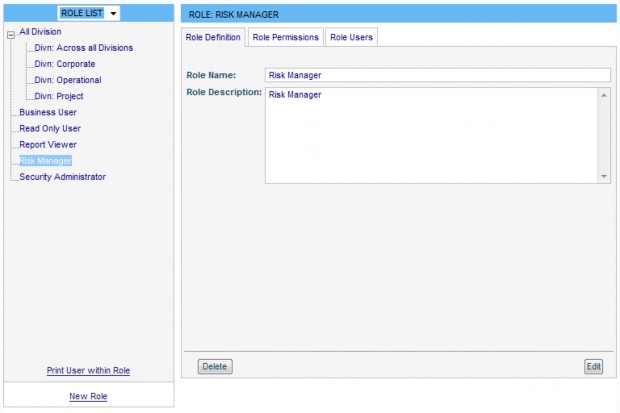
Select the System tab, then select Roles from the Security menu to display the Role List screen.
The RBS Role List screen allows the creation, navigation and maintenance of Roles. Roles are generally defined by a System Administrator, although, depending on the specific implementation of the software, it is possible for some Roles to be automatically generated by the application. For more information on automatically generating Roles, see “Example Of Row Level Security” on page 49.
A tree containing the Roles is displayed on the left. These Roles are defined by the System Administrator.
Clicking on a Role anywhere within the list displays the details of that Role in the detail section on the right side of the page.
Clicking on the New Role link text creates a new Role.

The right side of the page contains four tabs: Role Definition, Role Permissions, Role Users, Print Permission List.
Role Definition Tab
The Role Definition tab displays the following fields and buttons:
- Role Name – the name of the Role.
- Role Description – this is used as a ToolTip in other parts of RBS.
- Delete – click to delete the Role. A confirmation prompt is displayed prior to deletion.
- Edit – click to edit the Role.
This screen is also used to enter new Roles after clicking the New Role link in the Role tree on the left of the screen.
Role Permissions Tab
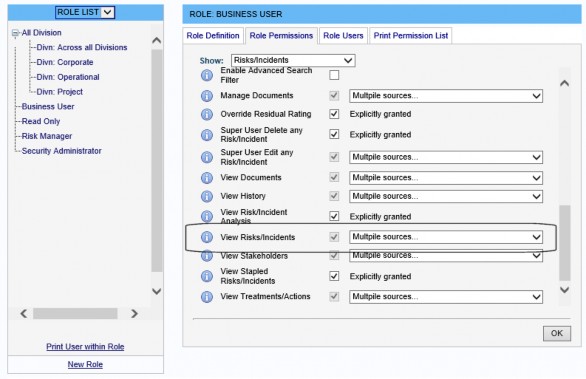
Permissions allocated to a particular Role are entered via the Role Permissions tab. Initially, the whole set of possible permissions is displayed, grouped by permission category.
The drop-down list at the top of the screen allows the view to be filtered by permission category. (Permission categories are simply convenient groupings of permissions.) By default, the filter is set to show All Permission Categories.
Each permission is displayed with an icon adjacent to it. Hovering over the icon with the mouse displays a ToolTip giving a further description of that permission.
A tick-box is displayed beside each permission. If this tick-box is selected, that particular permission is allocated to the Role. If the tick-box is cleared, the Role does not have that permission.
To allocate a Permission to a Role, click the Edit button at the bottom of the screen. Any permissions that the Role does not yet have may now be applied simply by clicking the tick- box. A tick-box is also provided by the permission category name – selecting this box simply allocates all permissions in that category to the Role. Once editing is complete, click the OK button.
Not all permissions are specifically allocated to the Role. Some permissions may already be selected because they may be triggered by other permissions which are checked (see the RBS Permissions section for further information about permission triggering). In this case, it is not possible to remove that permission. The cause of the permission must be adjusted instead.
Displayed to the right of each selected permission is a message explaining how the permission was allocated. This allows the System Administrator to determine how the permission was set. The message will be one of the following:
- Explicitly granted – The permission was allocated explicitly to this Role. The permission can hence be removed from the Role, simply by clearing the tick-box.
- Implied by permission: Permission name – Another permission allocated to the Role has triggered this permission. For instance, the permission View Departments is triggered by the permission Edit Departments, since you would need to view a department definition in order to edit it. Triggered permissions cannot be removed without removing the triggering permission. In the screen shot below, the tick-box for the View Departments is dimmed.
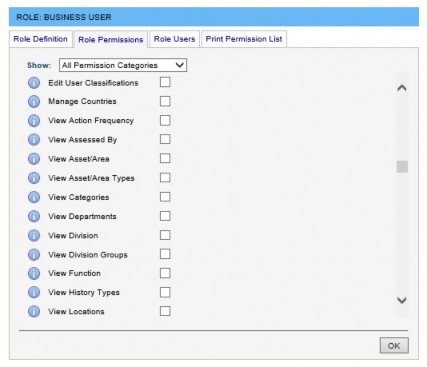
In some cases, a permission can be allocated from Multiple Sources. In this case, a drop-down list is displayed detailing each source of the permission. Selecting an item in the drop-down list navigates to the source of the permission, if applicable.
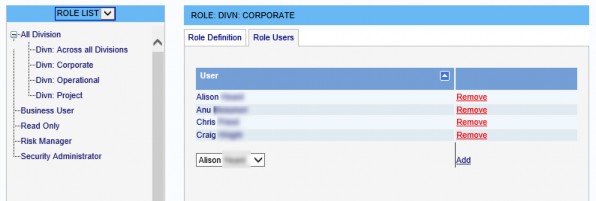
Role Users Tab
The Role Users tab displays a list of Users who have been added to the selected Role.
Users can be Added to the Role or Removed from the Role by clicking the appropriate text link.
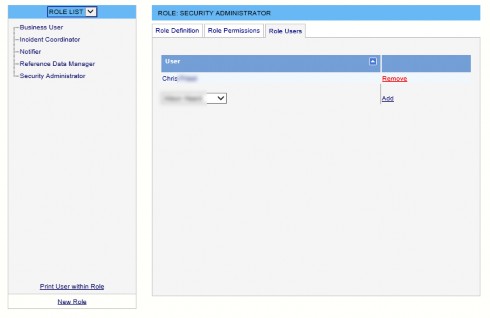
The screen shot shows one User has the Role Security Administrator.
Users
Select Users from the Security menu to display the User List page. You can navigate between Roles and Users from the drop-down list.
Select a name from the left-hand pane to see their Roles, Permissions and Details. To add a new User, go to Manage, select Users and click the New User button.
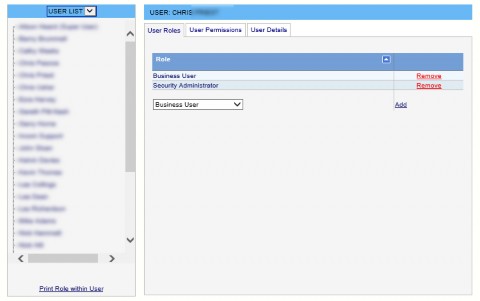
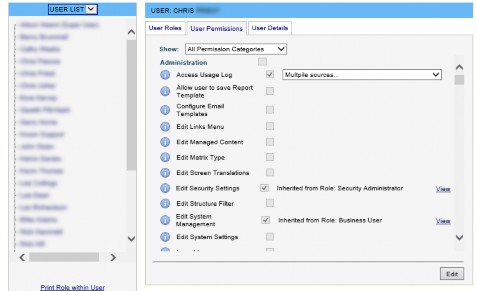
The right side of the page contains three tabs: User Roles, User Permissions and User Details.
User Roles Tab
The Roles to which a User belongs are displayed on the User Roles tab. Additional Roles can be added to the User simply by selecting a Role from the drop-down list and clicking the Add button.
The User can be removed from a Role by clicking the Remove button against that Role.
Note: This removes the User from that Role, it does not delete the Role.

User Permissions Tab
Select the System tab, select Security and select Users from the menu. The User Permissions tab is on the right.
Permissions allocated to a particular User are entered via the User Permissions tab. Initially, all the permissions are displayed, grouped by permission category.
The drop-down list at the top of the screen allows the view to be filtered by permission category. (Permission categories are simply convenient groupings of permissions.) By default, the filter is set to show All Permission Categories.
Each permission is displayed with an icon adjacent to it. Hovering over the icon with the mouse displays a ToolTip giving further description of that permission.
A tick-box is displayed beside each permission. If this tick-box is selected, that permission has been allocated to the User. If the tick-box is cleared, the User does not have that permission.
To allocate a permission explicitly to a User, click the Edit button at the bottom of the screen. Any permissions the User does not yet have may now be applied simply by selecting the tick- box. A tick-box is also provided beside the permission category name – selecting this box allocates all permissions in that category to the User. Once editing is complete, click the OK button.
Usually, permissions are not specifically allocated explicitly to the User but are inherited from their Roles. The User might have specific permissions selected because:
- They may be inherited from one or more Roles of which the User is a member.
- They may be triggered by other permissions which are checked.
If a permission is implied by either of the above scenarios, it is not possible to remove that permission. The cause of the permission must be adjusted instead.
To assist with this, displayed to the right of each permission that has been allocated is a message explaining how the permission was allocated. This allows the System Administrator to determine how the permission came to be set, and will be one of three messages:
-
Explicitly Granted – This means that the permission was actually allocated explicitly to this User. The permission can hence be removed from the User, simply by clearing the tick-box.
-
Implied by permission: Permission name – This means that another permission that the User has triggered this permission. For instance, the permission View Departments is triggered by the permission Edit Departments, since you would need to view a department definition in order to edit it. Triggered permissions cannot be removed without removing the triggering permission. As you can see, the tick-box for the View Departments is greyed out.
-
Inherited from Role: Role name – This means that a Role of which the User is a member has this permission, and the User has inherited it from the Role. In this case, a View link is provided which navigates directly to that subordinate Role for convenience.
In some cases, a permission can be allocated from Multiple Sources In this case, a drop-down list is displayed detailing each source of the permission. Selecting an item in the drop-down list navigates to the source of the permission, if applicable.
Permissions Configured
Permissions define tasks that can be performed in Incident Manager, not data that can be accessed. Permissions are global in scope, and apply regardless of Department, Division, Location and Function/Area. That is, they do not apply at database row level. Row level security is applied after permissions are checked. See “Example Of Row Level Security” on page 49 for further details.
Incident Manager checks relevant permissions prior to granting access to screens, buttons, menu items and tabs. This means that for a particular User, if there are no permissions granted to view anything on a particular page, the page does not appear as a menu option. If no menu options appear for a menu, the menu does not appear. If there are no permissions granted to view anything on a tab, the tab does not appear.
If a User does not have permission to see a page, not only will it not be present within the menu structure, but they also cannot access it via the URL or bookmarks. In these cases, an access denied message is displayed.
User Details Tab
The User Details tab provides a link to the User definition screen. Click View Application User Details to navigate to the User Details page.
System Security Settings
Select the System tab, then select the System Settings tab and select the Security tab.
Row Level Security
Customers who have purchased an RBS licence have access to four tick-boxes on the Security tab (select the System tab, select System Settings and then select the Security tab):
-
Limit Access by Division
-
Limit Access by Department
-
Limit Access by Location
-
Limit Access by Asset
-
Limit User List by Division
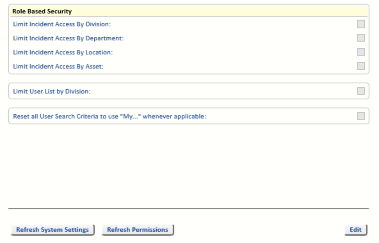
The purpose of these tick-boxes is to restrict access to Incident related information based on whether the User is in the same Division, Department, Location or Asset as the Incident itself.
To facilitate this, Incident Manager automatically creates RBS Roles to represent Divisions, Departments, Locations or Assets. These Roles are read-only, and may not be altered within RBS.
Then when a User attempts to access Incident related information, Incident Manager:
- Checks the User has the View Risks/Incidents permission (and other permissions relevant to the page) either directly or via one of the User’s Roles.
- Checks the User is a member of the Role for the Division/Department/Location/Asset to which the Incident in question belongs.
Note: While check 1 is always carried out for customers using RBS, check 2 is only carried out when the relevant tick-box in System Settings is selected. If either check fails, the User is denied access to that Incident.
This is best illustrated by example.
Example Of Row Level Security
In this example, an Incident manager wants to allocate each User to a Division, and only wants each User to view Incidents linked to their own Division.
This is achieved as follows:
- Select the System tab, select the System Settings tab and then select the Security tab.
- Click Edit. Select the Limit Incident Access by Division tick-box and clear the other three
Limit... tick-boxes. Click Save.

- Incident Manager then automatically creates a Role in RBS for each Division in Incident Manager. It conveniently groups all the new Division Roles under a parent Role called All Division.

- Ensure that each User has the View Risks/Incidents permission either directly, or indirectly via any Roles to which the User already belongs.
- Ensure that each User is also placed in the Role created for their respective Division.
- When a User attempts to view an Incident, Incident Manager first checks they have the View Risks/Incidents permission either directly or via one of their Roles. Then Incident Manager notes the Division the Incident is in and checks the User is in the Role created for that Division. If either check fails, they are denied access to that Incident.
The process is similar for limiting permissions by Location, Department and Asset.
Multiple Roles
It is possible (via Roles) for a User to be a member of more than one Division, Department, Location or Asset, with access to Incidents being restricted to, for example, three Departments or two Locations. Simply add the User to more than one of the Roles concerned.
If the Roles for Division, Location, Department or Area are not present in the RBS Role List screen, then the relevant tick-box in the System Settings screen is not checked.
Access All Areas
If a User is to have access to Incidents regardless of, for example, Location, there are two choices:
The first is to leave the Limit Incident Access by Location tick-box in System Settings cleared, thus not limiting any Users by location.
The second is to select the Limit Incident Access by Location tick-box, but add certain Users to all of the Location Roles.
The same methodology applies to Department, Division and Asset.
Troubleshooting
No Roles Appearing For Division/Department/Location/Asset
If you are trying to restrict access by Division, but there are no Roles appearing for Divisions in the Role List screen, ensure the Limit Incident Access by Division tick-box is selected within System Settings. The Division Roles will appear in the Role list under a Role called Division Roles. (Similarly for Department, Location and Asset.)
Access Not Granted
If you have changed a permission but you are still not granted access, close the browser and re-open it. Ensure that the permission is selected for the User in the RBS User List screen. If the permission is against a Role, ensure the User is a member of the Role.
Error Message
The error message You have not been assigned any [Department/Division/Location/Asset] Roles is displayed on one or more of the Incident related screens.
This message is displayed if:
- The system is set up to apply row level security by Department/Division/Location/Asset but the User has not been placed in a Role relating to the Department/Division/ Location/Asset.
- The row level security to be applied is set on the System Settings screen, and membership of Roles is set on the Role List screen or the User List screen. For example, a User who is not a member of any Location Roles is not allowed access to the Incident Search screen if they are not assigned to any Locations.