
Incident Form
Incident Manager provides a standard tabbed form and customs forms allowing administrators to create Incident forms which are suitable for your business.
Standard Form
The standard form provides over 35 fields to log an incident. However, if the incidents your company will log do not require this many fields, Custom Forms can be created to tailor the information logged to your incident management requirements (see “Custom Forms”, below).
Custom Forms
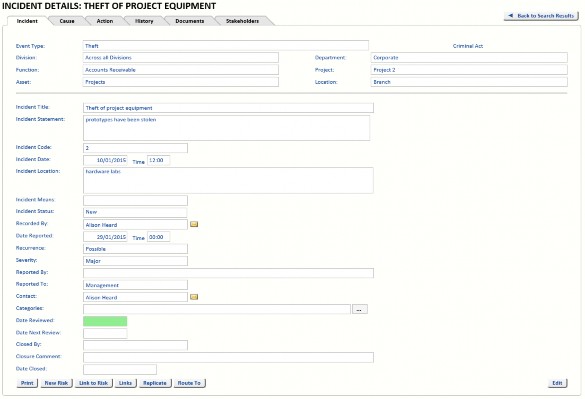
An example custom form is shown below.
To configure a custom form, select the System tab, select System Settings and then select the Workflow tab.
Click the Edit button at the bottom of the page, select Custom Forms and click the Save button. Now that Custom Forms has been enabled, you can create Custom Forms. Click the Custom Forms button. Click Add new form and then enter a name for the new custom form and a description. Click Save and then click Back to list.
Incident Level
To change the fields which are part of the new custom form, in the Incident Level column, click Edit. A dialog is displayed reminding you to make sure no one is using the form you are editing.
This screen lists all the fields which can be added to a custom form. The following fields must be present on the custom form and cannot be removed:
- Division
- Department
- Asset
- Location
- Incident Title
- Incident Statement
- Incident Date
- Project (If Show Additional Enterprise Structure is set)
- Function (If Show Additional Enterprise Structure is set)
- Recurrence
- Severity
Select a field to include it on the form, or clear the selection to remove it from the form. The Mandatory option is used to ensure that, when the field is included on the form, it must be completed before the Incident can be saved. Clear the Mandatory option if you want users to be able to save the Incident without completing the field.
The placement of the fields on the form is set by the Order field. Some fields cannot be moved, these fields have N/A in the order field. Change the values in the Order fields so the fields appear in the required order on the form. To create the custom form displayed earlier, the following settings were used.
Click Sort and Save to re-order the fields in to the requested order and to save the changes to the form.
Action Level
Click Back to List and click Edit under Action Level for the new Custom Form. This screen lists all the fields which can be added to a custom Action form.
The fields displayed on the Action form can be configured in the same way as the Incident Form. The following fields must appear on the Action form and cannot be removed.
- Action Code
- Details
- Due Date
- Completed Date
Select the fields you want to appear on the Action form for the Custom form, using the Order field to set the order the fields appear on the form. Click Sort and Save to re-order the fields in to the requested order and to save the changes to the action form.
Using A Custom Form
When the Custom Form has been designed, it must be associated with the Incident Type it can be used with. Select the Manage tab, then select Reference Data and then select Incident Types. Click on the Edit link beside the Incident Type you want to use the new Custom Form. Then select the Custom Form from the drop down list. Click the Save link to save the change.

In a similar way, link the Custom Form to other Incident Types as required.
When both tabbed forms and custom forms are used, click New Incident to create a new Incident using the standard tabbed form, or click New Incident (Custom Form) to create a new Incident using the Custom Form linked to the Incident Type selected.
Note: To use Custom Forms only, ensure every Incident Type is associated with a Custom Form before disabling Standard Forms.
