
Employment Management
Introduction
The ‘Employee Management’ application/module stores all of the organizational employee records. Each employee profile has an employee ID, First Name, Last Name, and a unique email address, etc. These records can be used as a human resources tool for data capture of employee training and competency requirements. The employee profiles also define the employment type (current or alumni), the employee’s organizational structure, portal group, the roles & responsibilities, the ACL group, etc.
These details ensure a level of access control for each employee to ensure they can only raise a certain Smartform and be notified of certain notifications if they are a part of a respective role & responsibility group. Employee profile can also be used to capture the training details of an employee with respect to CBT Courses (Computer Based Training).
Creating a New Employee
To create a new employee, we need to navigate to the Main System Navigation > Stakeholders > Employees > New Employee > New Employee Page opens in a new tab.

Next, fill in the details like Employee First name, Last name, Email, etc, to create a simple employee profile.
The ‘New Employee’ page has 4 tabs or sections capturing different sets of information.
Section 1: Basic Info
Below is a screenshot of what this section looks like. You can capture the basic details like name, email, ID, address, contact, designated manager, employment status, etc in this tab.
Note that the First name, Last name, Email fields on this page are mandatory fields and hence must be filled to create a profile.

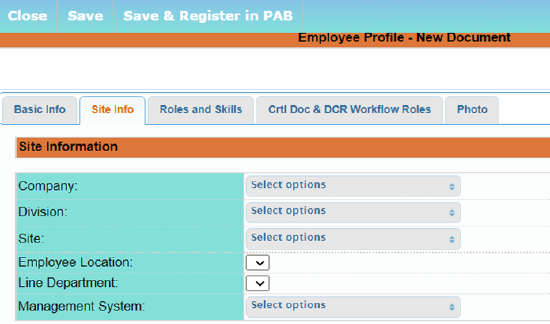
Section 2: Site Info
This captures the organizational structure information of the respective employee. This page lists the various levels of organizational structure as defined in the keyword, it could be anywhere from 3-10 levels. Below is a snip of what this page looks like:
Section 3: Roles and Skills
The main information this section captures is the ACL group, which is also a mandatory field, various roles & responsibilities that could be assigned to any employee, portal group, etc.

Section 4: Ctrl Doc & DCR Workflow roles
This section is mainly only applicable if using the ‘Workflow 2: Author Role – Reviewer (Roles)-Approver in the ‘Controlled Document workflow keyword. If not, this section can be skipped. If applicable, we just need to select the author and reviewer roles from this section.

Section 5: Photo
This is a simple section with a photo attachment of the respective employee.

Next, once all the details to be captured in the employee profile are filled in, simply click on ‘Save & Register in PAB’ or Save on the top ribbon of the page

Change Password for an Employee
To change the password of an employee we have 2 options, either request a change in their password to them by email or force change it for them in the system directly.
Request a password change
This option allows to send a request to the employee to change the password themselves with the password change link sent to their email.

Follow the steps in the snip above and hit OK, this will open a new pop-up window as shown in the snip below.

Type the security code and hit submit. This will send a password change request email to the respective employee which can be sued by them to update their password.
Force change a password
This option is to force change one or more employee’s passwords and assign them the password yourself. To do this, click on Batch update > and assign them the respective password.
Follow the steps in the snip below and hit save. Note, you can also choose to force the user to change their password when they attempt to login with the password assigned to them by ticking yes to the last option on the pop-up screens.

Update an employee profile
This functionality is used to add, remove or modify an employee’s detail for one or more fields captured in the employee profile. This can be done using 2 options.
Update a profile using search function
To do this, firstly locate the employee whose profile needs to be updated in the ‘Employee module’. This can be easily done using the ‘Search’ function in case there are too many employees in the system. See the snip below explaining the steps to use this function. You can use the respective employee's first name, last name, job title, or email to look them up.

Once the employee is located in this pop-up window using the search functionality, their profile will open in a new pop-up window. Click Edit and make the necessary changes. Once the changes are made, simply click save to update those changes in the employee address book.
Note, this option enables users to update an employee one by one. To update multiple employees, choose option 2 defined below.
Batch update
This function is used to update multiple employee profiles with the same logic. For example, if we want to up update multiple employees to have a new portal page, we can do so using the batch update using the steps explained in the snip below.

Note that the original sections are overwritten when using batch update. This means if an employee had a portal group ‘A’ assigned to him/her. When we use the batch update to make changes to this person’s profile to assign him a portal group ‘B’, then after Save, the employee will have only ‘B’ as assigned portal group and not ‘A’ and ‘B’ both. Hence, always use the original selection + the new selection when using the batch update function to update any employee detail on their respective profile.
All the changes done by the system or by an individual on an employee profile are always tracked in the audit trail so we can always find out who modified the respective profile and when.

Terminate/delete an employee or mark them as alumni
When an employee leaves the organization, we have an option to either mark them as alumni or delete them completely from the system. Marking them as alumni allows us to keep their profile in the system but does not allow them to log in to the system, deleting them removes their profile completely. One of the main differences between marking an employee as alumni or deleting them is that once deleted, all the documents that they were supposed to acknowledge are updated to remove their names from the acknowledgment in case those acknowledgments were pending.
