
INSZoom - Select Form Utility Drop Down Menu
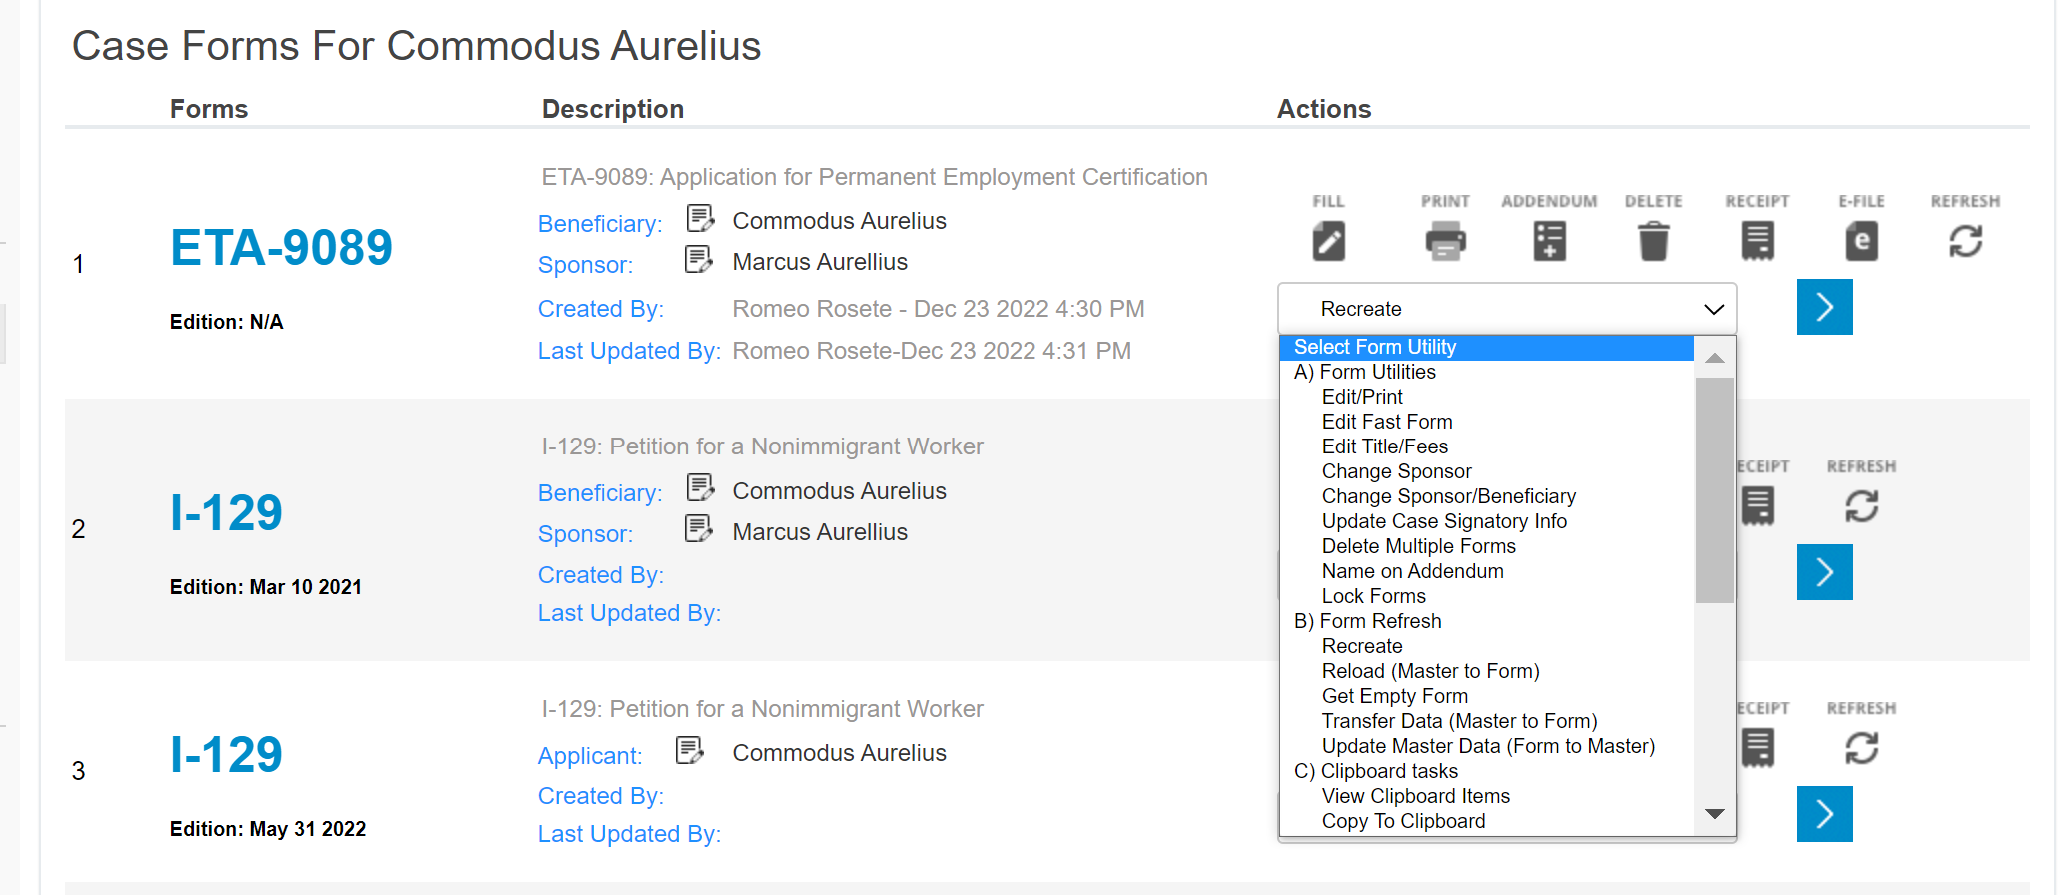
Select Form Utility drop-down menu
This article will describe the different functions from the Select Form Utility drop-down menu that appear in the forms list.
Note: Please be sure to always click the arrow after selecting one of these functions.
1. Edit/Print - You can use this option to create (open) the form to make edits and print.
2. Edit Fast Form - This will open the form in the Edit format in a new window for you to edit.
3. Edit Title/Fees - With this, you can change the title of the form and edit any related fee information
4. Change Sponsor - If you have already assigned a sponsor while creating the form and you want to change the sponsor linked to the form(s), then use this option. A pop-up window will appear. From the drop-down list, select the sponsor to whom you wish to assign the form. Then, you will have two options, as below.
Save to this form: To assign the selected sponsor to only the current form.
Save to all forms: To assign the selected sponsor to all the forms linked to the case.
Cancel: To close the window without making any changes.
5. Change Sponsor/Beneficiary - When you created the form, you assigned a beneficiary and a sponsor for this form. If you wish to change either of the two or both, choose this option. In the pop-up window, you can change the sponsor or beneficiary you have currently assigned. Click on the "Save" button.
6. Update Case Signatory Info - If you have recently changed the attorney's address or details after the form was created and you want to update the forms with the Attorney's new address, then choose this option. You can also choose this option when you have recently populated the Attorney's profile and you want to update the same in the forms. A pop-up window appears with the following options:
Update This Form: To update Attorney details only for the current form.
Update All Forms: To update Attorney details for all the forms pertaining to the case.
Cancel: To close the window without making any changes.
Go To List: To return back to the forms list.
7. Delete Multiple Forms - Use this option to delete one or more of the forms for a particular case.
8. Name on Addendum - With this function, you can change the name that appears at the end of any addendum pages. You can choose between either the sponsor's or beneficiary's names.
Select the "Copy Name" hyperlink to open a new window where you can choose the new name. You can save it for that one form or for all forms for that case.
9. Lock Forms - When you have decided that a form no longer needs to be changed/updated, you can use this option to prevent other non-super users from editing it. They will only see the option to print the form and/or add a receipt number to the form. Their Select Form Utility drop down menu will be limited as well.
10. Recreate - The existing data in the created form will be cleared and recreated with the existing master data stored on the system. This function would be used if any changes were made to a questionnaire or to the client/case profile. Any form specific field data you have entered in the forms will be lost. For example, if you update the client's Alien Number directly on the form and not on the questionnaire, it will be lost upon re-creating.
11. Reload (Master to Form) - The latest changes you have made to the master data stored on the system will overwrite the corresponding data on the form. The form will have the latest data from the master data, but the form specific data that you have entered will not be affected. A Form specific field is any field that is not stored in the INSZoom system database and entered by you in the form
Example:In the form, there are 2 fields related to a beneficiary: one for the date of birth and another for the beneficiary's age (which is form specific) You have changed the date of birth in the INSZoom system. When you use this option, only the date of birth will be affected. The age entered by you on the form will remain the same.
12. Get Empty Form - Use this option to view the empty form in PDF format. You will not be able to save any edits with this option.
13. Transfer Data (Master to Form) - This option will reload any new information that is added to the master data but presently not populated in the form. However, any changes you have made both to the master data and the form data will be retained.
Example: The form has 2 fields related to a beneficiary: one for Passport Number and another for the date of birth. Suppose, while first creating the form, only the passport number is entered into the system and the beneficiary's date of birth is missing. But later, you change the passport number and add the beneficiary's date of birth to the system. When you choose this option, only the date of birth, which you have newly added to the system, will be put on the form. The changes made to the passport number will not be updated in the form.
14. Update Master Data (Form to Master) - If you have modified the data in the form and the data you modified is different than the corresponding master data stored on the system, the "Update Master Data" option will update the master data with the modified data of the form (This will update up to 80–90% of the form data).
Example: The form has "Passport Number" as one of the data items You create the form. All the information required by the form that is stored in the system will be populated in the form. While editing the form, you changed the passport number and saved the form changes. If you wish to update the master data with the change you have made to the passport number, then you can use this option.
15. View Clipboard Items - Displays all the forms previously copied by you to the clipboard.
16. Copy to Clipboard - If you wish to copy the data of the present form to the clipboard for later use, then you can use this option. Only the forms that have been created can be copied to the clipboard. A pop-up window appears where you can change the form description and save the form to the clipboard. A confirmation message is shown.
17. Paste/Overwrite From Clipboard - Any previous form's data, which you have copied to the clipboard, can be copied to the current form. You can copy only the same type of form. Suppose you have copied to the clipboard the "I-485" form. If your current form is "AR-11", then you cannot copy the "I-485" form data to the "AR-11" form. Your current form needs to be of type "I-485."
18. Copy Old Form to New Form - You can use this function if you have already created a form and a new edition of the same form has come out. This way, you will not have to fill out the same information for the new form all over again. Link the new form, create it, and save and close. Then, from the drop-down menu next to the old form, select this function and choose the old form from which to copy. You will get a pop-up message saying the form was successfully copied.
19. Form History - Use this option to see the form history with details like Form Status and Created By.
Clicking on Edit Form Status will let you change the status to something else, like "In Progress," "Waiting for Signature," etc.
20. Emailed Forms History - Use this option to see a list of forms you emailed to the Client.
NOTE: The Edition Date reflects the Access Date set when emailing the forms.
21. View Track Changes - When you send a form to the client to fill out some required information, you want to make sure that only that information is entered/modified by the client. When the client has filled out the information, you can view the "View Track Changes Report" to cross verify the changes made by the client. This will save you time, as you don't have to look into each and every section of the form to verify the data change. This will display a report listing the changes in data made by the client.
22. Receipt Numbers - Use this option to link case receipt numbers to the forms. Select the form and which receipt number you would like to link to each form.
23. Service Center - This option will let you link a Service Center and Receipt Number in order to view processing time information.
24. District Office - Like the Service Center option, this function will let you keep track of processing dates.
25. Form and Addendum's With Signature - This option will let you print forms that have addendum's with a signature and date line at the bottom of the addendum page.
26. Form and Addendum's Without Signature - You will not get the signature and date line at the bottom of the addendum page.
27. Form With Addendum's - Full Data - This option will show the entire description, starting from what was entered on the original form rather than starting from where it had cut off.