
Getting Started with EraCLM
Overview
EraCLM is a cloud-based contract lifecycle management solution that lets you streamline the process of creating agreements and negotiating from end to end. An agreement is a contract, it binds arrangements between an agreement originator and a counterparty as to a course of action. The agreement originator creates the initial contract and negotiates with the counterparty. This article describes the UI and introduces you to the solution.
User Interface
The homepage displays the following areas:
 The navigation bar on top
  A cog, help button, and user profile on the top right
  The + New Agreement button
 Your tasks on the left panel
 Your team's agreements, records, and requests on the right panel

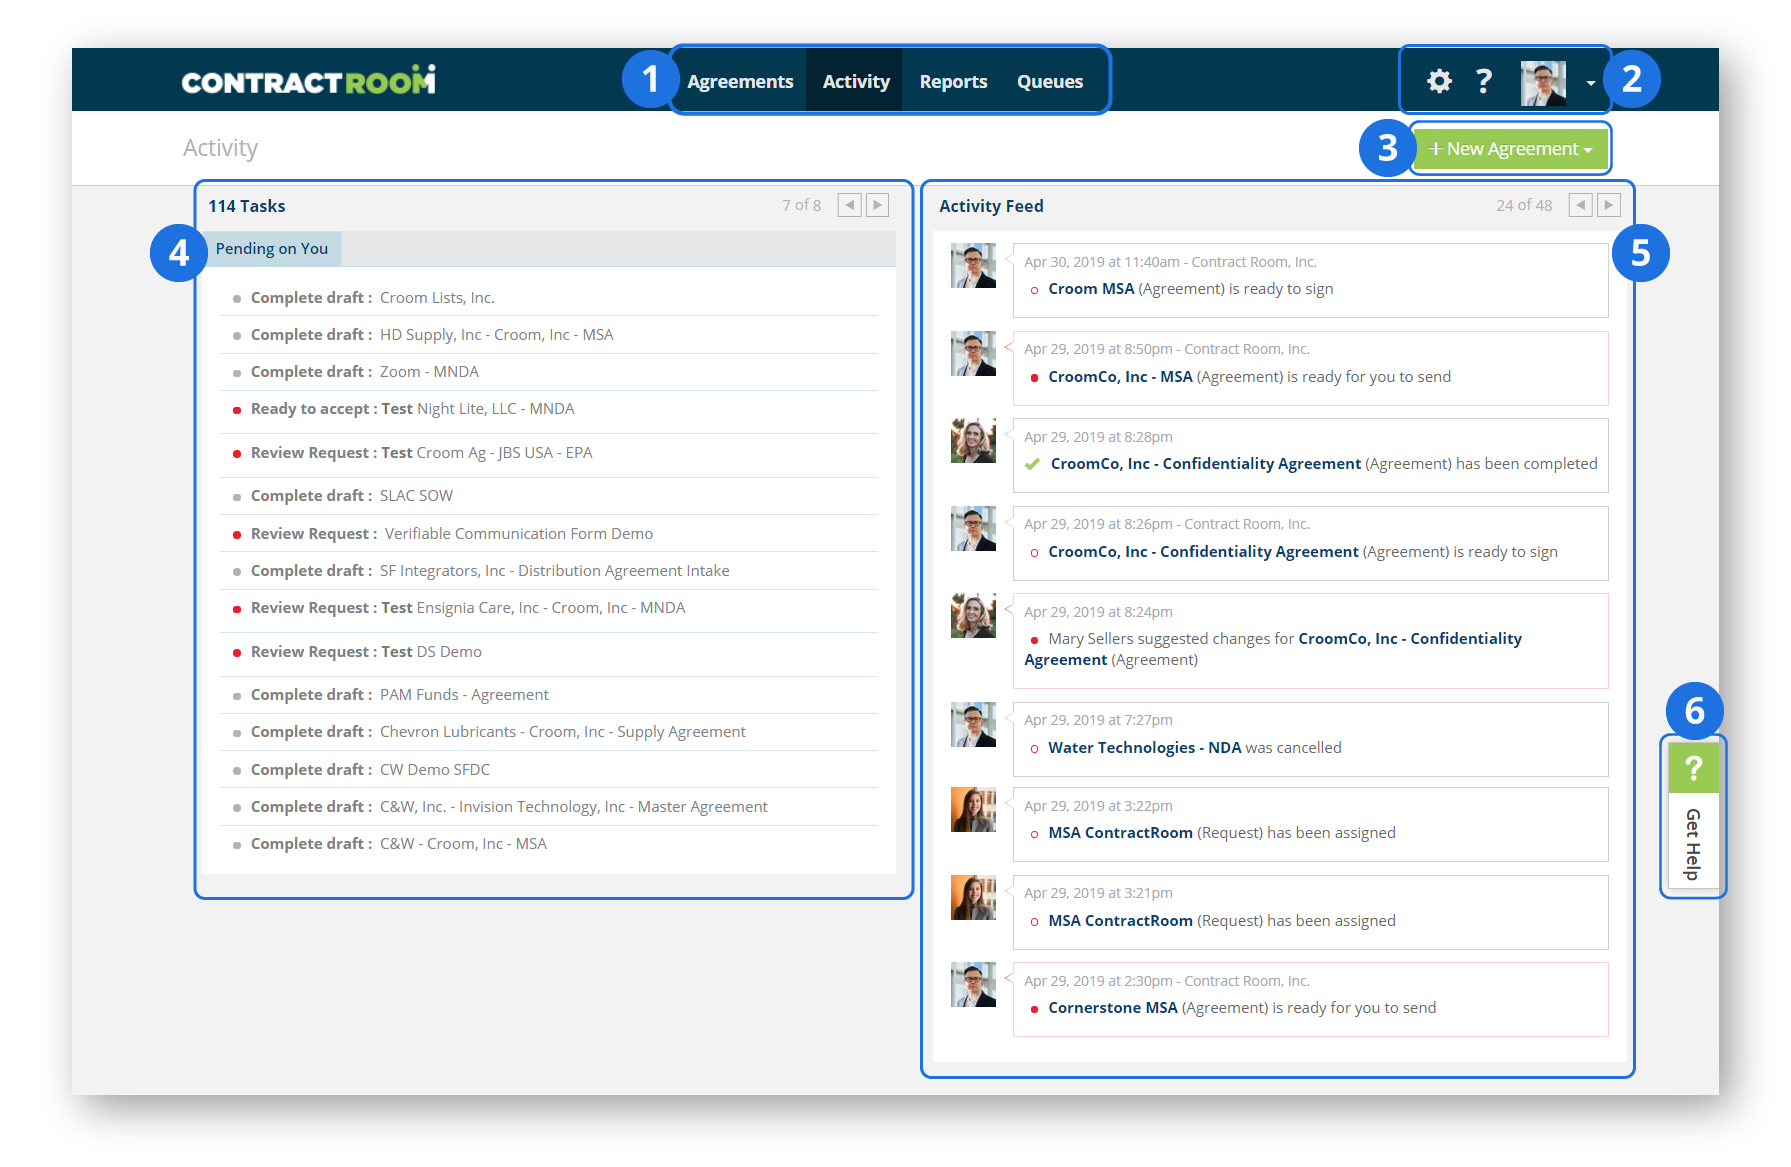
1. Navigation Bar
This section lets you access the following EraCLM features:
| Feature | Description |
| Agreements | Access the contract editor. |
| Activity | EraCLM homepage. Monitor your activity feed and your tasks. |
| Reports | Run reports of your document data. Save and load filters with your search criteria. Access your documents directly from your reports. |
| Queues | Access your queues. Queues let you create agreements based on requests and lets you approve agreements during negotiation. |
2. Settings, Help Center, and Profile
This section contains the following features:
Settings
Note: The settings menu is only available for admins.
The Settings menu ![]() contains the following options:
contains the following options:
| Option | Description |
| Admin Panel | Configure your site and add users to EraCLM. |
| Framework Builder | Create new frameworks, edit, and delete existing ones |
| Workflow Builder | Create paths for users to follow when working on a series of documents. |
| Smart Table Library | Create and configure a Smart Table. Smart tables are sets of tags that are used to connect a third-party service and enter data. |
Help Center
The Help menu ![]() contains the following options:
contains the following options:
| Option | Description |
| Help Center | Access EraCLM user guides, video materials, release notes, and other useful resources. |
| Contact Support |
Submit a ticket to support. Enter the following information:
Our support team will contact you soon. |
Profile
Profile  contains the following options:
| Option | Description |
| Profile |
|
| Logout | Log out of EraCLM |
3. New Agreement
The + New Agreement button  creates an agreement. To know more about agreements, refer to Document Types and How to Create an Agreement.
4. Tasks
Tasks are on the left pane under Activity and they consist of pending tasks to be performed on agreements, for example, send an agreement to negotiation or sign an agreement.
5. Activity Feed
The Activity Feed is on the right pane under Activity and it is a news feed. You can see the status of the agreements, if you were assigned to a team, and other actions performed on agreements by other team members.
Creating an Agreement in EraCLM
The platform allows you to create Agreements based on digital templates, named frameworks.
If you have multiple frameworks assigned to you, you can choose one as a template to generate your Document. If you have only one framework assigned, you are automatically directed to create your Agreement.
When you select a framework to work with, the system prompts you with a questionnaire if you have different Document assembly options configured. When completing the questionnaire, the system pre-fills your Agreement accordingly.
Once you log in the platform, the system displays your personal dashboard.
To create a new Agreement:
-
Click the New Agreement button next to the Activity Feed section. Select Document from the dropdown menu. The system displays the Start New Document dialog box.
Note
There are more options for Document creation. To learn more, refer to the EraCLM User Guide.
-
In the Start New Document dialog box:
- Fill the Name field.
- Add an optional description.
- From Document Source, select Use Framework to use one of your available templates to draft the Agreement.
Note
There are more options for Agreement creation. To know more, refer to the EraCLM User Guide.
- Fill the Company Name field with the name of your company.
- From Allow offline edits select Yes
Click Next to continue with the process.
-
If you have more than one framework assigned to your account, select one to work with for the new Agreement. Otherwise, you are automatically directed to the Contract Editor.
-
If the system prompts you with the questionnaire for Document assembly, answer accordingly. If not, continue to the next step.
-
In the Collaboration Settings dialog box, choose I will work alone and click Next.
-
Enter the email of your counterparty, click Next. Confirm the email, click Next. Enter the company of the counterparty who will be receiving this Agreement and click Next. The system displays the Contract Editor.
-
Review your generated Agreement, fill the term tags if applicable, and edit text from your Agreement according to your needs.
Note
When you finish drafting, the system highlights the Next icon in red (indicated with an arrow).
-
Click the Next icon. The system displays the Begin collaboration dialog box. Add a comment if needed and click Send.
After you complete these steps, the system sends the Agreement via email to the counterparty you previously designated.
Reviewing and Negotiating an Agreement as a Counterparty in EraCLM
When someone assigns you as the counterparty of an Agreement, you receive an email invitation with a link to the Document in the platform.
To review an Agreement as a counterparty:
- Follow the link inside the email received from EraCLM.
- Log in or create a EraCLM account if you don't have one.
- Now that you are logged in, the system displays the message "You have been assigned as the Controller for this collaboration." If you are the person designated to review this Agreement click the I'm the Controller button. Otherwise, click Reassign to designate the right person.
-
The system displays a preview of the Agreement. If you want to negotiate the terms in your Agreement, click Make Edits. The system displays the Contract Editor screen.
Note
If you don't want to make changes to the Agreement, click Complete and Sign to sign and accept the Agreement.
-
Accept or decline terms in tags according to your needs, edit text if needed.
- Once you're done making changes, the system highlights the Next icon. Click this icon to send back your Agreement to the originator for his review.
Once the Agreement originator agrees with your changes, you can accept the Agreement.
Reviewing the Status of your Agreement in EraCLM
EraCLM allows you to visualize the entire contracting process status.
To review the status of your Agreements:
- Click the Agreements tab on the navigation bar located on the top of the page. The system displays a list of all the Agreements you have collaborated in.
- Find the Agreement of which you want to see the status. You can manually search the Agreement on the Search bar.
- Select the Agreement. The system redirects you to the Contract Editor.
- On the toolbar, click the History icon, indicated with a small clock. Select Summary from the options displayed.
The system displays the Summary of the Agreement. If there are pending activities on you, you can proceed to take action.
After following these steps, you were able to create an Agreement as an originator, review an Agreement as a counterparty, negotiating terms, accepting an Agreement, and see the status of all your Documents. For more information on the usage of EraCLM platform, refer to the EraCLM User Guide.