
WebDAV Service Configuration
Windows 7 Pre-Requisites
Microsoft has a known WebDAV performance issue on client Windows 7 machines (which will be accessing DataStoreDSX documents via WebDAV instead of via Searching Client) which are set to automatically detect settings and which are on a network which has not been set up to use the Automatically detect policy.
To see the details of this issue, click on this link: http://support.microsoft.com/kb/2445570
Performance is greatly improved by following these steps:
- Start Internet Explorer.
- Click Tools and then click Internet Options.
- Click the Connections tab and then click LAN Settings.
- De-select the option Automatically detect settings.
- Click OK.
- To verify that performance has been improved, open the mapped web location and browse through the available folders.
WebDAV Service Configuration Settings
WebDAV is an acronym for Web-based Distributed Authoring and Versioning. It is a set of extensions to the HTTP protocol which enables users to collaboratively edit and manage files on remote web servers.
The WebDAV Service Configuration options are described in Table 41.
Table 41. Terminology: WebDAV Service Configuration Options
|
Term |
Meaning |
||
|---|---|---|---|
|
Enable WebDAV Service |
Select to enable the configured WebDAV Service. When WebDAV is enabled, users can open and edit an Office document without having to first download it from the server. |
||
|
Windows Endpoint |
|||
|
Enable Windows Endpoint |
Select to enable WebDAV for all users who log in to DataStoreDSX using Windows authentication. |
||
|
SSL |
Select to bind an SSL Certificate to the WebDAV Windows port. |
||
|
Server Name (optional) |
This is the endpoint root server address. The format of this must be a website address, for example http://machine_name. If a server name is not entered, the DataStoreDSX server name is used for the machine_name.
|
||
|
Port Number |
The port number is appended to the server address to complete the WebDAV URL. For example http://machine_name:9148. |
||
|
Forms Endpoint |
|||
|
Enable Forms Endpoint |
Select to enable WebDAV for all users who log in to DataStoreDSX using Forms authentication. |
||
|
SSL |
Select to bind an SSL Certificate to the WebDAV Forms port. |
||
|
Server Name (optional) |
This is the endpoint root server address. The format of this must be a website address, for example http://machine_name. If a server name is not entered, the DataStoreDSX server name is used for the machine_name.
|
||
|
Port Number |
The port number is appended to the server address to complete the WebDAV URL. For example http://machine_name:9149. |
||
|
File Explorer Endpoint |
|||
|
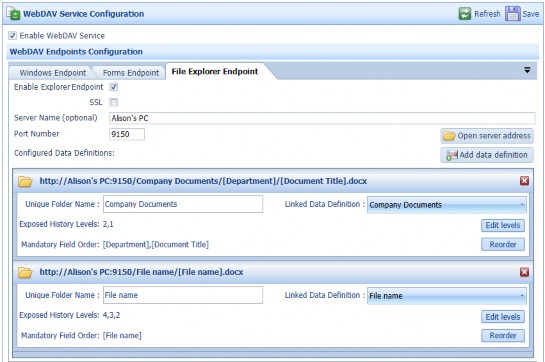
Enable Explorer Endpoint |
Select to enable WebDAV for all users who will use the file explorer view to edit Office documents. |
||
|
SSL |
Select to bind an SSL Certificate to the WebDAV file explorer view port. |
||
|
Server Name (optional) |
This is the endpoint root server address. The format of this must be a website address, for example http://machine_name. If a server name is not entered, the DataStoreDSX server name is used for the machine_name.
|
||
|
Port Number |
The port number is appended to the server address to complete the WebDAV URL. For example http://machine_name:9150. |
||
|
Open server address |
Click to open the logical folder which holds the WebDAV documents which have been stored with the Data Definitions listed on this tab. |
||
|
Add data definition |
Click the Add data definition button to add a new Data Definition folder to the configuration. |
||
|
Data Definition Folder(s) |
|||
|
http://server name:port number/ folder name/field1.../ fieldx.docx |
The path and file name of the documents stored with this Data Definition folder configuration. The address comprises the server name, the port number, the unique folder name, the contents of selected mandatory fields. The contents of the last field in the list is used to name the file. See “Reorder” on page 373 for information on changing the order of the mandatory fields. When SSL is enabled, the path begins with https:// |
||
|
|
Click to delete the Data Definition folder. The logical folder containing the files indexed with the selected Data Definition is deleted (although the documents remain stored in DataStoreDSX). |
||
|
Unique Folder Name |
This is the name of the logical folder which will contain the documents indexed with the selected Data Definition. This folder name should contain letters, numbers and spaces only. If the following characters are used, they are displayed as shown:
|
||
|
Linked Data Definition |
Click on the drop-down list beside Linked Data Definition to display the list of Data Definitions which can be used with the WebDAV Explorer view. Only Data Definitions which meet all the following requirements, are listed:
|
||
|
Exposed History Levels |
Displays the revisions which are currently selected. The documents which were stored with the selected revisions of the Data Definition can be retrieved from the configured logical folder. The Exposed History levels can be changed by clicking the Edit levels button (see below). |
||
|
Edit levels |
Click to edit the configured Exposed History Levels for the selected Data Definition. The Data Definition Revision History window is displayed. See Table 42.
|
||
|
Mandatory Field Order |
Displays the order of the mandatory fields. When the Data Definition level contains multiple mandatory fields, the contents of the last field is used as the file name. The contents of the other mandatory fields is used to name the sub-folders below the Unique Folder Name. |
||
|
Reorder |
Click to reorder the mandatory fields in the selected level of the Data Definition. See “Reorder Fields” for more information. |
||
When you click the Edit levels button, the Revision History window is displayed.
The Data Definition Revision History options are described in Table 42.
Table 42. Terminology: WebDAV Service Configuration Options: Data Definition Revision History
|
Term |
Meaning |
||
|---|---|---|---|
|
Tick box |
A tick indicates the revision is selected and documents which were stored using this revision of the Data Definition will be available in the configured folder. Multiple revisions can be selected if they have the same mandatory fields, with the same ids. |
||
|
Revision |
The revision number of the Data Definition. |
||
|
Name |
The name of the revision of the Data Definition. |
||
|
Description |
An (optional) description of the Data Definition. |
||
|
Mandatory Fields |
The name of each mandatory field and its id. In the example above, Revision 1 has two fields: File name with id 76 and Author with id 77. |
||
|
Show Summary |
Click to display the Data Definition Summary information for the highlighted revision. The Data Definition Summary window (shown below) displays summary information about the selected Revision of the Data Definition. (Description, ID, Creation date, Last modified, Revision, Published, Full text, Category, Default Acceptance, Document Versioning Allowed and a list of fields.) |
||
|
OK |
Click to close the Revision History window.
|
When you click the Show Summary button, the Data Definition Summary window is displayed for the currently highlighted revision.
The Data Definition Summary options are described in Table 43.
Table 43. Terminology: WebDAV Service Configuration Options: Data Definition Summary
|
Term |
Meaning |
|---|---|
|
Data Definition Name |
The name of the Data Definition is displayed in the border above the Description. |
|
Description |
An (optional) description of the Data Definition. |
|
ID |
The unique ID of the Data Definition. The ID is assigned automatically and cannot be changed. |
|
Creation date |
The date and time the Data Definition was first created. |
|
Last modified |
The date and time the Data Definition was last modified. |
|
Revision |
The revision number of the Data Definition whose summary is displayed. This is the revision which was highlighted in the Revision History window when the Show Summary button was clicked. |
|
Published |
Yes – this revision of the Data Definition has been Published. |
|
Full text |
Yes – this revision of the Data Definition has the option Store content for full text searching selected. See “Store Content for Full Text Searching” for more information. |
|
Category |
Shows the Category to which the Data Definition belongs, or None if it is not assigned to a Category. |
|
Default Acceptance |
Shows the Default Acceptance State of the Data Definition. See “Default Acceptance State” for more information. |
|
Document Versioning Allowed |
Yes – Document Versioning is enabled, enabling users to view the document History and Edit documents using the WebDAV file explorer (depending on configuration and permissions). |
|
Order |
Indicates the order in which the fields are displayed in the Data Definition. |
|
Field Name |
The name of the Data Definition field. |
|
Type |
The base field type (Text, Date and Time, Whole Number, Currency) or the Custom Field Type of the field. |
|
Content Field |
Yes – the index value is extracted automatically from the text or PDF document. |
|
Index Level |
Page – the field is a page-level field. |
|
Mandatory |
Yes – the index value must be provided before the document can be stored. |
|
Revision |
The revision number of the index field. |
|
Last Modified |
The date and time the index field was last modified. |
|
CFT Revision |
The revision number of the Custom Field Type when the Type is a Custom Field Type. |
|
Stored Field |
Yes – option Is Stored is selected. See “Is stored”. |
|
Close |
Click to close the summary window. |