
Field Selected – Validation
When a field is selected and the Validation tab is selected, the following options are displayed.
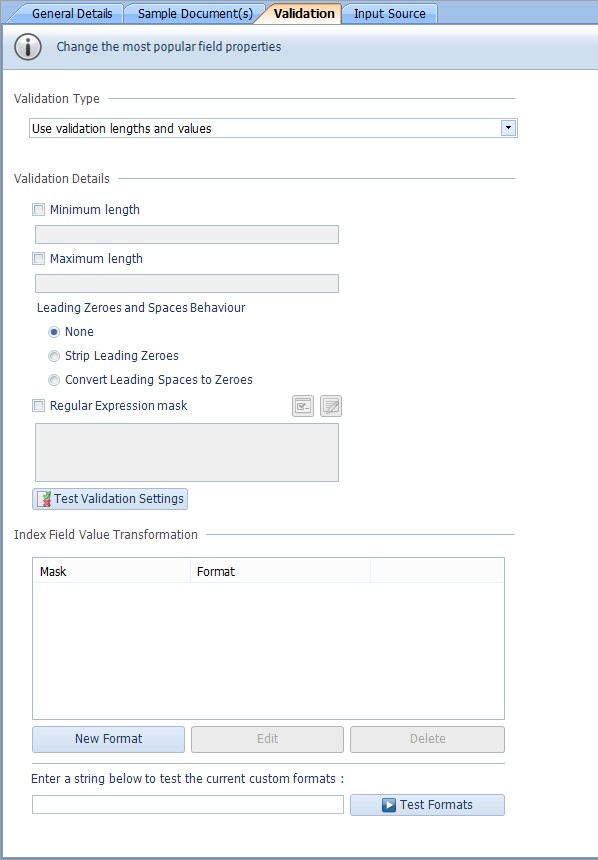
The Validation Type is used to define how the field value is determined to be valid. The Validation Type options are described in Table 84.
Table 84. Terminology: Data Definition Field Validation Type and Details
|
Term |
Meaning |
||
|---|---|---|---|
|
Use Validation lengths and values |
When selected, the validation of the field value is determined by the configured validation lengths and values. The settable options change according to the field Type selected. See |
||
|
Use Allowable values |
When selected, the validation of the field value is determined by the configured entries in the Allowable Values list. If the field value is equal to a value in the Allowable Values list, it passes validation. See Table 89. |
||
|
Use an expression |
Use an expression – enables you to enter date and time keywords and operators to ensure the date falls within a specified range. See the option described below. |
||
|
Expression to be used for validation (Indexing keywords, for example) |
Enter an expression, using date and time keywords, to be used to validate the date and time field. For example, for a day accuracy field, to ensure the date is only today’s date or yesterday’s date enter: #today [OR] #yesterday Alternatively, for a year accuracy field, to limit dates to no earlier than 10 years ago, enter: >#now (-10 years) A full list of valid date and time keywords see “Date and Time: Keyword Syntax”.
|
The options when the field Type is set to Text are described in Table 85.
Table 85. Terminology: Data Definition Field – Validation Properties: Text
|
Term |
Meaning |
|---|---|
|
Minimum length |
When selected, enter the minimum number of characters in the text string that is valid. |
|
Maximum length |
When selected, enter the maximum number of characters in the text string that is valid. |
|
None |
Leading zeroes are not removed and leading spaces are not converted to zeroes. |
|
Strip Leading Zeroes |
When selected, if the text string starts with one or more zeroes, these are removed. |
|
Convert Leading Spaces to zeroes |
When selected, if the text string starts with one or more spaces, these are converted to zeroes. |
|
Regular Expression mask |
When selected, enter a regular expression in the text box provided. Or click the button to display the Regular Expression Generator window. |
The options when the field Type is set to Currency are described in Table 86.
Table 86. Terminology: Data Definition Field – Validation Properties: Currency
|
Term |
Meaning |
|---|---|
|
Minimum value |
When selected, enter the minimum value for the Currency that is valid. |
|
Maximum value |
When selected, enter the maximum value for the Currency that is valid. |
|
Non zero |
When selected, only non-zero values are valid. |
The options when the field Type is set to Whole Number are described in Table 87.
Table 87. Terminology: Data Definition Field – Validation Properties: Whole Number
|
Term |
Meaning |
|---|---|
|
Minimum value |
When selected, enter the minimum value Whole Number that is valid. |
|
Maximum value |
When selected, enter the maximum value Whole Number that is valid. |
|
Non zero |
When selected, only non-zero values are valid. |
The options when the field Type is set to Date and Time are described in Table 88.
Table 88. Terminology: Data Definition Field – Validation Properties: Date and Time
|
Term |
Meaning |
|---|---|
|
Minimum date and time |
When selected, click the … button and select the earliest Date and Time that is valid. |
|
Maximum date and time |
When selected, click the … button and select the latest Date and Time that is valid. |
The buttons available when Use allowable values is selected are described in Table 89.
Table 89. Terminology: Data Definition Field – Validation Properties: Use Allowable Values
|
Button |
Meaning |
|---|---|
|
|
Add Value. Enter the Allowable value in the text box and click the Add Value button. |
|
|
Edit Value. Select the Allowed value in the Allowable Values list, edit the value and click the Edit Value button. |
|
|
Delete Value. Select the Allowable value in the Allowable Values list and click the Delete Value button. |
|
|
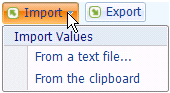
Import Allowable Values.
Select From a text file to import the Allowable Values from a text file. Select the path and the file you want to Import to produce the Allowable Values list. (Only data from the file which is of the same Type as the field will be Imported, for example, Date and Time.) Select From the clipboard to import the Allowable Values from the contents of the clipboard. |
|
|
Export Allowable Values. Click Export to open a Windows directory navigation pane. Enter a name for the text file in which you want to save the allowable values and select a folder in which to save the text file. Click Save to save the text file, or Cancel to exit without exporting the allowable values to a text file. |
Validation – Index Field Value Transformation
![]()
Caution: This feature is for advanced DataStore®DSX users.
Index Field Value Transformation is provided to enable you to manipulate data that might not pass validation. For example, consider you have a document in which the date is stored as 05072005. This, in its current state, is not a valid date. It needs to be transformed so it’s displayed as 05/07/2005.
![]()
Note: Transformations can be applied to Content fields only. That is, Transformations are not available for manually entered field values.
![]()
The options for Field Value Transformations are described in Table 90.
Table 90. Terminology: Data Definition Field Validation Field Value Transformations
|
Term |
Meaning |
|---|---|
|
New Format |
Click to create a new Custom Format. The Custom Format Editor is opened. |
|
Edit |
Click to edit the selected Format. The Custom Format Editor is opened. |
|
Delete |
Click to delete the selected format. |
|
Test Format |
Enter a string in the text box beside the Test Format button. Click the Test Format button to test how the string is transformed with the transformation mask. A window is displayed indicating whether the transformation was successful. If the transformation was successful, a window is displayed showing the output string. |
The options for the Custom Format Editor are described in Table 91.
Table 91. Terminology: Data Definition Field Validation Custom Format Editor
|
Term |
Meaning |
|---|---|
|
Mask to match index field |
Enter a Regular Expression mask to define how the string should be split in to components. In the above date example, this would be (\d{2})(\d{2})(\d{4}). |
|
Format to transform value |
Enter the order of the components and any separators you want to use. In the above date example, this would be {0}/{1}/{2}. |
|
String to be tested |
Enter the string to be tested. In the above date example, this would be 05072005. |
|
Test Custom Format |
Click the Test Custom Format button. A window is displayed indicating whether the transformation was successful. If the transformation was successful, the output string is displayed. |