
Full Text Indexing
Full Text Indexing can be enabled on a per-Data Definition basis. The schedule for when data is Full Text Indexed is configured in this area of Management Studio.
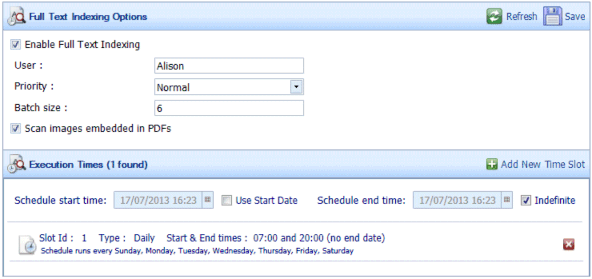
The Full Text Indexing options are described in Table 34.
Table 34. Terminology: Full Text Indexing Options
|
Term |
Meaning |
||
|---|---|---|---|
|
Enable Full Text Indexing |
Select to enable Full Text Indexing. |
||
|
User |
Enter the DataStore®DSX user name under which you want the Schedule to run. If you do not enter a valid user name, the user name of the account under which you are currently logged in will be used. This User may be displayed in Audit Logs. |
||
|
Priority |
Select a priority from Lowest to Highest from the drop-down list. This setting can affect how much of the system resources are used to perform the Full Text Indexing. The Priority applies to all Time Slots. A High Priority ensures Full Text Indexing gets a lot of the system resources whereas a Low Priority uses fewer resources and so will have less effect on other applications running at the same time. |
||
|
Batch size |
Enter a Batch size value. The Batch size is the number of Data Items that will be processed at a time by the crawler. For data that is page based (Text, TIFF images and PDF) the Batch size will represent the number of pages that are crawled and full text indexed at a time. For non-page based items (Office documents) the Batch size will represent the number of documents that are full text indexed at a time. When the batch completes, no full text indexing is done until the scheduler kicks off another batch. The ideal Batch size varies depending on the type of file being Full Text Indexed. For example, if only Microsoft Office® documents are being Full Text Indexed, a Batch Size of 5 might be ideal. If only text files are being Full Text Indexed, a Batch size of 500 might be ideal. Setting the Batch size to 0 means the internally set default value is used. The value of the Batch size is internally limited to a maximum of 1000. |
||
|
Scan images embedded in PDFs |
Select this option if you are using Full Text Indexing on PDF files which have embedded images (often TIFFs) which contain OCR and you want the OCR to also be Full Text Indexed. Clear this option if you do not want the images containing OCR (embedded in PDF files) to be Full Text Indexed.
|
||
|
Run PDF and IFilter indexing in a separate process |
Select this option if, should problems occur with the Full Text Indexing process, you want to ensure the DataStoreDSX Service is not affected and continues to run. This option should be selected when lots of documents or large documents are being Full Text Indexed. |
||
|
Execution Times |
|||
|
Add New Time Slot |
Click to add a new time slot. |
||
|
Schedule start time |
The date and time at which the Full Text Indexing Schedule started. To change the schedule’s start date and time to a future date, select Use Start Date and enter the required start date and time here. |
||
|
Use Start Date |
Select to change the Full Text Indexing Schedule’s start date and time to a date in the future. See Schedule Start Time. |
||
|
Schedule end time |
The date and time at which the Full Text Indexing Schedule will stop running. To change the schedule’s end date and time to a date in the future date, clear Indefinite and enter the required end date and time here. |
||
|
Indefinite |
Select to make the Full Text Indexing Schedule run indefinitely. |
||
|
Slot Id and details |
Each configured time slot is summarized. Click a time slot to expand it. It can then be edited. See Table 35 on page 357 below, for details on the options. |
||
|
X |
Click the X icon beside a Slot Id and details to delete the time slot. |
The Time Slot Configuration options are described in Table 35.
Table 35. Terminology: Full Text Indexing Time Slot Configuration Options
|
Term |
Meaning |
|---|---|
|
Daily |
Select to display the days of the week. Select the days of the week for which you want to configure the time slot. Enter the time slot’s Start time and End time. The End time must be later than the Start time. |
|
Weekly |
Select to display the weekly time slot options. Select the week of the month (first, second, third, fourth or last) for which you want to configure the time slot. Then select the days of the week for which you want to configure the time slot. Enter the time slot’s Start time and End time. The End time must be later than the Start time. |
|
Monthly |
Select to display the months of the year. Select the months for which you want to configure the time slot. Next, select On week of month and select the week of the month (first, second, third, fourth or last) for which you want to configure the time slot. Then select the days of the week for which you want to configure the time slot. Alternatively, select On calendar day(s) and enter the days of the month for which you want to configure the time slot. For example, 1, 8, 15, 22, 29. Enter the time slot’s Start time and End time. The End time must be later than the Start time. |
|
Yearly |
Select to display the yearly time slot configuration options. Enter a value for Repeat this number of years. Select to display the months of the year. Select the months for which you want to configure the time slot. Next, select On week of month and select the week of the month (first, second, third, fourth or last) for which you want to configure the time slot. Then select the days of the week for which you want to configure the time slot. Alternatively, select On calendar day(s) and enter the days of the month for which you want to configure the time slot. For example, 1, 8, 15, 22, 29. Enter the time slot’s Start time and End time. The End time must be later than the Start time. |
Note: To create a Full Text Indexing schedule which runs from, for example, 9pm until 5am, create one time slot from 9pm until 23:59 and a second time slot from 00:00 until 5am.