
CCM April 2023 Release Highlights
Main highlight #1: TSM Connectors
This release brings in multiple enhancements to the on-premise Connector support for Text Script Management. The file system Connector allows you to upload your text scripts from within your network to the ClusterSeven Cloud without requiring dragging and dropping or manual selection of files via browsing. This release expands on this support by bringing in the below new capabilities:
- Whitelist support for file locations via Allowed Locations
- Global and Team specific Connectors
- User interfaces for managing Connectors
- Automatic upgrade for Connectors
Allowed Locations
Connectors allow users to seamlessly submit files for comparison either on demand or in an automated fashion via a schedule. A whitelist is required for every Team in TSM which ensures that users are limited to what files they can access via the Connector. The whitelist, known as Allowed Locations, ensures that users within a Team can set a File Path which has been specifically whitelisted. Any other paths will be rejected.

Figure 1 Allowed Locations on a Team
For example, in the above Risk Modelling team, a single Allowed Location of “\\fileserver\RiskModelTeam\models\” has been specified. A user within this team cannot “connect” to a file or folder which is not in that location.
Managing Allowed Locations requires Business Administrator rights and is configured via the Teams page in the Administration section.
Global and Team Connectors
Multiple Connectors can now be deployed to allow for tighter access restrictions. Along with the ability to whitelist paths (described above), access to files on your file systems can be controlled precisely.
For simple deployments, a Global Connector can be deployed and configured. This is the recommended model for when the files to be monitored are either in a single file share and can be accessed with a single domain account.
The deployment can be expanded with the deployment of additional Connectors, called Team Connectors. A Team Connector is associated with one or more Teams in TSM and can be an effective solution in the following scenarios:
- Monitored files are in different Active Directory domains or even completely different networks and a single domain account or connector cannot be used.
- Monitored files are widely spread and allowing a single domain account to access all the locations is not allowed for security reasons.
- Defence in depth around file access. If the Connector associated with a Team does not have permissions to other network locations, it is not possible for the Connector to access those locations even if the location is allowed via the Team’s Allowed Locations whitelist.
Once a Connector has been configured via the Connectors administration page, it can be assigned to one or more Teams via the Teams Administration page.

Figure 2 Connector association with a Team
Note: Association of a Connector with a given Team prevents any apps within that Team from accessing the Global Connector (if one is configured).
Connector administration user interface
A Connector must be registered in TSM before it can access TSM and vice versa. To make the administration of this easier, a user interface has been introduced in the Administration section of the web application.
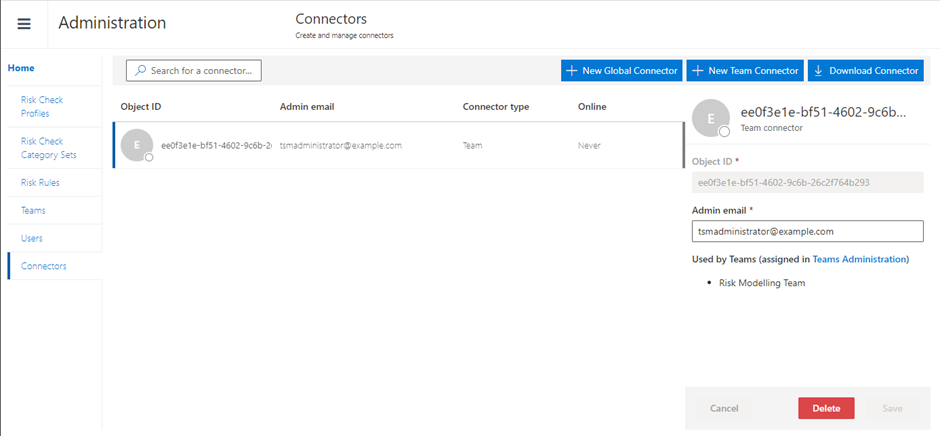
Figure 3 Connectors administration user interface
The Connectors user interface provides the following capabilities:
- Ability to add, remove or view Global and Team Connectors
- Ability to download the installation package for the Connector
- The ability to view if a Connector is online and when it last connected successfully
- Being able to view a glance which Teams are assigned a given Team Connector
The Connectors page can be only administered by a user in the System Administrator role. This means that a Business Administrator can only associate a Connector with a Team if it has been configured by a System Administrator.
A detailed configuration guide for connector configuration is available in here.
Auto-upgrade capability
A connector once deployed will automatically upgrade to a newer version without requiring manual intervention. This reduces the need for additional maintenance and ensure functional and security fixes are delivered seamlessly.
Main highlight #2: Other Enhancements:
Schedules user interface
Once an application has been registered in TSM, it can be configured with a schedule to enable automatic submission of script files. To manage the schedule, go to the App’s dashboard, and click on the  button on the toolbar. This will launch a dialog which can be used to configure the schedule.

Figure 4 Add schedule dialog when no schedule exists
The screenshot above shows when you an App has no schedule. Clicking the New Schedule button will show the below user interface.

Figure 5 Schedule configuration user interface
To set up a daily schedule, choose the days on which the schedule will run and the time at which it will run. Frequency of runs can be configured by choosing a mix of the above options. For example:
- Use the defaults selected to set up a daily (weekdays) schedule and select the appropriate time to run it
- Select Every 1 week and choose Sunday (or any other day) to do a weekly schedule
As you can see in the above screenshot, a File Path is required for successful execution. If you did not configure a File Path at the time of registration, you can add one via the Edit Settings dialog, accessible by pressing the  button on the App Dashboard.

Figure 6 Edit Settings dialog for setting App File Path
Please note that a File Path cannot be set on an App in your Personal Files for security reasons.