
Sending/Receiving Emails Using Microsoft 365 With Regular User & Service Account
Sending Emails Using Microsoft 365 With Regular User Account
This method doesn’t require Admin consent to be set.
Step 1
Open web.config and add (or update) following key / values:
- <add key="Mail.Sending.ServerType" value="Microsoft365" />
- <add key="Mail.Sending.Microsoft365.IntegrationType" Value="Public" />
Step 2
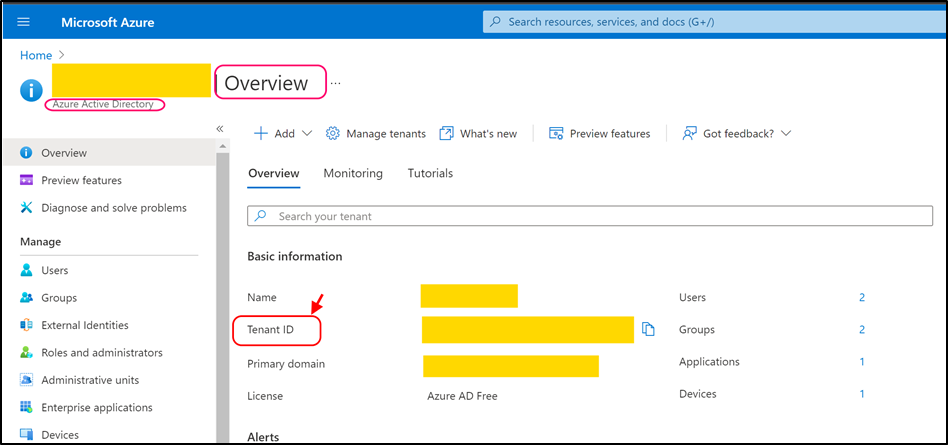
Navigate to azure portal (https://portal.azure.com/) and open Azure Active Directory > Overview.

Copy TenantID value and paste it into the following key (as value):
- <add key="Mail.Sending.Microsoft365.PublicApp.TenantId" value="copied_tenant_id" />
Step 3
Navigate to App registration and register using 'New registration' or use one of existing registered app.
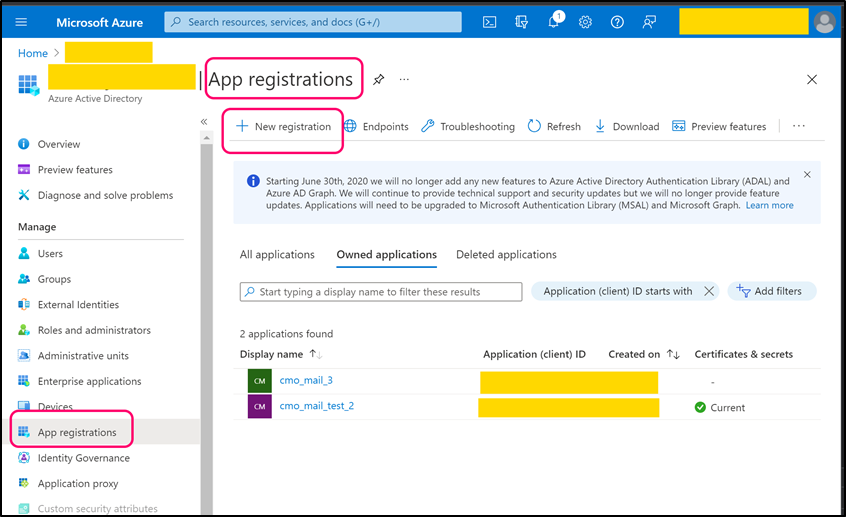
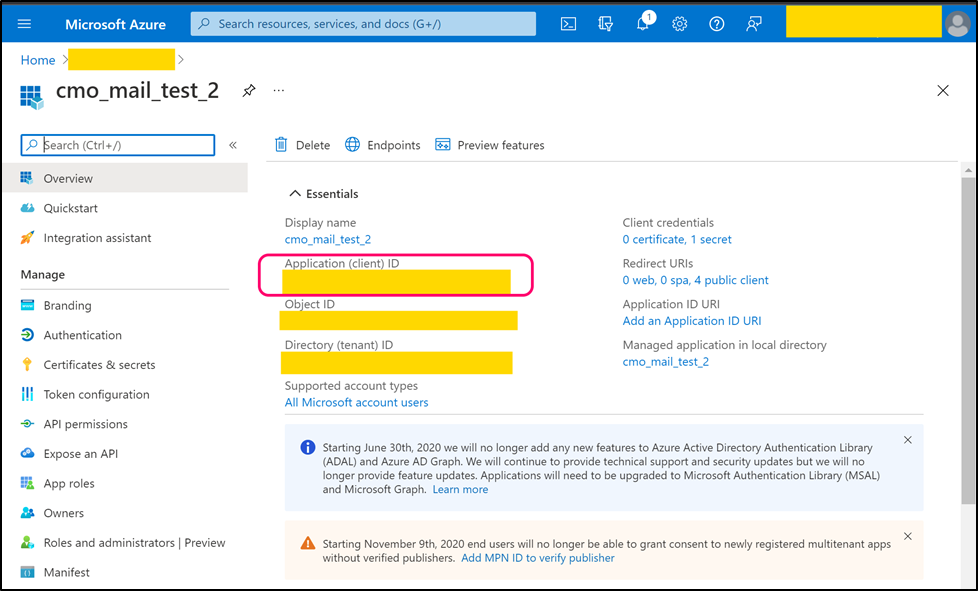
For new application select suitable 'Supported account types' and as Redirect URI please select 'Public client/native (mobile & desktop)'. Once application is registered open its page. Copy 'Application (client) ID' (value) and paste into the following web.config key:
- <add key="Mail.Sending.Microsoft365.PublicApp.ClientId" value="client_id" />

Step 4
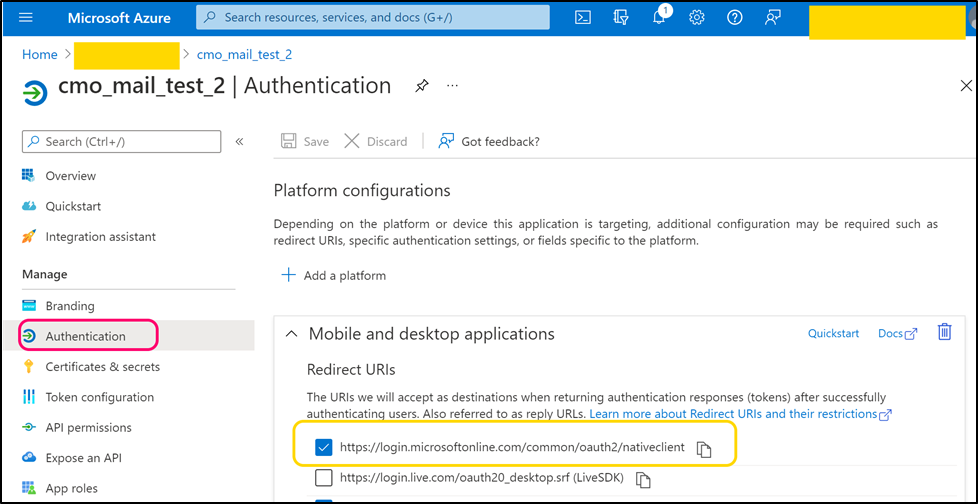
Navigate to Authentication tab. Find 'Redirect URI' for native client. Copy its value and paste it into the following web.config key:
- <add key="Mail.Sending.Microsoft365.PublicApp.RedirectUri" value="native_client_uri" />

Step 5
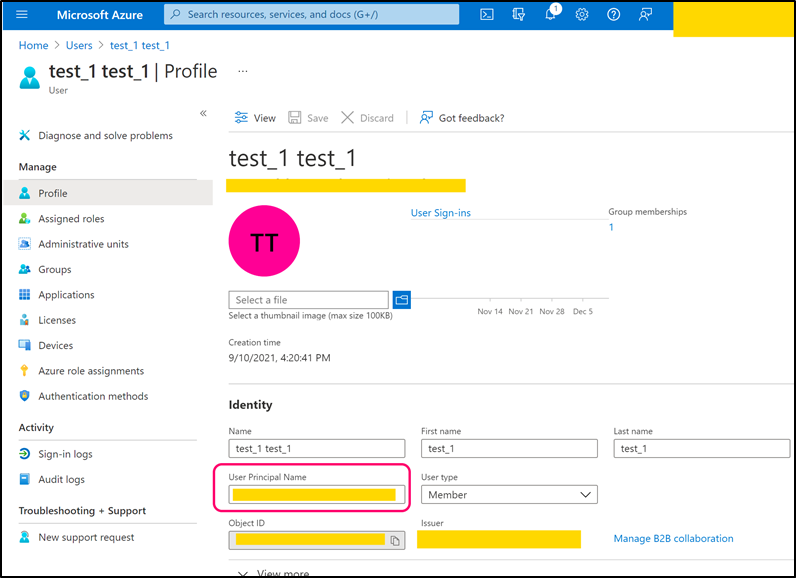
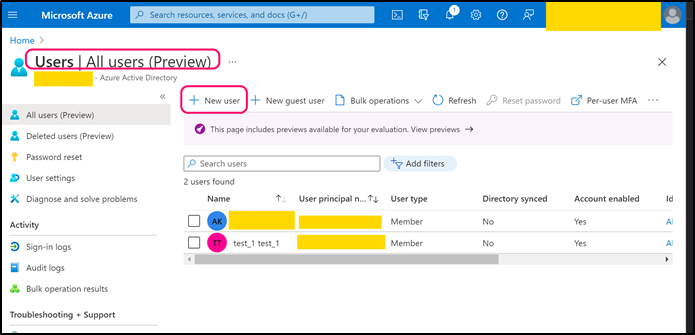
Navigate to back to Azure Active Directory page. Open Users page and create a user that can be used by CMO application (or use any existing suitable user).

Copy 'User Principal Name' and paste its value into the following web.config key:
- <add key="Mail.Sending.Microsoft365.PublicApp.AccountName" value="user_principal_name" />
Step 6
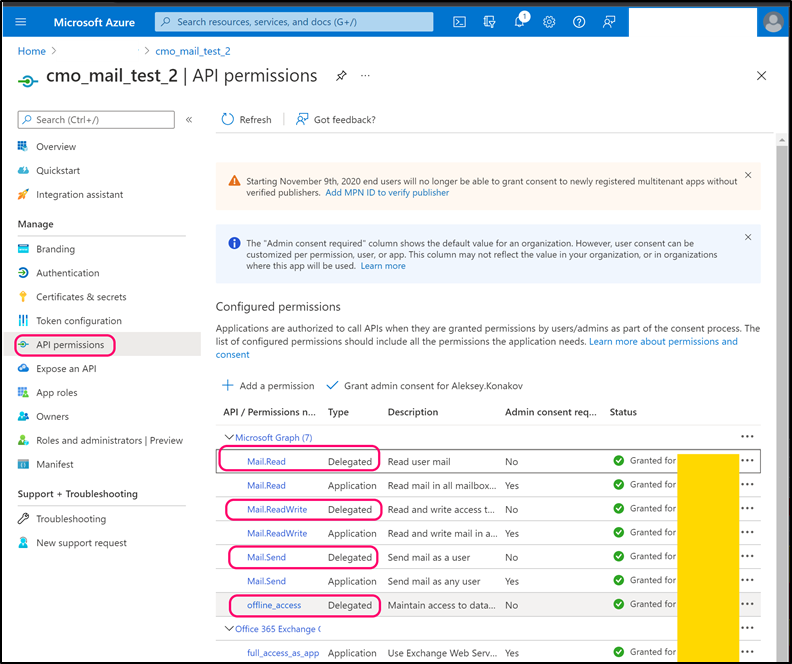
Navigate to 'API Permissions' and add following Microsoft.Graph permissions (note, all permissions must be 'Delegated'):
- Mail.Read
- Mail.ReadWrite
- Mail.Send
- Offline_access

Step 7
Login to the hosted Web.App server (in case of setup: ‘multiple web servers – one db’ repeat this step for every web server or at least for web servers that are used by CMO Scheduler).
Find 'CMO.Microsoft365TokenHelper' (current version is 1.0.1, the tool is available in packages folder) tool. The tool has following options:
- <add key="ClientId" value=""/>
- <add key="TenantId" value=""/>
- <add key="RedirectUri" value=""/>
- <add key="CacheFileName" value=""/>
- <add key="CacheDirectory" value=""/>
ClientId , TenantId, RedirectUri must have exactly the same values used in previous steps.
The tool should generate a file with saved OAuth token for a user specified in Step 5. This token will be used by CMO Application for authorization. CacheFileName is a name of file to be generated with token (default name is cmo_msal_cache.dat). CacheDirectory is a directory where the file will be generated (note, the user who run the tool must have access to the CacheDirectory, i.e. should be able to create file in that directory). Default value is MSAL_CACHE. Run the tool in Windows Terminal / CMD, Power Shell. The tool should open an standard MS Authorization window. In that window, please enter credential for the user from the Step 5.
Step 8
Open web.config and add (or modify) following keys:
- <add key="MSAL.Cache.Folder" value="" />
- <add key="MSAL.Cache.FileName" value="" />
MSAL.Cache.FileName should be a name of file with token generated in Step 7. MSAL.Cache.FileName should be a directory name accessible for the IIS user. Now copy file generated in Step 7 to folder specified in MSAL.Cache.Folder.
Receiving Emails Using Microsoft 365 With Regular User Account
This method doesn’t require Admin consent to be set.
Step 1
Open web.config and add (or update) following key / values:
- <add key="Mail.Receiving.ServerType" value="Microsoft365" />
- <add key="Mail.Receiving.Microsoft365.IntegrationType" Value="Public" />
Step 2
Navigate to azure portal (https://portal.azure.com/) and open Azure Active Directory > Overview.

Copy TenantID (highlighted on the screenshot above) value and paste it into the following key (as value):
- <add key="Mail.Receiving.Microsoft365.PublicApp.TenantId" value="copied_tenant_id" />
Step 3
Navigate to App registration and register using 'New registration' or use one of existing registered app.

For new application select suitable 'Supported account types' and as Redirect URI please select 'Public client/native (mobile & desktop)'. Once application is registered open its page. Copy 'Application (client) ID' (value) and paste into the following web.config key:
- <add key="Mail.Receiving.Microsoft365.PublicApp.ClientId" value="client_id" />
Step 4
Navigate to Authentication tab. Find 'Redirect URI' for native client. Copy its value and paste it into the following web.config key:
- <add key="Mail.Receiving.Microsoft365.PublicApp.RedirectUri" value="native_client_uri" />
Step 5
Navigate to back to Azure Active Directory page. Open Users page and create a user that can be used by CMO application (or use any existing suitable user).

Copy 'User Principal Name' and paste its value into the following web.config key:
- <add key="Mail.Receiving.Microsoft365.PublicApp.AccountName" value=" principal_name" />

Step 6
Navigate to 'API Permissions' and add following Microsoft.Graph permissions (note, all permissions must be 'Delegated'):
- Mail.Read
- Mail.ReadWrite
- Mail.Send
- Offline_access
Step 7
Login to the Server where Web.App is hosted (in case of setup: ‘multiple web servers – one db’ repeat this step for every web server or at least for web servers that are used by CMO Scheduler).
Find 'CMO.Microsoft365TokenHelper' (current version is 1.0.1, the tool is available in packages folder) tool. The tool has following options:
- <add key="ClientId" value=""/>
- <add key="TenantId" value=""/>
- <add key="RedirectUri" value=""/>
- <add key="CacheFileName" value=""/>
- <add key="CacheDirectory" value=""/>
ClientId , TenantId, RedirectUri must have exactly the same values used in previous steps.
The tool should generate a file with saved OAuth token for a user specified in Step 5. This token will be used by CMO Application for authorization. CacheFileName is a name of file to be generated with token (default name is cmo_msal_cache.dat). CacheDirectory is a directory where the file will be generated (note, the user who run the tool must have access to the CacheDirectory, i.e. should be able to create file in that directory). Default value is MSAL_CACHE. Run the tool in Windows Terminal / CMD, Power Shell. The tool should open a standard MS Authorization window. In that window, please enter credential for the user from the Step 5.
Step 8
Open web.config and add (or modify) following keys:
- <add key="MSAL.Cache.Folder" value="" />
- <add key="MSAL.Cache.FileName" value="" />
MSAL.Cache.FileName should be a name of file with token generated in Step 7. MSAL.Cache.FileName should be a directory name accessible for the IIS user. Now copy file generated in Step 7 to folder specified in MSAL.Cache.Folder.
Sending Emails Using Microsoft 365 With Service Account
This method requires Admin consent to be set.
Step 1
Open web.config and add (or update) following key / values:
- <add key="Mail.Sending.ServerType" value="Microsoft365" />
- <add key="Mail.Sending.Microsoft365.IntegrationType" Value="Confidential" />
Step 2
Navigate to azure portal (https://portal.azure.com/) and open Azure Active Directory > Overview.
Copy TenantID (highlighted on the screenshot above) value and paste it into the following key (as value):
- <add key="Mail.Sending.Microsoft365.ConfidentialApp.TenantId" value="copied_tenant_id" />
Step 3
Navigate to App registration and register using 'New registration' or use one of existing registered app.

For new application select suitable 'Supported account types' and as Redirect URI please select 'Public client/native (mobile & desktop)'. Once application is registered open its page. Copy 'Application (client) ID' (value) and paste into the following web.config key
- <add key="Mail.Sending.Microsoft365.ConfidentialApp.ClientId" value="client_id" />

Step 4
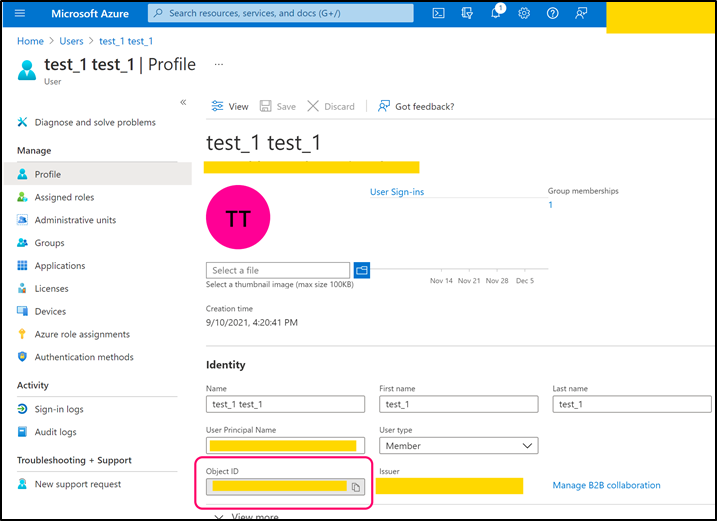
Navigate to back to Azure Active Directory page. Open Users page and create a user that can be used by CMO application (or use any existing suitable user).

Copy 'Object ID' and paste its value into the following web.config key:
- <add key="Mail.Sending.Microsoft365.ConfidentialApp.UserObjectId" value="object_id " />

Step 5
Navigate to 'Certificates & secrets' > Client Secrets. Create new secret. Copy its value and paste into the following web.config key:
- <add key="Mail.Sending.Microsoft365.ConfidentialApp.Secret" value="secret" />

Step 6
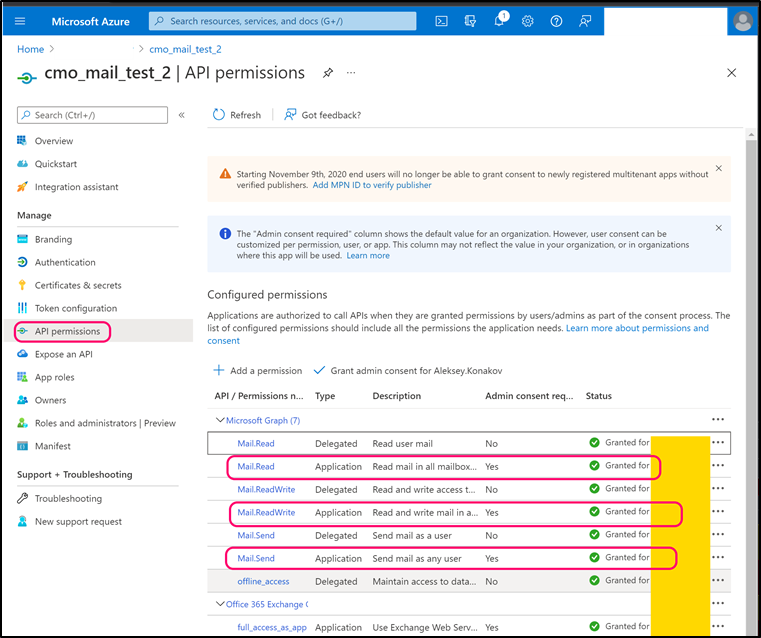
Navigate to 'API Permissions' and add following Microsoft.Graph permissions (note, all permissions must be Application):
- Mail.Read
- Mail.ReadWrite
- Mail.Send
Confirm Admin consent for all permissions.
Receiving Emails Using Microsoft 365 With Service Account
This method requires Admin consent to be set.
Step 1
Open web.config and add (or update) following key / values:
- <add key="Mail.Receiving.ServerType" value="Microsoft365" />
- <add key="Mail.Receiving.Microsoft365.IntegrationType" Value="Confidential" />
Step 2
Navigate to azure portal (https://portal.azure.com/) and open Azure Active Directory > Overview.

Copy TenantID (highlighted on the screenshot above) value and paste it into the following key (as value):
- <add key="Mail.Receiving.Microsoft365.ConfidentialApp.TenantId" value="copied_tenant_id" />
Step 3
Navigate to App registration and register using 'New registration' or use one of existing registered app.

For new application select suitable 'Supported account types' and as Redirect URI please select 'Public client/native (mobile & desktop)'. Once application is registered open its page. Copy 'Application (client) ID' (value) and paste into the following web.config key:
- <add key="Mail.Receiving.Microsoft365.ConfidentialApp.ClientId" value="client_id" />

Step 4
Navigate to back to Azure Active Directory page. Open Users page and create a user that can be used by CMO application (or use any existing suitable user).
Copy 'Object ID' and paste its value into the following web.config key:
- <add key="Mail.Receiving.Microsoft365.ConfidentialApp.UserObjectId" value="object_id " />
Step 5
Navigate to 'Certificates & secrets' > Client Secrets. Create new secret. Copy its value and paste into the following web.config key:
- <add key="Mail.Receiving.Microsoft365.ConfidentialApp.Secret" value="secret" />

Step 6
Navigate to 'API Permissions' and add following Microsoft.Graph permissions (note, all permissions must be Application):
- Mail.Read
- Mail.ReadWrite
- Mail.Send
Confirm Admin consent for all permissions.

Receiving New Action Emails
Configuration steps the same as for ‘Receiving emails using Microsoft 365 with regular user account’ and ‘Receiving emails using Microsoft 365 with service account’. The difference is only in a web.config key prefix. Instead of Mail.Receiving Mail.NewAction.EmailClient should be used., e.g.
Instead of:
- Mail.Receiving.Microsoft365.ConfidentialApp.ClientId
use:
- Mail.NewAction.EmailClient.Microsoft365.PublicApp.ClientId
and so on.
Receiving Document Import Emails
Configuration steps the same as for ‘Receiving emails using Microsoft 365 with regular user account’ and ‘Receiving emails using Microsoft 365 with service account’. The difference is only in a web.config key prefix. Instead of Mail.Receiving Mail.DocumentImport.EmailClient should be used., e.g.
Instead of:
- Mail.Receiving.Microsoft365.ConfidentialApp.ClientId
use:
- Mail.DocumentImport.EmailClient.Microsoft365.PublicApp.ClientId
and so on.