
O-Auth Support to IDP Login
This guide provides an overview on O-Authentication in android CMO application
1. O-Auth Support to IDP Login
The CMO application provides secure login for its users by introducing open standard authorization framework (O-Auth) to its clients. It helps the users by collecting limited user data without giving away user’s password.
1.1 Definition
O-Auth is an open standard authorization framework or protocol where unrelated servers can safely allow authenticated access to their assets without actually sharing the login credentials.
1.2 Why O-Auth?
O-Auth allows single sign on (SSO) instead of providing username and password to the server for each request. In this scenario the end user talks to their Identity Provider (IDP) where the IDP generates access tokens and hands it to the application to authenticate the user. The application then allows the user to login after the user is authenticated.
2. OpenID Connect
In CMO, the O-Auth is maintained by introducing the OpenID Connect infrastructure where it acts as a layer. With OpenID Connect, the clients can verify the end user based on the authentication performed by an authorization server.
3. Version Support for O-Authentication
The O-Authentication support for IDP login is being introduced by CMO application from version R2106 provided the client-side server supports IDP login.
3.1 Bypassed O-Authentication for Existing Users
For existing CMO application users upgraded to version R2106 and the user side server doesn’t support O-authentication, the CMO application by passes support for O-authentication. These users will continue providing username and password for CMO application login which is based on the client URL.
3.2 O-Authentication Support for Existing Users
For existing CMO application users upgraded to version R2106 and the user side server supports O-authentication, the CMO application redirects the user to IDP page that supports single sign-on. Based on the client URL provided during the CMO application login, the system recognizes client server that supports O-authentication.
4. User Authentication
CMO application verifies the user and authenticate for the first-time login. The user has to provide username and password in the IDP page. The IDP settings are configured by the admin from the web end. The IDP login page may be same or different from company to company.
Note:
- When the user tries to logs in the CMO application, the login page redirects to clients IDP for initial authentication.
- When the user logs out of the application and re-login, the system prompts the user to enter credential in the IDP page again for user authentication.
- If the user closes the application (without logging out) and re launches the application, the user can login to the application just by using device security settings like Screen Lock (pin/password/pattern/swipe) and Fingerprint (biometric) in offline and online mode.
- When the application is used in offline mode, all the data will be synced to the sever and the user is authenticated when the device is connected to the internet.
4.1 Initial User Authentication in Mobile
iOS
- Go to CMO mobile application.
- Enter the company web address for the CMO and click Submit.
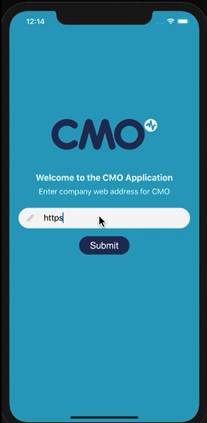
- The user gets redirected to Single Sign-On (SSO) login page. Click on the SSO Login button.
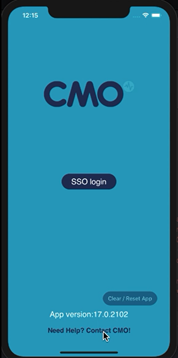
-
The application redirects the user to IDP page to enter the username and password for authentication.
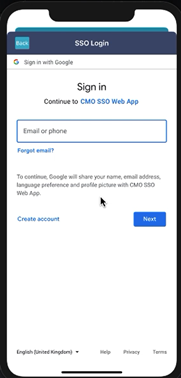
-
Enter the email id, password and click Next.
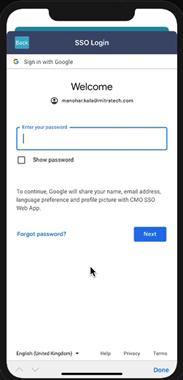
Note: The email id used to create the user in the CMO application has to be provided in the username section.
-
The user is prompted to check if the device is connected to the internet to authenticate. The user must be connected to the internet.
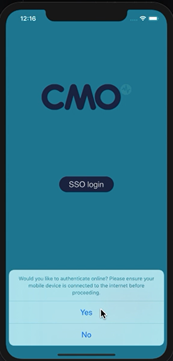
- Click Yes. The user is authenticated and the mobile app gets synchronized with the web app.
- For the second time login, the user doesn’t have to provide username and password. The user goes through SSO login and directly lands on the mobile application homepage.
- The CMO application asks the user to authenticate in the following scenarios after the initial authentication.
- When mobile token expires.
- When mobile token revoked from web end (Admin can revoke for specific user).
- When a user logs out of the application and re-login
4.1.1 Offline Mode (iOS)
The CMO mobile application user can login in the offline mode. For the authentication of the user to happen, the user must connect to the internet. The user can still login if there is no internet.
Before the implementation of the O-Auth, in the offline mode, the user is authenticated by comparing the username and password credentials provided in the login fields and the data existing in the database. But, after the implementation of the O-Auth, in the offline mode, the user will be authenticated using device security settings where the user can login by providing pin or biometric (fingerprint) scan.
For the first time, when the user logs into the CMO application, the system prompts to set up security lock for the application with pattern or password or pin or fingerprint.
- CMO application prompts the user with a Warning message.
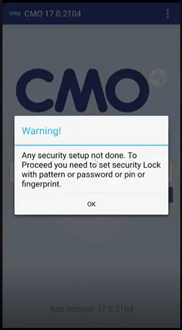
- Click OK. The user will be redirected to Device Security Settings page in the mobile.
- Depending on the type of security, the user can choose Fingerprint or other Screen lock options available in the settings.
4. The user then lands on the CMO mobile application homepage.
-
After the initial setup, when the user closes the application and logs in again, the application authorizes the user when the device is connected to internet but the user will be able to log in to the application in the offline mode.
4.2 Initial User Authentication in Web
- Go to CMO web application.
- The CMO login page redirects to the IDP page if the user is not authenticated.
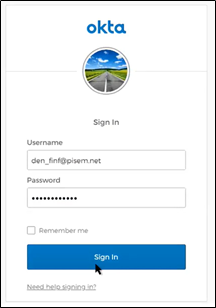
-
The Okta IDP page opens up where the user has to enter username and password for Single Sign On (SSO).
Note: Each company can have different IDP pages for SSO. E.g. Okta, Google, Microsoft are some of the Identity Providers for SSO.
-
The user information is sent to the CMO application where the user account is verified and authenticated. Once the account is authenticated, the user gets automatically logged in.
-
The CMO application prompts the user to authenticate again in the following scenarios after the initial authentication.
- When the login session expires/user logs out.
- When the browser is closed.
5. O-Auth Resolution Details
OpenIDConnect is implemented for Web and Mobile authentication.
Web
To enable OpenIdConnect for the Web new Authentication Mode (OpenIDConnect) was introduced. To turn on OpenIdConnect, add OpenIdConnect value into Authentication.Mode parameter in the web.config.
1. <add key="Authentication.Mode" value="OpenIdConnect"/>
Some additional OpenIdConnect parameters are required to be filled in the web.config.
Example of parameters for authentication against google:
1. <add key="Authentication.OpenIdConnect.ClientId" value="157513018297-gc3l8hm2lvdp27f89jgcekq67hp1ploe.apps.googleusercontent.com" />
2. <add key="Authentication.OpenIdConnect.ClientSecret" value="xp6jDs81V0-_ehPkbbjkCLoO" />
3. <add key="Authentication.OpenIdConnect.Audience" value="157513018297-gc3l8hm2lvdp27f89jgcekq67hp1ploe.apps.googleusercontent.com" />
4. <add key="Authentication.OpenIdConnect.RedirectUri" value="https://localhost:44315" />
5. <add key="Authentication.OpenIdConnect.PostLogoutRedirectUri" value="" />
6. <add key="Authentication.OpenIdConnect.ClaimType" value="email" />
7. <add key="Authentication.OpenIdConnect.IdentityType" value="Email" />
8. <add key="Authentication.OpenIdConnect.Scope" value="openid email profile" />
9. <add key="Authentication.OpenIdConnect.ClockSkew" value="2" />
10. <add key="Authentication.OpenIdConnect.ResponseType" value="code id_token" />
11. <add key="Authentication.OpenIdConnect.MetadataUri" value="https://accounts.google.com/.well-kn...-configuration" />
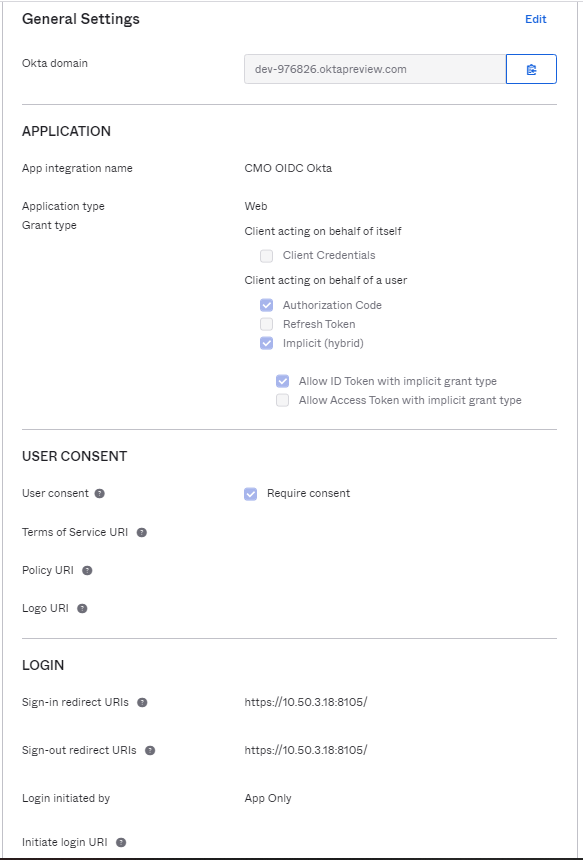
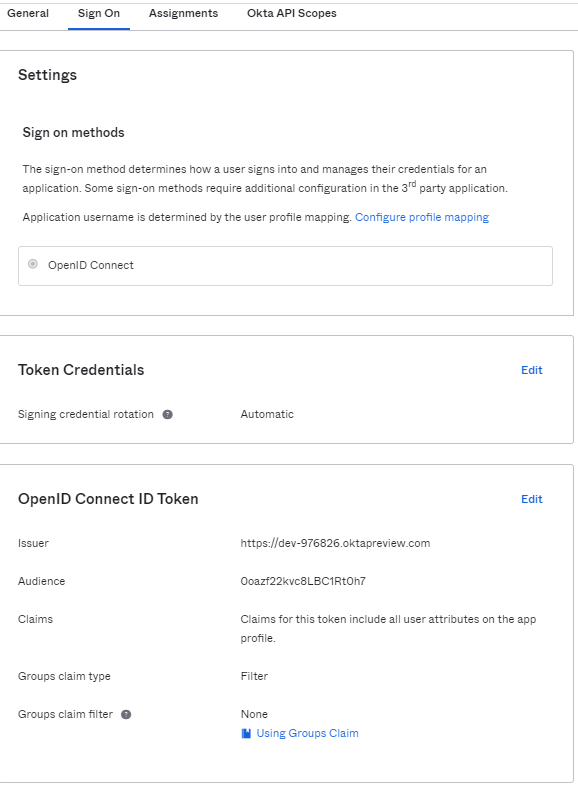
The OpenId Connect example for OKTA
1. <add key="Authentication.OpenIdConnect.ClientId" value="0oazf22kvc8LBC1Rt0h7" />
2. <add key="Authentication.OpenIdConnect.ClientSecret" value="XhqXrh85sfyHlFe4f2-OGIJj4up2yvW3LezYx05i" />
3. <add key="Authentication.OpenIdConnect.Audience" value="" />
4. <add key="Authentication.OpenIdConnect.RedirectUri" value="https://10.50.3.18:8105/" />
5. <add key="Authentication.OpenIdConnect.PostLogoutRedirectUri" value="" />
6. <add key="Authentication.OpenIdConnect.ClaimType" value="email" />
7. <add key="Authentication.OpenIdConnect.IdentityType" value="Email" />
8. <add key="Authentication.OpenIdConnect.Scope" value="openid email profile offline_access" />
9. <add key="Authentication.OpenIdConnect.ClockSkew" value="2" />
10. <add key="Authentication.OpenIdConnect.ResponseType" value="code id_token" />
11. <add key="Authentication.OpenIdConnect.MetadataUri" value="https://dev-976826.oktapreview.com/oauth2/default
Settings from OKTA

OpenID Connect Example for Azure
1. <add key="Authentication.OpenIdConnect.ClientId" value="9ae3526a-2755-460b-9f2a-77cbcd85fdf2" />
2. <add key="Authentication.OpenIdConnect.ClientSecret" value="" />
3. <add key="Authentication.OpenIdConnect.Audience" value="" />
4. <add key="Authentication.OpenIdConnect.RedirectUri" value="https://10.50.3.18:8105/" />
5. <add key="Authentication.OpenIdConnect.PostLogoutRedirectUri" value="" />
6. <add key="Authentication.OpenIdConnect.ClaimType" value="email" />
7. <add key="Authentication.OpenIdConnect.IdentityType" value="Email" />
8. <add key="Authentication.OpenIdConnect.Scope" value="openid email profile offline_access" />
9. <add key="Authentication.OpenIdConnect.ClockSkew" value="2" />
10. <add key="Authentication.OpenIdConnect.ResponseType" value="code id_token" />
11. <add key="Authentication.OpenIdConnect.MetadataUri" value="https://login.microsoftonline.com/6c...-configuration" />
12. <!-- End OpenIDConnect Settings -->
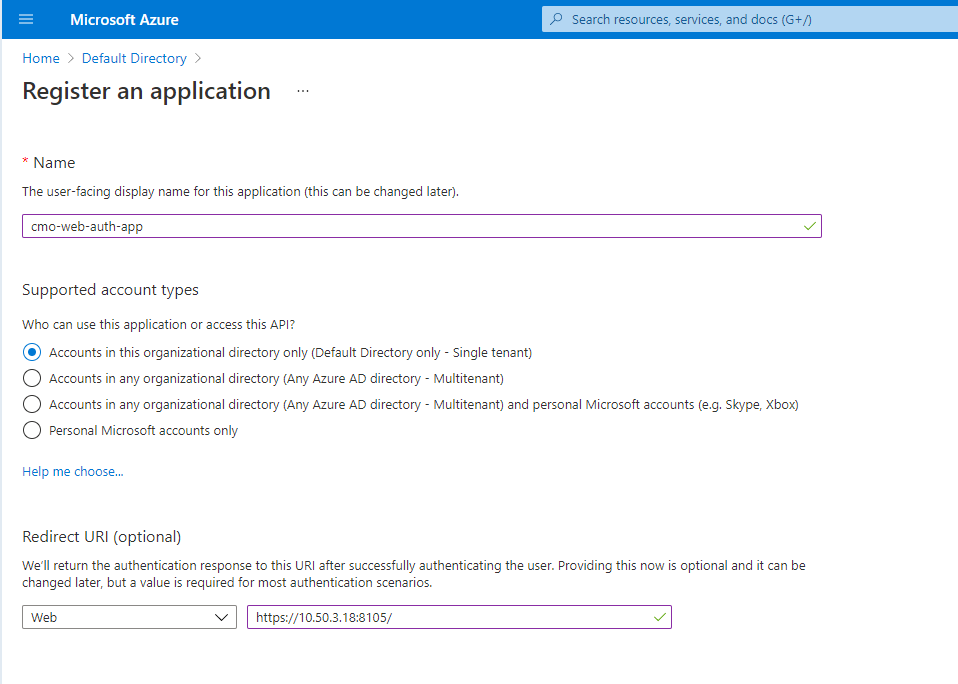
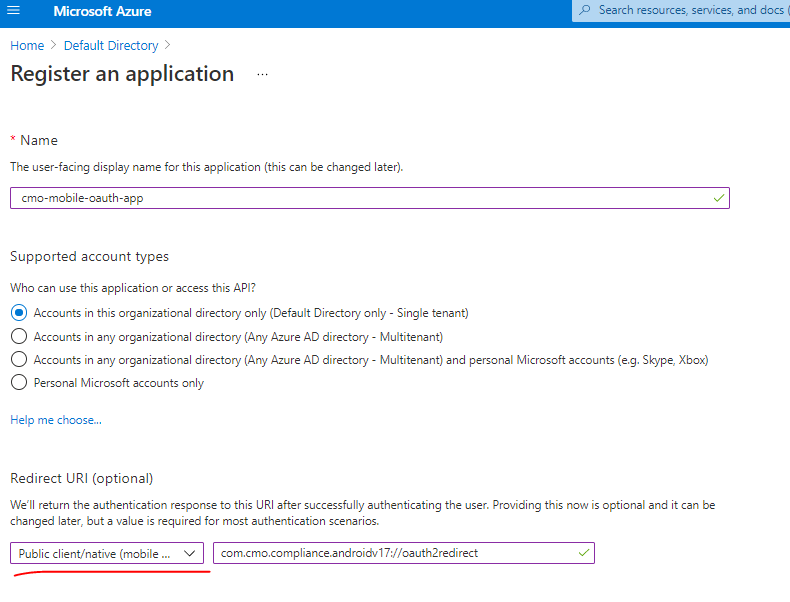
The user must register App on Azure and the define redirect url should point to CMO Web app url. For example - https://10.50.3.18:8105/
This URL should be added as value for Authentication.OpenIdConnect.RedirectUri parameter. See example of web configuration above.
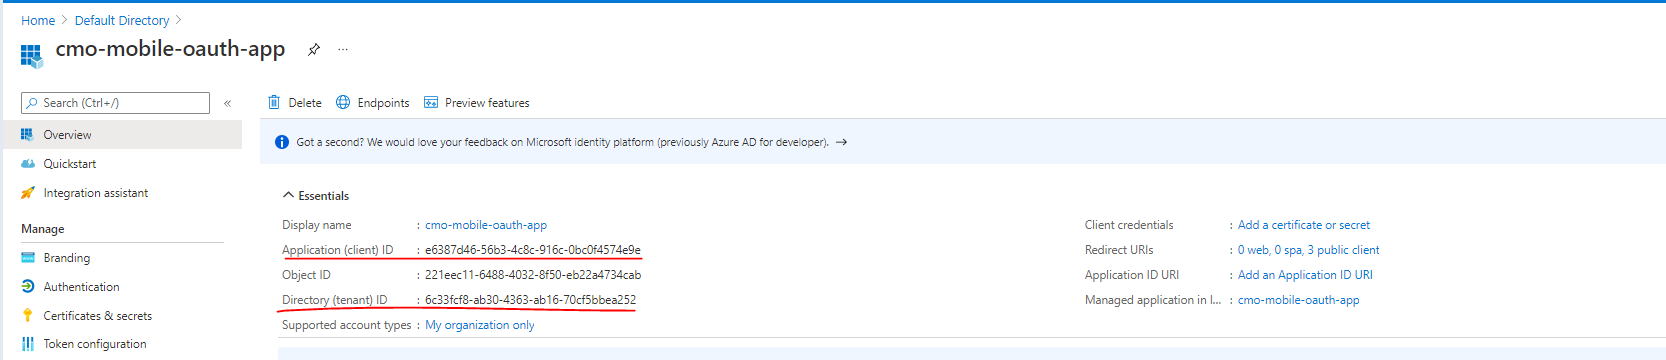
When app is registered Application (Client) ID and Directory (Tenant) ID will be assigned to the app.
Please add Application (Client) ID as value for Authentication.OpenIdConnect.ClientId parameter. in current example client id is 9ae3526a-2755-460b-9f2a-77cbcd85fdf2
Directory (Tenant) ID is used to build metadata url. ie https://login.microsoftonline.com/<put your tenant id here>/v2.0/.well-known/openid-configuration in our example it is https://login.microsoftonline.com/6c...-configuration or you can click on Endpoints button on the top menu of your app on azure and copy OpenID Connect metadata document url.
Add metadata url as value for Authentication.OpenIdConnect.MetadataUri parameter.
For more details see screenshots below.

Authentication settings on Azure
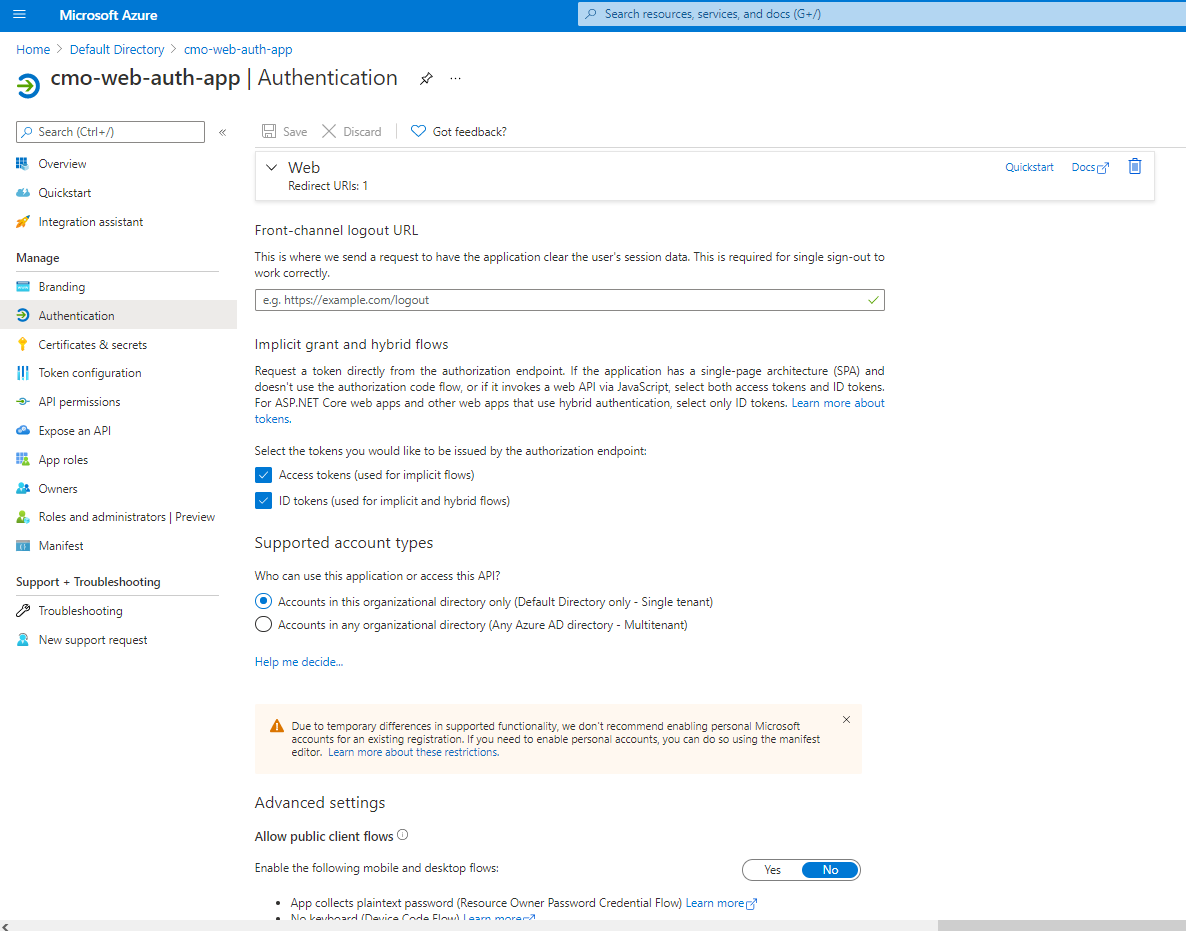
Token Configuration
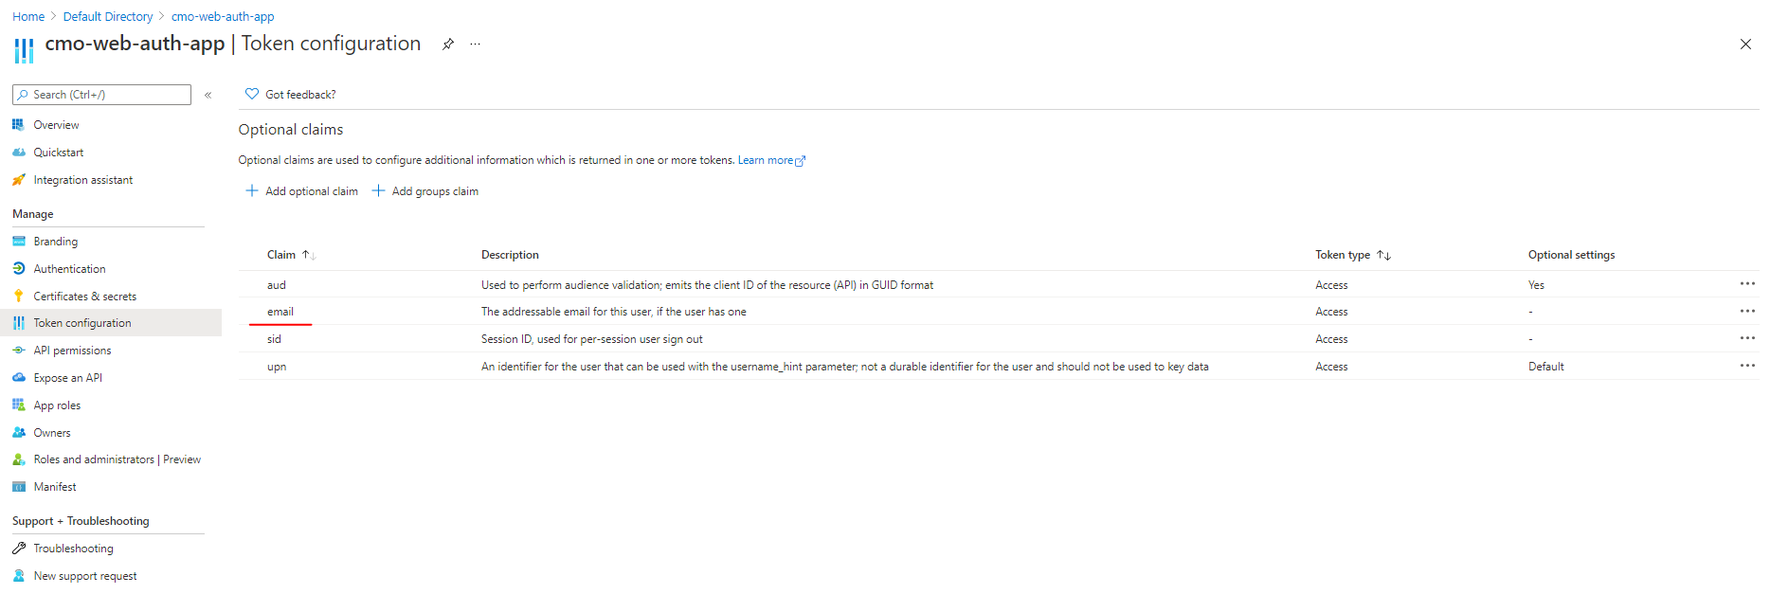
Permissions from Azure side
It relates to the Scope parameter in the web configuration.

Mobile
To enable OpenIdConnect for Mobile, add OpenIdConnect value into Authentication.Idp parameter in the web.config.
1. <add key="Authentication.Idp" value="OpenIdConnect "/>
Additional parameters:
1. <add key="Authentication.OpenIdConnect.MobileAppClientId" value="157513018297-gc3l8hm2lvdp27f89jgcekq67hp1ploe.apps.googleusercontent.com" />
2. <add key="Authentication.OpenIdConnect.MobileAppClientSecret" value="xp6jDs81V0-_ehPkbbjkCLoO" />
3. <add key="Authentication.OpenIdConnect.MobileAppAudience" value="157513018297-gc3l8hm2lvdp27f89jgcekq67hp1ploe.apps.googleusercontent.com" />
4. <add key="Authentication.OpenIdConnect.MobileAppRedirectUri" value="https://localhost:44315" />
5. <add key="Authentication.OpenIdConnect.MobileAppMetadataUri" value="https://accounts.google.com/.well-kn...-configuration" />
6. <add key="Authentication.OpenIdConnect.MobileAppIssuer" value="https://accounts.google.com" />
Example of web.config file with OpenIDConnect settings was added to the project as well.
Web.OpenIdConnect.config.sample
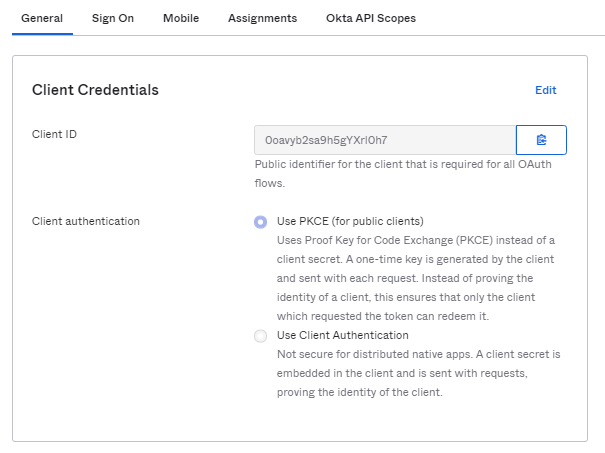
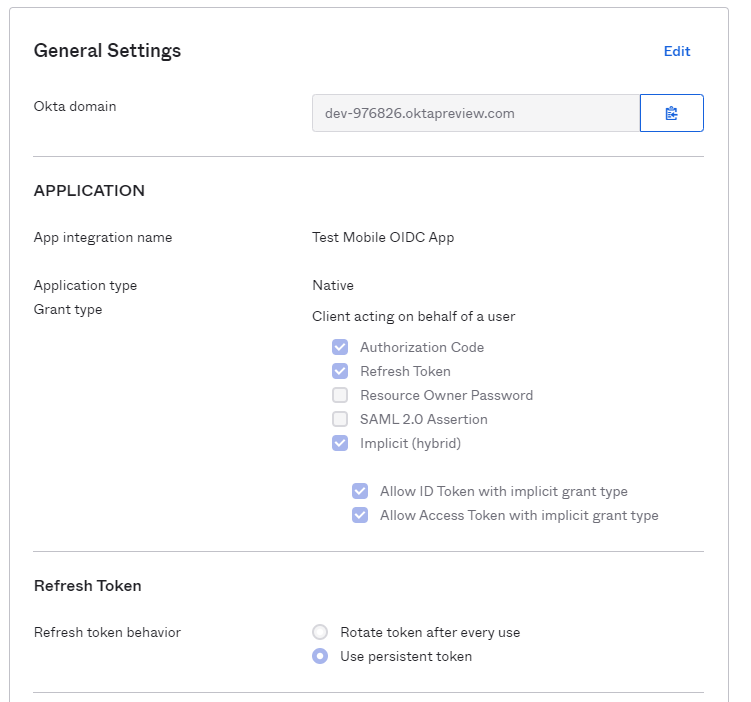
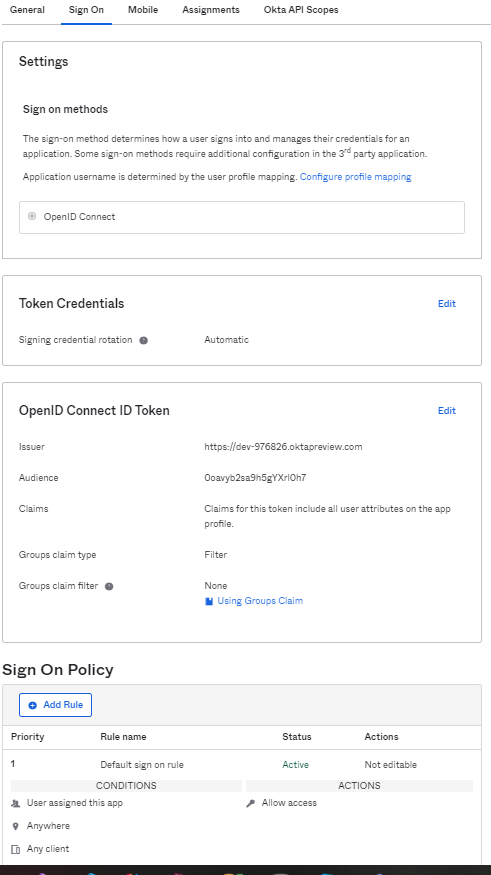
The OpenId Connect for OKTA
1. <add key="Authentication.OpenIdConnect.MobileAppClientId" value="0oavyb2sa9h5gYXrl0h7" />
2. <add key="Authentication.OpenIdConnect.MobileAppClientSecret" value="" />
3. <add key="Authentication.OpenIdConnect.MobileAppAudience" value="" />
4. <add key="Authentication.OpenIdConnect.MobileAppRedirectUri" value="http://127.0.0.1:52456/" />
5. <add key="Authentication.OpenIdConnect.MobileAppMetadataUri" value="https://dev-976826.oktapreview.com/o...-configuration" />
6. <add key="Authentication.OpenIdConnect.MobileAppIssuer" value="https://dev-976826.oktapreview.com/oauth2/default" />
Settings on OKTA side
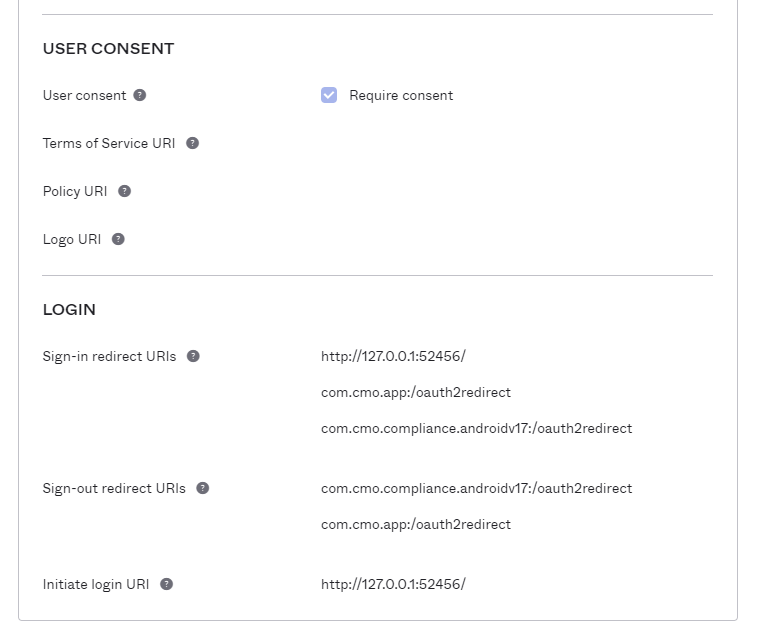
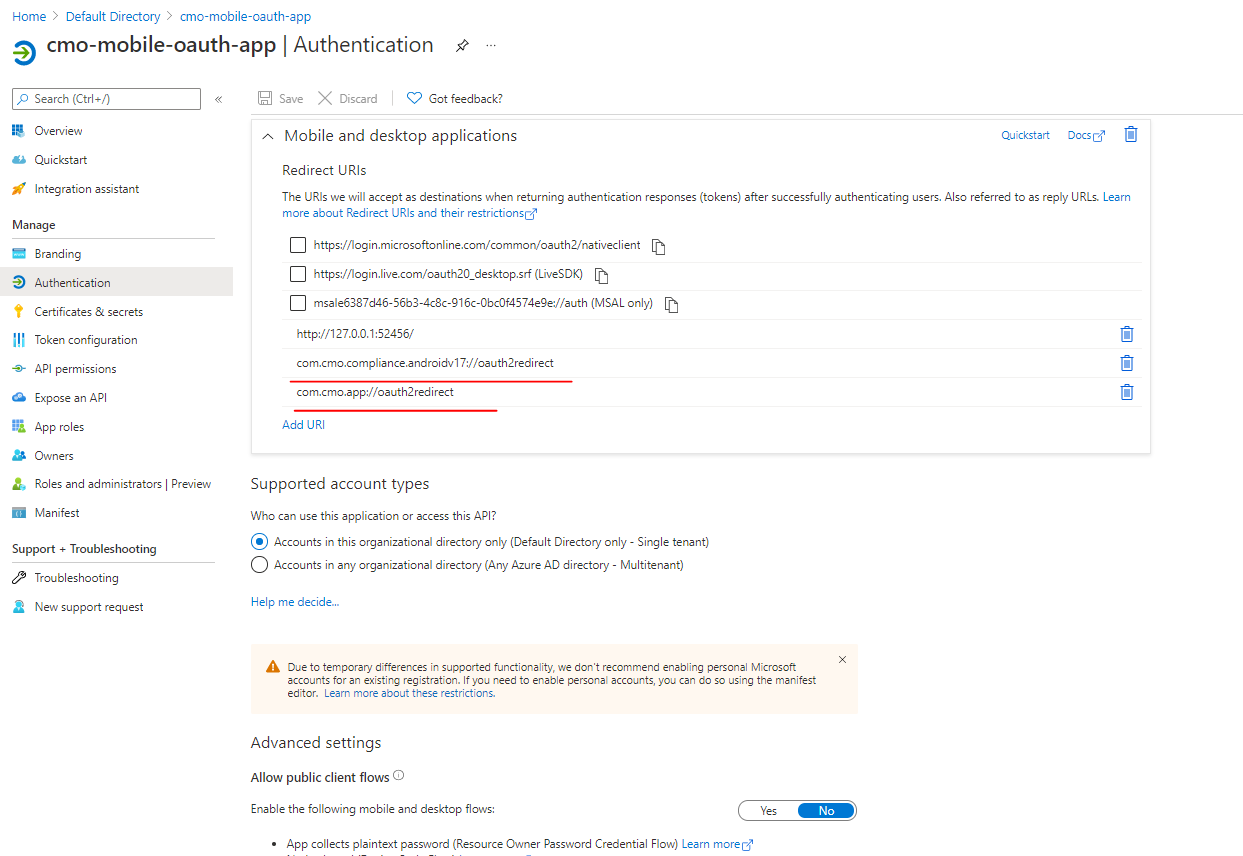
Note: The above screenshot redirect URLs have single slash in url but it should be double slash:
ie.
- com.cmo.app://oauth2rediret
- com.cmo.compliance.androidv17://oauth2redirect
OpenID Connect Example for Azure
1. <add key="Authentication.OpenIdConnect.MobileAppClientId" value="e6387d46-56b3-4c8c-916c-0bc0f4574e9e" />
2. <add key="Authentication.OpenIdConnect.MobileAppClientSecret" value="" />
3. <add key="Authentication.OpenIdConnect.MobileAppAudience" value="" />
4. <add key="Authentication.OpenIdConnect.MobileAppRedirectUri" value="http://127.0.0.1:52456/" />
5. <add key="Authentication.OpenIdConnect.MobileAppMetadataUri" value="https://login.microsoftonline.com/6c...-configuration" />
6. <add key="Authentication.OpenIdConnect.MobileAppIssuer" value="https://login.microsoftonline.com/6c...f5bbea252/v2.0" />
Like web, the user must register App on Azure (most likely the user can just add new Platform with redirect URLs on Authentication tab of App registered for web).
The same as for prev app use Application (Client) ID and Directory (Tenant) ID to fill out Authentication.OpenIdConnect.MobileAppClientId, Authentication.OpenIdConnect.MobileAppMetadataUri and Authentication.OpenIdConnect.MobileAppIssuer.
Authentication settings on Azure
Note: The redirect URLs should be: com.cmo.app://oauth2rediret and com.cmo.compliance.androidv17://oauth2redirect
5.1 Validation of Access Token
5.1.1 Resolution Details
1. POST: /api/openidconnect/GetMobileToken
json payload
1. {
2. "CompanyID":<id of the company>,
3. }
If companyID is unknown then it should have value -2. Use CompanyID parameter the same way as for request to /api/sync/authorize/post. Request should contain Authorization header with token.
i.e.:
1. Authorization Bearer <id_token recieved from IDP>
Response is the same as for /api/sync/authorize
1. {
2. "Token": "df62161f483a423a97ada35bc11db5d56878fd80468b445b999be52fe60f66c648838a18e82e4c84b5164e497568bcaa",
3. "ExpiredDate": "2021-04-15T20:36:58.387"
4. }
Currently there is endpoint /api/sync/companies to retrieve available companies for the user.
Now this endpoint accepts login/password. i.e. the same JSON payload as for /api/sync/authorize endpoint.
In case OpenIdConnect it will be impossible to send login/password so additional endpoint to retrieve companies has been added.
1. GET: /api/sync/companies/GetAvailableCompanies
Request to this endpoint should contain Header with Mobile token. i.e. the same mobile token like for other sync api requests.
1. Token <mobile token>
It would be good to use this Endpoint regardless of Authentication type.
So first of all, it will require to retrieve mobile token from CMO Web. And then using mobile token retrieve available companies.
5.2 Retrieve Mobile Auth Settings
5.2.1 Resolution Details
The following endpoint was created to receive auth settings.
1. GET: /api/sync/Settings/GetAuthSettings?key=<static key>
<static key> - the same static key which is used for the following endpoints
/api/sync/AuditScores/Recalculate
/api/sync/Audits/ValidateAuditStructure
/api/sync/logs/GetLogs
/api/sync/logs/ClearLogs
Response:
1. {
2. "Idp": "OpenIdConnect",
3. "Settings": "F8IH7PV7+VA2s1iML3jbMYd6XFt+WVOtlZZeENQi6XLNAownRleWXyACPaMhzdMueG1Wf9gCXtnJv4rUPNAuHus42rG7Y4RPWyH0KQvZr5X705zC3A4fAu/VL08yJTFmLV337ZNW1t1dj2VYZt4hlbcRE2R8lNTLQBp+u9FQa1s/rxSlhw57WkuTBbal8QpzpDJ3niGDnK84PRMuaDj2XadggIBEjwUcrclzyVIaeIO0D+gnAkCi3ajoAesFOUkUN/RMF5gbQMatBuhRtUVheYMp+6dw73kqecVIOSSYinRwCW39AIqMyTYnX7oyqIWj/JrlFLT22KzM80M8ecba8J+9Ka1uRMrD+929zVWCnr/mI2v65DFC3eriDxLfk3ZXnUffIATAY5pTWiPLme+e6t35VVnfO66fPi4Yx3tCoHnbWtJwA0dADagIptwiubfgLeAGjQ8kVN+XLUrkz+L9Sk1Lz9B6OfR742W+6K/b4fJRt/06p8k+15E864oCvc6vrRKPf4toCHbUGDr61yvd92sMzfZKcevcLM1jBNIhGKDkxe6J3H42BiS8ChMimFOjX8gY6jhG+inZaLpyt7Nc/A=="
4. }
IDP - string field which can have one of the following values
- Default
- ActiveDirectory
- AzureAD
- ADFS
- Okta
- SecureAuth
- OpenIdConnect
Settings - it is encrypted settings.
Decrypted Settings is JSON string of the following format
1. {
2. "ClientID": "157513018297-gc3l8hm2lvdp27f89jgcekq67hp1ploe.apps.googleusercontent.com",
3. "ClientSecret": "xp6jDs81V0-_ehPkbbjkCLoO",
4. "Issuer": "https://accounts.google.com",
5. "MetadataUri": "https://accounts.google.com/.well-kn...-configuration",
6. "Audience": "157513018297-gc3l8hm2lvdp27f89jgcekq67hp1ploe.apps.googleusercontent.com",
7. "RedirectUri": "https://localhost:44315",
8. "ResponseType": "code id_token",
9. "Scope": "openid email profile"
10. }
To decrypt settings, you have to use AES algorithm with the same key which you use to encrypt password when you send it to the web.
NOTE: Ignore Settings field if Idp is not OpenIdConnect
If IDP is not OpenIdConnect then Settings field will contain encrypted empty string.
JWT Token
Currently there is endpoint /api/token to generate JWT token which can be used later for public api.
This endpoint accepts login/password.
In case OpenIdConnect it will be impossible to send login/password so additional endpoint to generate token was introduced.
1. GET: /api/openidconnect/GetJwtToken
Request should contain Authorization header with token.
i.e.:
1. Authorization Bearer <id_token recieved from IDP>
Response is the same as for /api/token.
1. "eyJ0eXAiOiJKV1QiLCJhbGciOiJIUzI1NiJ9.eyJzdWJqZWN0IjozLCJleHAiOjE3MzU4MDg0NTYuMH0.oP00-GndiZ0ibqvnXHbBkTmMV1T1ta_JKqG_RfPE2a8"