
Application Installation and Maintenance
Please note that Mitratech will have sent out an installation summary document after the initial installation of your product. This document will list existing location for your current environment and should be referred to while reading through this document, for any physical paths or URLs required.
Table of Contents
Select a link below to jump to that section of the guide:
- Pre-Requisites
- Installation Instructions
- Configuration Details
- Application Update Procedures
- Managing Backups
- Disaster Recovery Recommendations
- Installation Details
- Contact Support
Pre-Requisities
CMO Compliance has the following installation requirements for the server(s) it is to be installed on:
Web Server
- MS Windows Server 2012 through to 2019
- Microsoft .NET Framework 4.0 through to 4.7
- Microsoft .NET Framework 4.5.2 is required for CMO Version 14.07 and above
- Microsoft .NET Framework 4.7 is required for CMO Version 16 and above
- Roles activated for IIS and Application Server. See details on the Powershell Script to Enable IIS Feature to automate this
- SMTP server for outgoing notifications
- Microsoft Office 64bit Runtime
- See the Official Microsoft Site to download
- POP3 or IMPA Server access (To allow users the ability to close out events/actions via their email notifications. APOP3 server will need to be set up, so that CMO Compliance can read email responses from users via a mailbox.
- Note that CMO Compliance does not currently support MAPI Mail
- A domain name (A-Record) to point to the new CMO Compliance application - this can be an internal domain only and does not need to point to an external IP.
- Optional Microsoft Office (preferably 2010 - CMO Compliance allows documents to be presented to end-users in a read-only format, via the user of Google Docs. If Google Docs cannot access your server, then you have the option of purchasing our alternative document converter which uses a PDF conversion tool to show your documents in PDF format. This tool requires MS Office to be installed so that documents may be converted from standard MS Office formats by the tool).
Database Server
- Microsoft SQL Server 2012 or 2016, Standard or Enterprise Editions
- Microsoft SQL Server Reporting Services 2008 R2 SP2, 2012, 2014 or 2016, Standard or Enterprise Editions. (To allow use of our Custom Reporting module - Note that this is an additional module that must be purchased).
- Reporting Services can be installed on the same machines as the Database Engine, however, it's required that it is accessible from the Web (the same as the Web Server). Alternatively, you can install Reporting Services on a Web-facing server - as long as it can access the SQL Server Database engine.
- SQL traffic needs to be open between Database Server and Application Server.
Installation Instructions
Application Files
All application files will be provided by Mitratech in a single archived folder. For example, CCLive1404_50341_PreCompiled.zip.
- Extract this archive then copy the contents to a folder on your Application (IIS) Server which will store the website files (for example: E:\CC\Site\[ExtractFilesHere].
- Once you've copied and extracted this folder to your server, right click and select Properties. Click on the Security tab then click Edit.
- In the 'Site' folder (e.g. E:\CC\Site\), grant Read Only rights to the IUSR and NETWORK SERVICE users on the 'Site' Folder
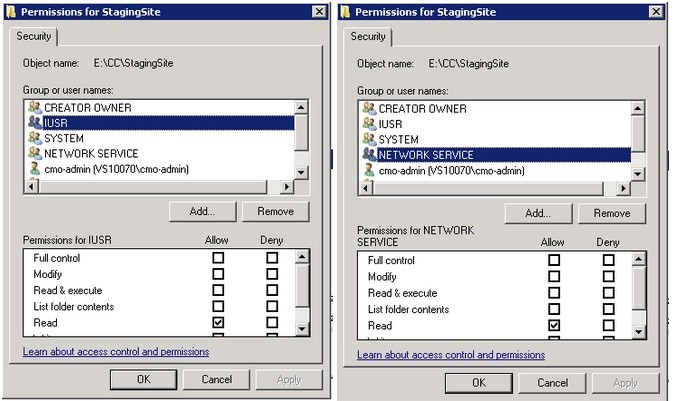
To edit these assignments, click the Edit button, then click Add and search for names.
- Add Read/Write permissions on E:\CC\Site\Upload
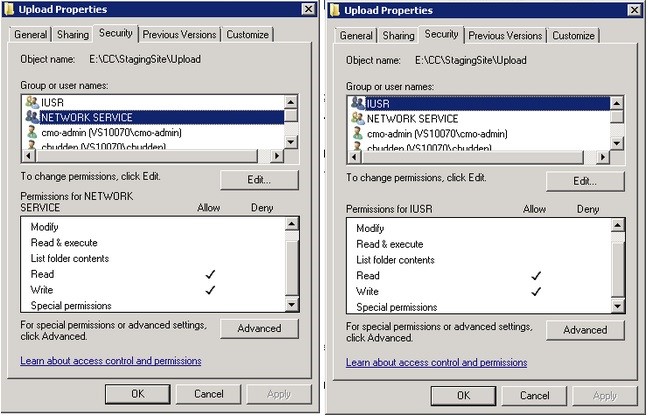
The same Read / Write permission need to be set within the host file system on the below directories:
%windows%\Temp'
%windows%\Microsoft .NET\fRAMEOWRK64\V4.0.30319\Temporary ASP.NET files'
If you are using a legacy 32bit version of CMO Compliance, you should use the 32bit folder location. If you are unsure, then use the above location - 32bit temporary folder- %windows%\Microsoft .NET\fRAMEOWRK64\V4.0.30319\Temporary ASP.NET files'
Database Files
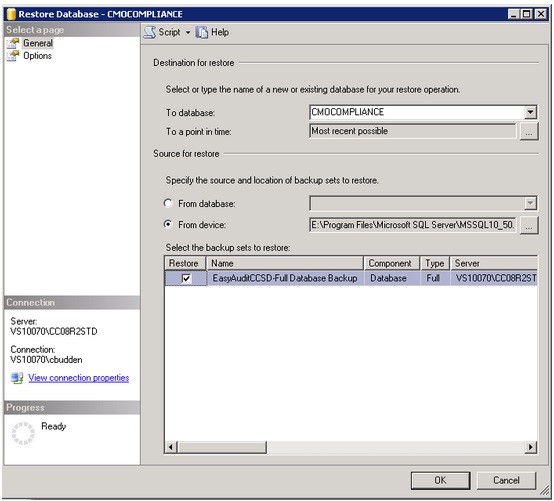
The Database file will be provided as a MS SQL Server backup file (.bak). This file can be restored to the Database server by following the steps below. Note, the instructions below are for SQL Server 2008 R2. The SQL 2012 and 2014 has a slightly different interface.
- Open MS SQL Server Management Studio and connect to the DB Server.
- Right click on the Databases folder in the object explorer panel and select Restore Database.
- Locate the To Database field in the Destinations for Restore section and enter the preferred name of your new database that you are restoring (e.g. CMOCOMPLIANCE).
- In the Source for Restore section, select the From Device option and select the (.bak) file that you were provided with.
When you have selected the file to restore, ensure the Restore option is selected in the table next to the database backup, then click Ok (detailed in the image below).
Now you must create a new user that CMO Compliance can use to connect to the database. Follow the steps below:
- Expand the Security folder in Management Studio's Object's explorer panel.
- Right click on the Logins sub-folder and select New Login.
- Enter a login name for the user (e.g. cmologin).
- Check/select the SQL Server authentication option and enter a password for the user. Ensure the option for Enforce password expiration and User must change password at next login are checked.
- Select your newly restored CMOCOMPLIANCE database as the 'Default Database' that the user has access to, then click on the User Mapping page in the left panel.
- Click the Map checkbox in the new CMO COMPLIANCE database, then click the db_owner role to assign the user to the database with that role.
- Click Ok to save the user.
- Expand the Databases folder in the 'Object Explorer' panel of Management Studio, then expand the newly restored CMOCOMPLIANCE Database.
- Expand the Security folder under the CMOCOMPLIANCE database, then expand the Users sub-folder.
- Double click on the new user that you created and ensure that the db_owner role is selected in the Database role Membership table.
The database has now been set up and a user with db access has been created.
Configuration
Configuring the site can be done entirely through Internet Information Services (IIS).
Creating the Website
As CMO Compliance is access via website, you will ne to create a website via IIS - Follow the steps below:
- Open IIS and expand the web server instance in the Connections panel on the left.
- Right click on Sites and select Add Web Site.
- Enter the site name then browse for the physical location of the site (e.g. E:\CC\Site). Point the site to the folder which stores all of the physical site files.
- if you are using folder naming provided by CMO, then you will need to point to the folder named Site, which is part of the Site files archive.'
- In the Binding section, add any domains/host names that are reserved for the application in the Host name field.
- If users are accessing the site via https: Select this from the Type drop-down, then select the relevant SSL certificate to be used. It is recommended to have three bindings: you.hostname.com:443, your.hostname.com:80, and 127.0.0.1.80xx.
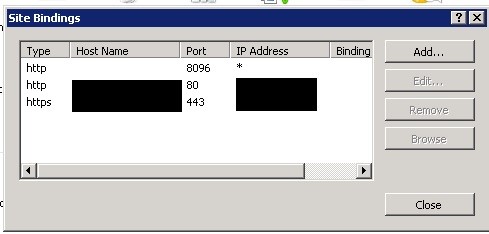
- If users are accessing the site via https: Select this from the Type drop-down, then select the relevant SSL certificate to be used. It is recommended to have three bindings: you.hostname.com:443, your.hostname.com:80, and 127.0.0.1.80xx.
- Click Close.
Configuring the Website
Some of the values will need to be modified in the configuration file once the website is set up. This is to ensure that it can connect to the database correctly.
To access the configuration file, click on the website in the left hand Connections panel, then double-click on the Application Settings icon.
In the application settings, there are a number of fields that you will need to modify to ensure that your CMO application functions correctly.
- Double-click on a setting to change it's value - click OK when finished editing.
- This can also be edited through the GUI in IIS Manager or through the web.config file (if you prefer).
- The main settings that you will be required to set up initially are detailed below:
| ConnectionString |
Definition: The connection string used to connect the application database. It appears in the following format: Server name may require a domain and/or a port number. If so, enter them in the format <domain>\servername;<port> Ensure that the login details match those of the database user created in the Configuring the Website section of this document. If your connection requirements differ, please see www.connectionstrings.com for additional connection string examples. Use this connection string if you wish to use Windows Integrated Authentication for the database login (use this in association with the correct setup of the Application Pool): |
| UseSSLForLoginPage | If you are connecting to the application via https, set this to setting to True but only after you have verified the website is running correctly. |
| AdminEmail | This field controls the default "Form" address of email notifications sent from the application. This MUST be configured in order for email to send out of the application. |
| CurrentURL | This field controls the default URL that is prefixed to links auto-generated by the application. |
| EmailURLReplace | This field controls the default URL that is prefixed to links auto-generated specifically in email notifications. |
| Pop3Server | This address for the POP3 server is used to receive responses to notifications. |
| Pop3Login | The login for the POP3 mailbox used by CMO to receive responses to notifications. |
| Pop3Password | The password for the POP3 mailbox used by CMO to receive responses to notifications. |
| Pop3UseSSL | Set to True if you want to use POP3 SSL, otherwise set to False. |
| SmtpServer | The address for the SMTP server used to send email notifications from the application. |
| UseSmtpAuth | If True, SMTP server authentication details must be provided. |
| SmtpLogin | The login required to connect to the SMTP server. |
| SmtpPassword | The password required to connect to the SMTP server. |
Setting up the Notification Center
- Email notification in CMO are sent out via a standard web service, available at http://<ApplicationURL>/Webservice/Scheduler.asmp
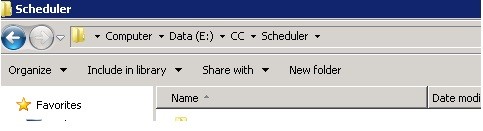
- To configure the Email Task Scheduler, open the application's physical location (to easily access this from IIS, right click on the website in the left panel then click Explore), then navigate up one directory. For example if the Site Folder is E:\CC\Site, navigate to E:\CC\.
- Create a folder called Scheduler and add RunSchedulerCommand_Jan2014.exe within the Scheduler folder. In the RunSchedulerCommand, create a file named start_sched.cmd. Open this file in a text editor and add 4-6 lines of text based on the example below - these lines of text are used to invoke a tool which calls the web services and passes a parameter.
- Use the following parameters:
- Audit
- Action
- Cleanup
The format of the web service call is as follows:
<PhysicalWebsitePath>\bin\Scheduler\RunSchedulerCommand.exe<WebsiteURL>\Webservice\Scheduler.asmx <parameter>
You should modify both the <PhysicalWebsitePath> and <WebsiteURL> values to match those of your CMO application. The <parameter> values should remain as they are.
An example of what the file should look like after editing is below:

Ensure you save your changes when you have finished editing the file.
Now, if you run the start_sched.cmd bat file, any queued notifications will be sent out by the application.
To automate the process of sending notifications, you will need to set up a Windows Scheduler task. Follow the steps below to do this:
- In the application server: click start, hover over administrative tools then click Task Scheduler.
- Click Create Task in the right Actions panel.
- In the General tab, enter a name for the task (e.g. CMO Scheduler). Ensure the Run whether users is logged on or not option is checked.
- In the Triggers tab, click New. Create a new trigger to match the settings as shown below (ensure you set the start date to a time in the past).

- Click Ok when all settings are configured.
In the Actions tab, click New, then click Browse, then locate your start_sched.cmd bat file as shown in the example below:
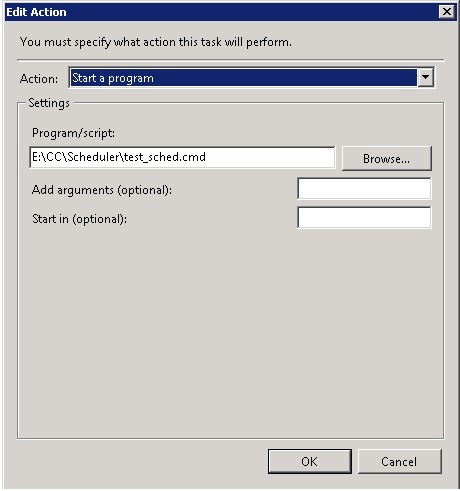
Click Ok when complete.
On the Settings tab, ensure the If the running task does end when requested, force it to stop option is NOT selected.
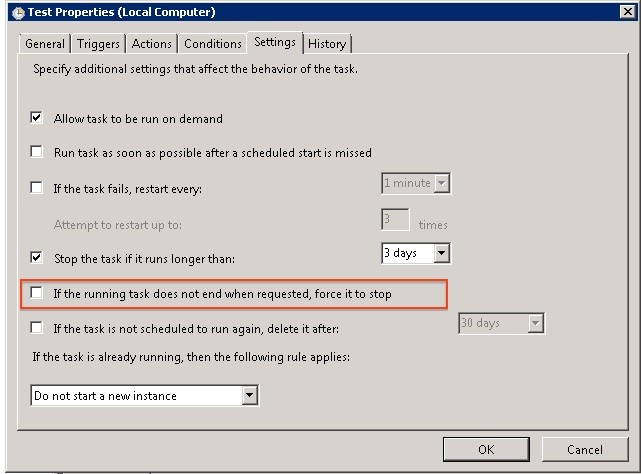
No other default settings need to be changed for the task - Click Ok to save the task.
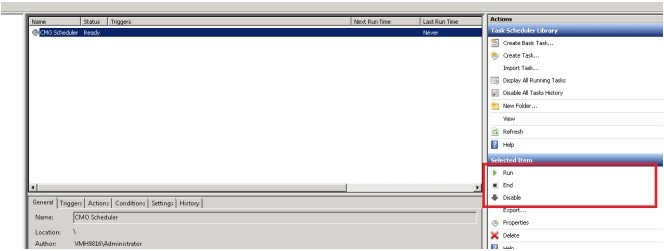
You can also manually run, end, or disable the task from the Task Schedule Library at any time by selecting the task and clicking one of the options in the right panel.
WinService
For CMO Compliance version 14.07 and above, WinService files are extracted alongside website files. Please follow the instructions below to get the Windows Service installed and running on your web server(s).
Note: Microsoft .net 4.5.2 is required for this installation.
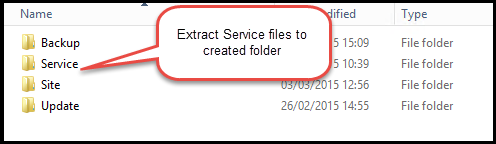
For first-time install of CMO Win Service, CMO recommends you create a WinService folder in the same directory where a folder with each web site is located, and add another sub-directory called Service. The CMO Compliance Win Service files will go in to Service Directory.
Create .bat Files
Create file Install.bat with the following contents and save it to the WinService folder in Service parent folder.
- Set installUtil=="C:\Windows\Microsoft.NET\Framework\v4.0.30319\InstallUtil.exe"
- installUtil: path to InstallUtil.exe utility. It is a part of .net framework so it is not necessary to install anything.
- Set serviceName="CMOCompliance-WinService"
- serviceName: name of Win Service. It should be a unique name, so if you have only one instance of this service then you can leave it as "CMOCompliance-WinService", otherwise you should add a prefix or postfix to identify it (e.g. CMOCompliance-WinService-Prod).
- Set servicefilePath="<path to win service\CMOCompliance.WinService.exe"
- serviceFilePath: path to Win service. In this example it is F:\CMOCompliance\<instancename>\WinService\Service\CMOCompliance.WinService.exe
- %installUtil% /servicename=%serviceName% %servicefilePath%
Create start.bat with the following contents and save it to the WinService folder in Service parent folder.
- Set serviceName="CMOCompliance-WinService"
SC start %serviceName%- serviceName: Name of the Win Service. It must be exactly the same as it is in the .bat file.
Create uninstall.bat with the following contents and save it to the WinService folder in Service parent folder.
- Set installUtil="C:\Windows\Microsoft.NET\Framework\v4.0.30319\InstallUtil.exe"
- Set serviceName="CMOCompliance-WinService"
- Set servicefilePath="<path to win service\CMOCompliance.WinService.exe"
- %installUtil% /servicename=%serviceName% /u %servicefilePath%
Parameters InstallUtil, serviceName, and serviceFilePath must be exactly the same as install.bat file.
Create stop.bat with the following contents and save it to the WinService folder in Service parent folder.
- Set serviceName="CMOCompliance-WinService"
SC stop %serviceName%- serviceName: Name of the Win Service. It must be exactly the same as it is in the .bat file.
Edit CMOCompliance.WinService.exe.config
Find the CMOCOMPLIANCE.WinService.exe.config file and edit it. In the <appsettings> section you will find a connection string key. You need to place the connection string key from the CMO application here.

Install WinService
Either double-click the install.bat file in the WinService folder or run it via CMD prompt (as an admin). If the install is successful, InstallUtil.InstallLog will be created in the WinService folder. The below log entry would indicate a successful install:
Running a transacted installation.
Beginning the Install phase of the installation
See the contents of the log file for the
F:\CmoCompliance\<instance name>\WinService\Service\CMOCompliance.WinService.exe assembly's progress.
The file is located at:
F:\CmoCompliance\<instance name>\WinService\Service\CMOCompliance.WinService.InstallLog.
The Install phase completed successfully, and the Commit phase is beginning.
See the contents of the log file for the
F:\CmoCompliance\<instance name>\WinService\Service\CMOCompliance.WinService.exe assembly's progress.
The file is located at:
F:\CmoCompliance\<instance name>\WinService\Service\CMOCompliance.WinService.InstallLog.
The Commit phase completed successfully
Start WinService
Either start the WinService by double-clicking the start.bat file you created (you can also do this via CMD prompt) or by opening services.msc and starting the service manually.
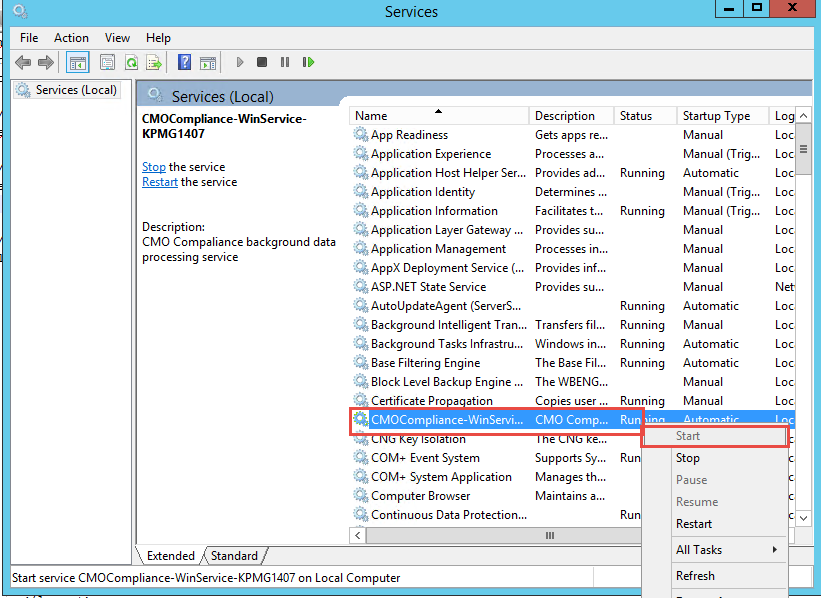
If your application is connecting to the SQL database via Trusted_Authentication then you need to set the service account for the service in Properties. For example: Website runs as svc-cmo-prod, you would need to set the CMOCOMPLIANCE-WinService to run under svc-cmo-prod as well.
Application Update Procedure
This process will be followed when any upgrades are required for:
- Cloud Hosted Deployments
- Private Cloud Deployments
Follow the procedures below when upgrading deployments of CMO Compliance. This process will take place once the Service Delivery Team has secured an update slot and provided notifications to users:
- Using RDP, connect to IIS server with Admin credentials.
- Stop the website.
- On the IIS server, locate the path of hte installted website (e.g. E:\CC\Website\) and take a full backup of the site files for restoring in the event of a problem with the update (exclude "upload" folder).
- Take a full backup of the SQL Database running CMO Compliance.
- Unzip the update package provided by Mitratech.
- Within the site folder, delete all files exept /Uploads, /Languages, and .webconfig.
- Note: The web.config is machine-specific and changes periodically. You can compare it to web.config.sample for any new config keys, config sections, or assemblies.
- Copy and past the contents of the update package into the site folder and accept all overwrites/copies.
- Make any required changes to the web.configu file (e.g. Add new config key).
- If Active Directory is enabled, disable it in the web.config (selection starting <authentication mode="Forms">).
- Start the website.
- Load migrationlauncher.aspx on local, private port (e.g. http://localhost:8081/migrationlauncher.aspx).
- Ensure the 'Migrate To' version is higher than the 'Current Database Latest Version' number. If not, try clearing your browser cache and refreshing. Contact CMO Support if it does not show a difference after clearing your cache.
- Wait for the migration to complete. You will know when they are completed: the page will reload and the two version number will now match. Contact CMO Support and send the error message if any discrepancies appear.
- Re-enable Active Directory in web.config, if required.
- If you have your scheduler file inside /bin, please replace it from the backup.
- Load your CMO login page URL and check you can login an dload all pages.
The update is now complete.
If your application has been requested from an Update Request form, feedback via the form that is completed.
Backing Up the Application
Mitratech recommends that you back up your website files before every application update. This is just a simple copy of the entire website folder outside of any regular backup routines.
Note also that physical documents added to CMO COMPLIANCE, such as standalone documents, event/action attachments and guidance documents, are all stored in subfolders of the {PhysicalPath}\Upload\ folder. This folder also stores documents used to represent dashboard charts, as well as log files output by the application. If documents are being added to CMO at a more regular frequency, we would recommend more frequent backups of this specific folder. This folder path should be backed up regularly.
Mitratech also recommends that regular daily full backups be carried out on the application Database, along with differential backups every 4 hours. Depending on the required RPO you may also want to configure Transaction Log backups or create your own schedule. These can be carried out manually or scheduling an SQL Agent job to backup the database.
Below is a summary of items that need to be backed up as well as the minimum recommended backup frequency.
| Item | Typical Location | Frequency and Backup | Backup Location | Retention Period |
| SQL Database | Remote SQL Server | Daily Full with 4 hour diff. backups | Offsite backup location | 4 weeks (4 full backups) |
| Website Folder | IIS Server running the application | Daily mirror | Offsite backup location or mirror IIS folder for DR | 7 days |
Restoring the Application
If you need to restore the application from a backup, first obtain the backed files from your backup storage and copy them to a new IIS and SQL server. Then follow the instructions from Step 3 to reconfigure the application.
Disaster Recovery Recommendations
As CMO Compliance uses standard Microsoft functionality and services, HA/DR can be achieved in many ways using whatever technology works best for your organization. Typically Mitratech implements DR using SQL Mirroring High Safety without automatic failover to handle Database DR. We have also successfully tested implementations using SQL 2012 AlwaysOn Availability Groups. In depth information on Disaster Recovery can be found on the Microsoft website here:
Mitratech can also discuss with you if required.
Additional information and detailed technical setup information for certificate based SQL Mirroring can be found at Setting up Database Mirroring with Certificate Authentication.
Installation Details
Dev Environment
Database Server
| Server Name | |
| Physical Database File Locations |
Data: Log: |
| Database Instance Name: | CMOCOMPLIANCE |
| Database Name | |
| Database User Login (SQL Auth) | |
| Database User Password | |
| Database Backup Location | |
| Additional Applications / Services Installed |
Application Server
| Name | |
| Physical Site Folder Location | |
| Site configuration file | |
| Environment access URLs | |
| Scheduled Task Folder Location | |
| SMTP Server Details |
Server: Admin Email: Authentication Details: |
| Site Backup Location | |
| Additional Applications / Services Installed |
.NET 4.5.2 Framework .NET MVC 3 |
Test Environment
Database Server
| Server Name | |
| Physical Database File Locations |
Data: Log: |
| Database Instance Name: | CMOCOMPLIANCE |
| Database Name | |
| Database User Login (SQL Auth) | |
| Database User Password | |
| Database Backup Location | |
| Additional Applications / Services Installed |
Application Server
| Name | |
| Physical Site Folder Location | |
| Site configuration file | |
| Environment access URLs | |
| Scheduled Task Folder Location | |
| SMTP Server Details |
Server: Admin Email: Authentication Details: |
| Site Backup Location | |
| Additional Applications / Services Installed |
.NET 4.5.2 Framework .NET MVC 3 |
Production Environment
Database Server
| Server Name | |
| Physical Database File Locations |
Data: Log: |
| Database Instance Name: | CMOCOMPLIANCE |
| Database Name | |
| Database User Login (SQL Auth) | |
| Database User Password | |
| Database Backup Location | |
| Additional Applications / Services Installed |
Application Server
| Name | |
| Physical Site Folder Location | |
| Site configuration file | |
| Environment access URLs | |
| Scheduled Task Folder Location | |
| SMTP Server Details |
Server: Admin Email: Authentication Details: |
| Site Backup Location | |
| Additional Applications / Services Installed |
.NET 4.5.2 Framework .NET MVC 3 |
CMO Compliance Support Information
CMO provides the following servies pursuant to the terms of your licensing and support agreement.
| Support Type | Support Hours and Availablility | Support Contact |
| Support Portal |
UK: 9:30am to 5:30pm (UTC) Monday to Friday (excluding public holidays) Australia: 9:30am to 5:30pm (EST & WST) Monday to Friday (excluding public holidays) US: 8am to 5pm (Central time) Monday to Friday (excluding public holidays) Response time: First web response from Mitratech to the support requestor will be made based on the Priority Level. |
Mitratech.my.site.com |
| Phone |
UK: 9:30am to 5:30pm (UTC) Monday to Friday (excluding public holidays) Australia: 9:30am to 5:30pm (EST & WST) Monday to Friday (excluding public holidays) US: 8am to 5pm (Central time) Monday to Friday (excluding public holidays) Response time: First response from Mitratech to the support requestor will be made based on the Priority Level. |
AUS: +61 (0)3 9521 7077 UK: +44 (0)207 078 7414 US: +1 678 388-9439 |
| Client Success Center | Access to knowledge articles and videos, release notes, and user guides year around 24/7. | https://success.mitratech.com/CMOCompliance |
Support requests should be submitted at mitratech..my.site.com clearly identifying the exact issue, so that the Mitratech Support team can attempt to replicate the error if required.