
Event Question Response Types
Question Response Types
Goal: Reference point for response types and aliases within CMO
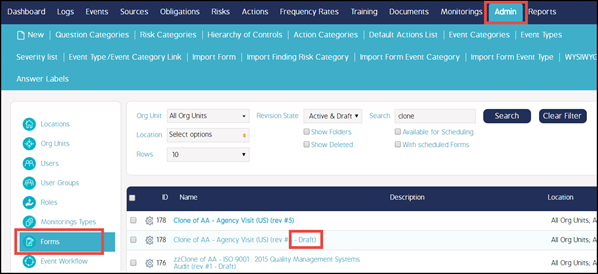
1. Go to Admin > Forms (or Events). Select the form in Draft mode where you want to create the notification.
2. Drill down into the form to the Question screen. Check the “Email” checkbox in the bottom right corner of the screen.
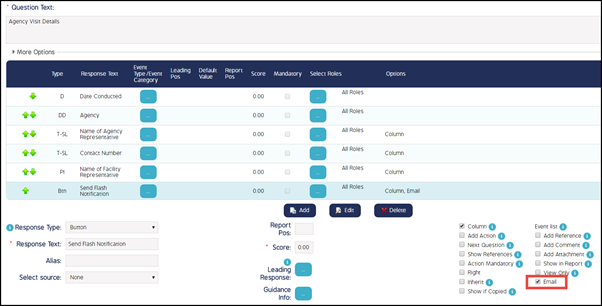
Note: While you can add an email to any Response Type, it may not make sense for many of them. It is most often used with the following Response Types: Button, Radio Button, Checkbox
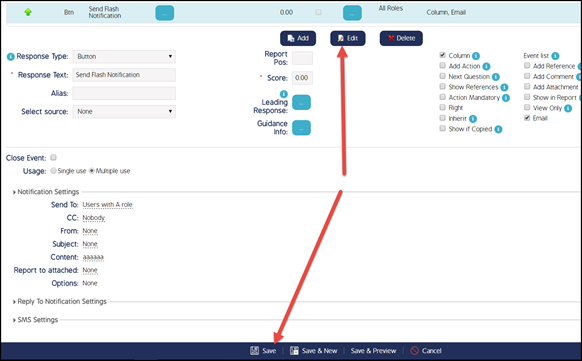
3. When the “Email” checkbox is checked, new “Notification Settings” fields display at the bottom of the screen. If the notification has not yet been configured, the fields will list Nobody or None.
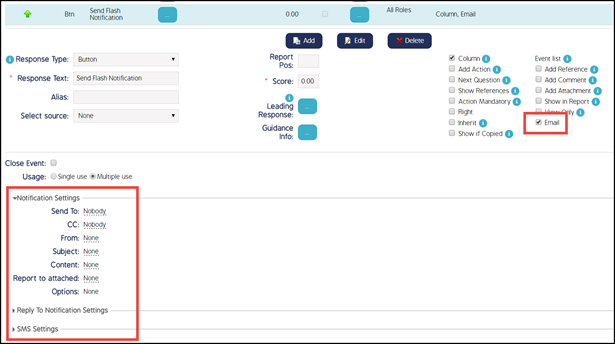
4. Click the “Nobody” link in the “Send To:” field. Select the recipients as needed. Click Save.

5. Click the “None” link in the From: Subject: or Content: fields. The Settings screen will pop up. Add what you would like to appear in the “From” field for this notification. You will see fields where the Subject and Content of the notification are created and edited (to be covered later in the Notification Message Configuration section).
6. After the Subject and Content are created click Save.
7. Be sure to click Edit and Save back in the Edit Question screen.
Notification Message Configuration
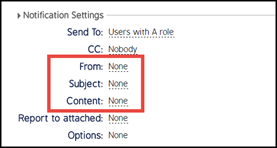
The notification fields From, Subject, and Contents are configured the same way no matter in which area of the application you are creating your notification.
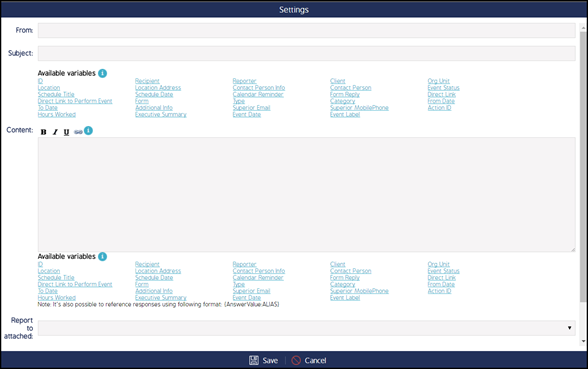
1. Earlier in this guide we covered how to configure the Send To field. Now we will look at the fields, From, Subject, and Content. Open your notification Settings screen by clicking one of these fields. We will look at how to create a notification from a blank screen, but you could also choose and existing notification, or copy the text from an existing notification into a blank Settings screen.

Note: In Admin > Custom Emails these fields are already open and you only need to put your cursor in the field to enter or edit data. The notifications in Custom Emails are already configured but can be easily edited.
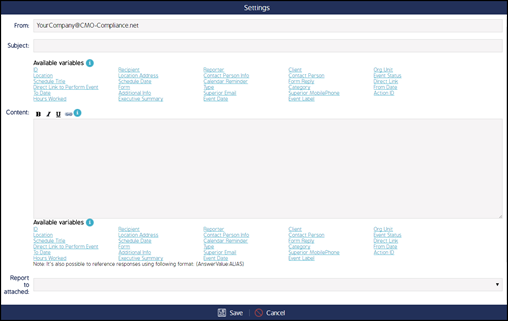
2. In the “From” field type the text that you want users to see in their notification 'From' field.
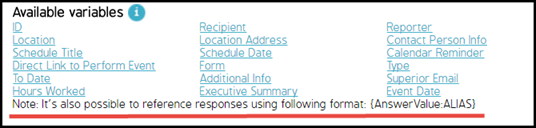
3. Configure the “Subject” field. You are able to type text as desired as well as add any of the tags listed below. Clicking a tag will enter that information from the record where the notification is being sent from. For example, if you click the “ID” tag, the system ID # of that record will display in the subject line of the email. Create or edit your subject line using a mixture of text and tags as needed.

Note: Some tags (such as “Location” which is shown above) will put a different label ({Auditee}) in the email text than what you would expect. Do not be concerned about this (the system is listing the database name in the label, while the tag below is more clearly descriptive of what you want to see when configuring.)
4. Configure the “Content” field. Again, you are able to type text as desired as well as add any of the tags listed below. The same tags that were available for the Subject field are available here.
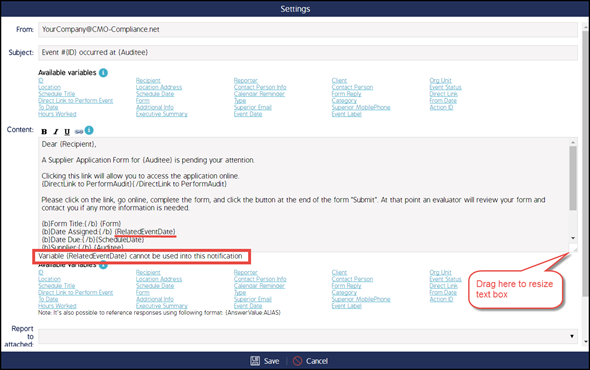
Note: If you copy the contents from another notification to here. You may not have the same tags available (for instance if it was copied from Custom Emails to a Workflow notification. If this is the case, you will get a message below the box when you try to save the notification informing you that Variable X cannot be used in this notification. You can likely find an equivalent in the list. So in the example above “RelatedEventDate” cannot be used, but “EventDate” can be selected instead.
(To expand the size of the Content text box, drag the bottom right-hand corner of the box to resize it.)
5. If you do not have the tag you need for your notification, you can create one using the Alias function in the Response configuration.
1A. To do so, go to the form that has the field that you want to include in your notification. Go to the question, and finally the response that you want included. You will see an “Alias” field for each response. Add unique text for your Alias (Do not use spaces). Click Edit and Save.
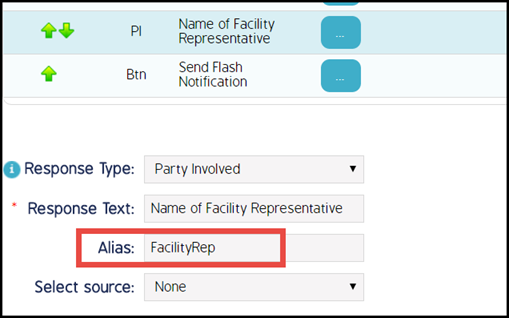
2B. Return to your Notification Settings screen and enter your Alias field as shown.
3C. Also note that html configuration can be done in this box, such as is shown -- {b} {/b} for bold text.

Generally configuration of notifications takes some experimentation with various tags to see what they will look like. Be sure to experiment in an environment where real users won’t be receiving the test notifications.