
New Event / Finding / Action / User Shortcut Widget Configuration
This widget displays shortcut buttons for users to quickly create a new Event, Finding, Action, and User. This widget is pre-configured to display one of each shortcut but can be reconfigured to display four New Event buttons.
Note: If the widget is created but not configured for specific Events / Findings / Actions / or Users then the buttons will open blank New screens for the respective button.
Create the Widget
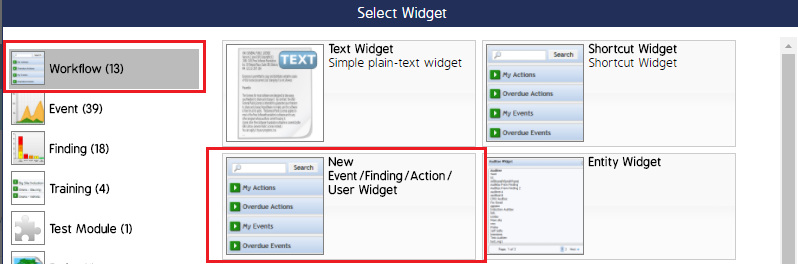
- Log in and navigate to the Dashboard module.
- Select the Dashboard you want to add the widget to, then click +Add Widget. The Select Widget screen will appear.
- Click Workflow, select New Event / Finding / Action / User widget, then click Ok.
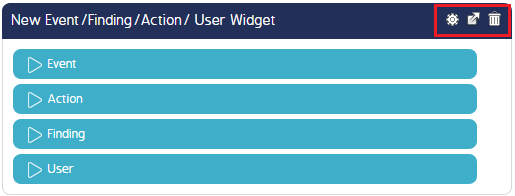
- The widget will appear but will need to be configured. Click the cog wheel in the top right corner of the widget to add/edit information. See the sections below to configure the respective information for Events, Actions, Findings, and Users buttons.
Important Considerations
- Ensure the save button is clicked after editing. All unsaved work will be lost if Save is not clicked.
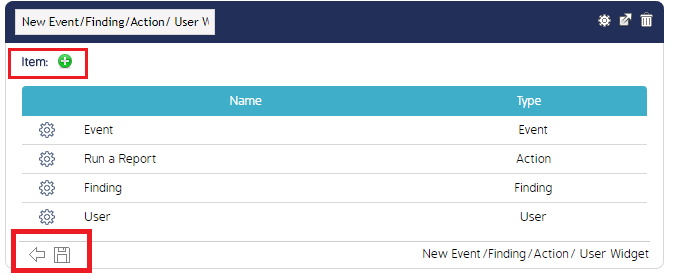
- New items (Event / Action / Finding / User) can be added to this widget by clicking the green + icon.
These buttons are designed to act as shortcuts to specific New Events, Actions, Findings, or User detail screens.The sections below detail how to configure information for each button on this widget (Event, Action, Finding, and User). The instructions below begin assuming the widget has already been created (steps 1-4 above).
New Event
This button is used to launch a new Event for a specific Form, Org Unit, and Entity. When clicked, this button will land the user inside the New Event Details page where they can add, edit, or modify the details of an Event before performing it.
- Click the cog wheel to the right of the word Event and select Edit.
- Fill in the respective fields in the Edit screen.
- *Name - Give the Event shortcut button an intuitive name.
- Type - Leave the type as Event.
- Org Unit / Entity / Form - Select the respective options from the drop down menus.
- Show Bubble - if checked, a text box will appear. Enter informational text in this box about the Event that you would want users to know. The information will be displayed in a small information bubble that expands when users hover over it.
- Simple / Advanced / Direct - This is essentially selecting where users will land when the click the shortcut button.
- Click Save.
New Action
This button is used to launch the New Action screen. Here, users will manually enter Action details before performing.
- Click the cog wheel to the right of the word Action and select Edit.
- Fill in the respective fields in the Edit screen.
- Name - Give the Action shortcut an intuitive name.
- Type - Leave this as Action.
- Category - This field can be left blank, if desired. If a category is selected then the new Action shortcut will automatically assign the new Action to the Category chosen.
- Show Bubble - if checked, a text box will appear. Enter informational text in this box about the Event that you would want users to know. The information will be displayed in a small information bubble that expands when users hover over it.
- Click Save.
New Finding
This button is used to launch the New Finding screen. Once clicked, users will manually enter Finding details and will have the ability to Save & Add Action.
- Click the cog wheel to the right of the word Finding and select Edit.
- Fill in the respective fields in the Edit screen.
- Name - Give the Finding shortcut an intuitive name.
- Type - Leave this as Finding.
- Category - This field can be left blank, if desired. If a category is selected then the new Finding shortcut will automatically assign the new Finding to the Category chosen.
- Show Bubble - if checked, a text box will appear. Enter informational text in this box about the Event that you would want users to know. The information will be displayed in a small information bubble that expands when users hover over it.
- Click Save.
New User
This button is used to launch the New User details screen. While configuring the widget, administrators can configure the button to automatically fill in certain details in the New User screen, such as the Role, Type, and User Group. Once clicked, the widget button will open the New User details screen. Here, users will manually enter the User details before saving.
- Click the cog wheel to the right of the word Finding and select Edit.
- Fill in the respective fields in the Edit screen.
- Name - Give the Name shortcut an intuitive name.
- Type - Leave the Type as “User”
- Login Information Required - If checked, new users created from this shortcut will be required to provide login information.
- Roles - The role selected here will automatically be assigned to new users created from this shortcut. Only 1 role can be assigned.
- User Group - The User Group selected here will automatically be assigned to new users created from this shortcut.
- Show Bubble - If checked, a text box will appear. Enter informational text in this box about the Event that you would want users to know. The information will be displayed in a small information bubble that expands when users hover over it.
- Show Classification - Displays the user's classification.
- Click Save.