Scheduled Actions
Newly created Actions can be scheduled to automatically perform based on a specific time or date parameters. Scheduled Actions are found on the Schedule Action register within the Action module. Although their functionality is the same as standalone Actions, Scheduled Actions are created, edited, and managed differently than other Actions.
See the considerations below regarding role permissions, Business Rule fields, and Action registers as they are relevant to Scheduled Actions:
| Role Permissions | There are six role permissions that apply specifically to Scheduled Actions. These permissions allow users to access, create, and manage assigned Scheduled Actions. See the Scheduled Actions role permissions page for further detail on what each permission does. |
| Business Rule Fields | The Show Original Action for Scheduled Action Business Rule Field is an option in the Business Rules module that specifically affects Scheduled Actions. If this field is enabled, there will be a Scheduled Form Action link in the Action description what will take users to the Action when clicked. When enabled, (if the user has access to edit the original Action), users will be able to see the Edit Schedule button, and will be allowed to adjust the schedule or future Actions. |
| Action Registers | Scheduled Actions will appear on the Schedule Action registers if the user is assigned to the Org Unit or Entity of the scheduled Action, even if the Allow View permissions is disabled. |
Create a Scheduled Action
Follow the steps below to create a single, or multiple, scheduled Action. Scheduled Actions can be created directly from the Schedule Action register or from the main Actions page.
- Option A: Log in and navigate to the Actions Module and click New.
Option B: Users can also navigate to the Actions module, then click the Schedule Action register tab, and then click New.
Both options will land users on the New Action screen.
- Select Single or Multiple from the first drop-down field in the New Actions screen. Multiple scheduled actions can be created at one time.
- Continue filling in the required new action fields along with any additional Action details.
- Select Scheduled from the Action Schedule field.
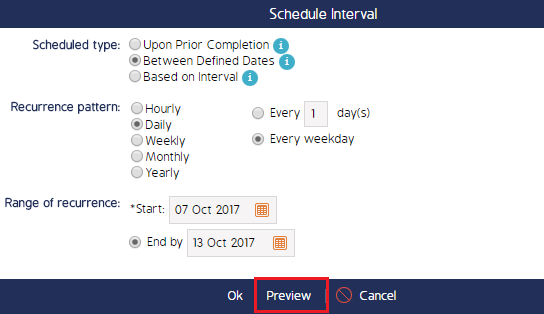
Click the Action Interval link when appear. Note, this field becomes mandatory if Scheduled is selected.

- Configure the schedule intervals in which the Actions will be triggered to perform.
Users can click the Preview button to view the list of dates that each scheduled action will perform.

- Click Ok when finished, then click Save to save the newly created scheduled Actions.
Scheduled Interval Types
The table below defines and explains the difference between the three Schedule Types for Scheduled Actions.
| Schedule Type | Definition | Example |
| Between Defined Dates | This will create all Actions based on the Interval specified between a defined date range | The user sets an Action to take place between August 1-31, 2017. |
| Upon Prior Completion |
The next recurring Event will only be created upon completion of the previous Action. So if an Action is Completed, then the next recurring Action is created using the information and due date based on the Interval specified (taken from the previous Due Date). Note: If user changes the first action before completion, it does not affect the second action (and other future actions) because they are created using details stored within the schedule |
The user creates a scheduled Action with Upon Prior Completion type. Only one action is created at first, and all Action details are stored as a Future Actions Template. When a user sets the first action to complete, the system automatically creates one more Action using details stored in the template. |
| Based On Interval | This option allows for more customizable scheduling which is based on the interval specified without requiring a previous Action to be completed or being limited to between defined dates | The user creates an Action they want to occur on the 1st, 15th, and 28th day of each month. Regardless if the Action from the 1st is closed out, an Action will automatically be created on the 15th using the details stored in the template. |
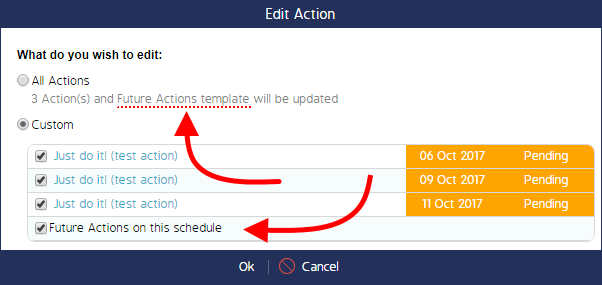
If a user changes any details to the first Action in a series of Actions (an Upon Prior Completion Action, for example), the changes will not affect any future Actions. Future Actions are created using the details stored within the Future Actions Template. The Allow Edit Future Actions Template role permission controls is users are able to change the template that future actions are created from (seen in the image below).


